













 AIIllustrative image: AI-generated
🔧 How to customize the WordPress admin interface for user roles
When a site has more than one author, the standard WordPress admin panel becomes a risk zone. An accidentally deleted widget, changed theme settings, a removed plugin, and suddenly a developer spends an hour restoring something the content manager should never have seen in the first place.
The problem is that WordPress out of the box does not offer flexible control over admin element visibility for different roles. Sure, you can play around with capabilities through code, but for a site owner that is not an option. You need a tool that works without functions.php and without the risk of breaking the site.
The solution is one free plugin that covers all admin restriction scenarios: from hiding menu items to customizing the login page. Let's break it down step by step.
💡 Quick overview:
- Install WP Admin UI Customize from the official WordPress directory. The plugin is free and requires no code.
- Select the user role you want to configure restrictions for (author, contributor, editor, or any other).
- Go through the settings tabs and disable everything that role does not need: menus, widgets, meta boxes, toolbar elements.
- Save your changes. They apply instantly to the selected role without reloading or editing templates.
What WP Admin UI Customize can do
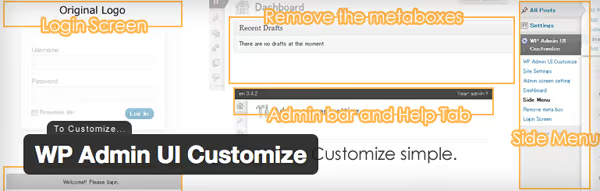
WP Admin UI Customize is a free plugin from the WordPress.org directory that as of March 2026 has over 30,000 active installations and a rating of 4.6 out of 5. The plugin intercepts the display of admin elements for the selected role and gives you granular control over every interface block.
The main scenario: the site administrator sees the full panel, while authors and contributors see only what they need for writing and submitting content. No access to "Appearance," "Plugins," or "Settings."
The free version applies ONE set of rules to ALL roles except administrator. This means if you set up hiding for the "Author" role, the same restrictions will apply to "Editor" and "Contributor" as well. For per-role management there is a premium add-on called WP Admin UI Customize Multiple, but for a typical site with one or two user roles the free version is sufficient.
Step-by-step setup: from installation to the login page
Step 1: select the target role
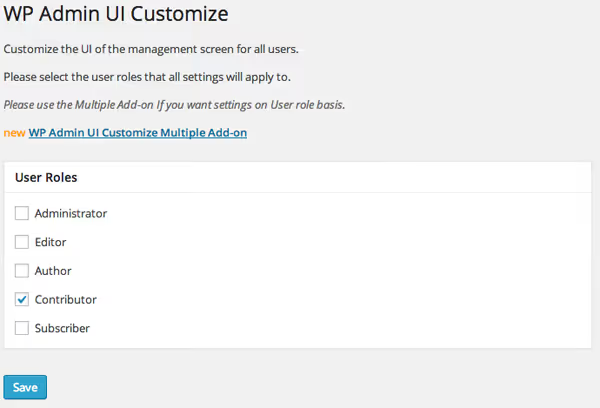
After activating the plugin, a new menu item appears in the sidebar: WP Admin UI Customize. The first tab, "Role Settings," contains a dropdown list of all roles registered on the site. Select the one you want to restrict, and all subsequent changes will apply specifically to it.
An important note: if caching is active on the site, clear the cache after saving each settings block. Otherwise changes may not take effect immediately.
Step 2: general screen settings
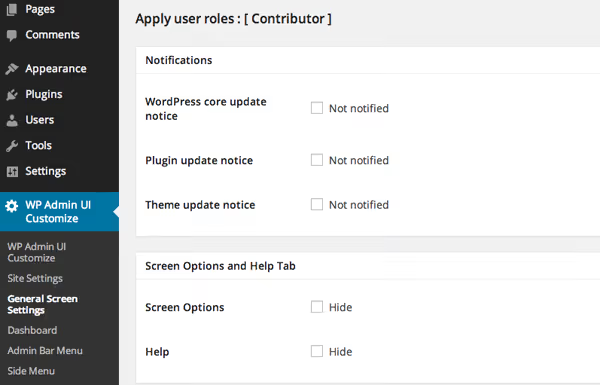
The "General Screen Settings" tab manages utility interface elements. Here you decide:
- whether to show notifications about available core and plugin updates;
- whether access to the "Screen Options" tab is allowed (the one that toggles columns in the post list);
- whether the "Help" tab in the top right corner of any admin page is visible;
- whether custom CSS can be added via a field in the footer.
For content managers and authors most of these options should be disabled. They provide no practical value but create visual clutter and potential points of error.
Step 3: dashboard widgets
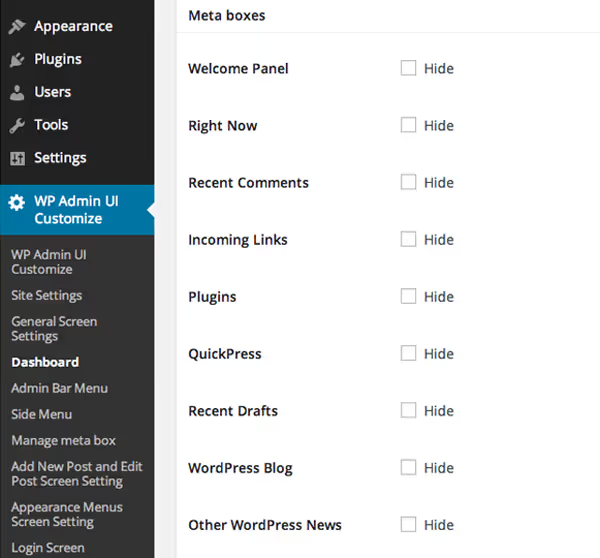
The WordPress dashboard on login shows a dozen widgets: "At a Glance," "Quick Draft," "WordPress News," "Site Health," and others. Through "Screen Options" you can hide them, but the user can bring them back with two clicks.
The plugin's "Dashboard" tab solves this definitively: you simply uncheck the widgets you do not need, and they disappear completely for the selected role with no way for the user to restore them. For authors it makes sense to leave only "My Posts" and "Quick Draft," removing everything else.
Step 4: the top admin bar
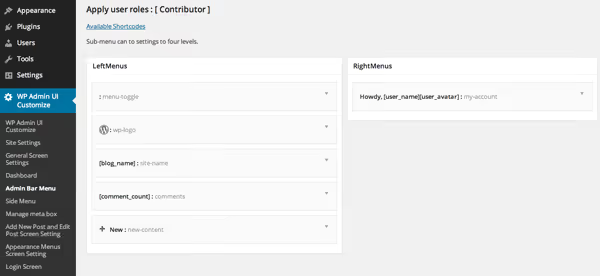
The toolbar at the top of the screen (admin bar) is another source of unnecessary links. The plugin allows you to:
- add custom menu items to the toolbar with your own URLs;
- reorder existing elements by dragging;
- remove everything unrelated to the user's work: the site link, comment counter, "Customize" button, customizer icon.
In practice it is convenient to leave only the WordPress logo (for logging out) and remove everything else. Authors need the toolbar exclusively for navigation between admin and front end.
Step 5: the sidebar menu, the most powerful lever
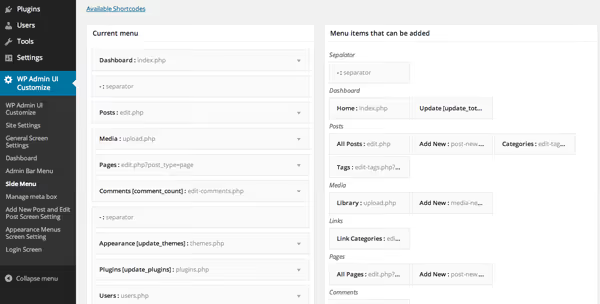
The "Sidebar Menu" tab is the plugin's main tool. This is where you define which admin sections the user sees.
A typical configuration for an author: leave only "Posts" (with subitems "All Posts," "Add New," "Categories") and hide "Media," "Pages," "Appearance," "Plugins," "Tools," and "Settings" completely. An author has no business in theme settings or the plugin list, and every hidden menu item is one less chance of accidental breakage.
For subscribers and contributors you can leave only "Profile" for editing their own data.
Step 6: editor meta boxes
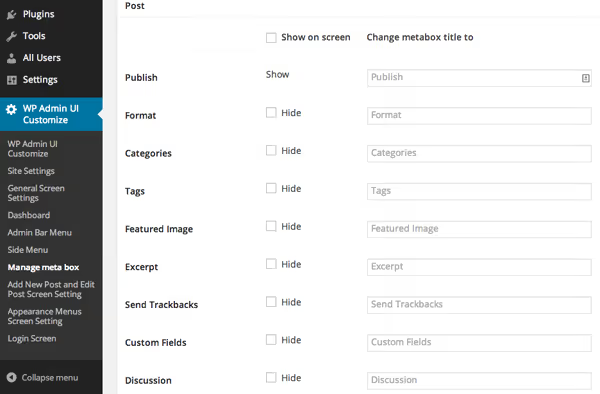
The "Meta Box Management" tab tidies up the post editing screen. You can hide or rename:
- the category selection block;
- the "Featured Image" block;
- the "Post Format" block;
- the "Permalink" (slug) block.
Renaming works especially well: for example, the "Category" block can be renamed to "Content Section," which is clearer for novice authors. And the "Permalink" field is better hidden for contributors: they cannot publish posts anyway, and the slug is generated automatically when submitted for review.
Step 7: the login page
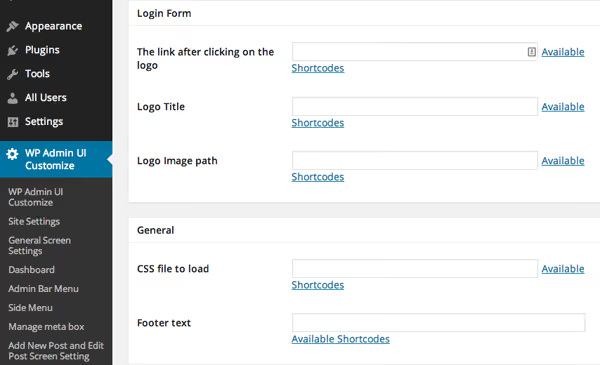
The last tab, "Login Page," allows you to replace the standard WordPress logo on the /wp-login.php page:
- a custom logo URL (instead of the WordPress logo);
- a custom page title for the login page;
- additional CSS for fine-tuned styling;
- footer text for the page.
A small but nice touch: when a client or author logs into the admin and sees the company logo instead of the WordPress one, it reinforces brand recognition and trust in the site.
Step 8: navigation and final touches
A separate tab controls the visibility of navigation menu settings. If menus have already been created on the site through "Appearance → Menus," you can block access to editing them for the selected role. The user will see only the finished structure with no ability to change anything. This is useful for sites with complex category architectures and landing pages.
The video above clearly demonstrates the process of setting up roles and restricting visibility, from installing the plugin to the final admin view for an author.
⁉️🤔 Frequently asked questions
How is this plugin different from built-in "Screen Options"?
Built-in "Screen Options" can be reset by the user at any time; this is not a restriction but a personal display preference. WP Admin UI Customize blocks elements at the role level: the user physically does not see hidden menus and widgets and cannot restore them.
Do I need to buy the premium version for two different roles?
If you have an administrator and everyone else, no. The free version applies a single set of rules to all non-administrator roles. The premium add-on is needed when you require different configurations for editors, authors, and contributors SEPARATELY, for example, on a magazine site with a dozen staff members at different levels.
Does the plugin only change visibility, or does it actually block access?
Only interface visibility. Direct access to a hidden section via URL (for example,
/wp-admin/themes.php) will remain open if the role has the corresponding capabilities. For full blocking at the permissions level, use a combination with a capabilities management plugin such as User Role Editor.
Can I hide items added by other plugins?
Yes. Any menu item registered by a third-party plugin (SEO, caching, forms, slider) appears in the sidebar menu and toolbar list and can be hidden exactly like standard WordPress items.
What happens when the plugin is deactivated?
All restrictions are removed and the interface returns to its standard appearance. However, the settings are preserved in the database. When you reactivate the plugin, everything is restored without reconfiguration.
Is it worth bothering with admin restrictions?
If you are the only one working on the site, no. You do not need this plugin. The standard WordPress admin is sufficient for a solo project.
But as soon as even one external user with admin access appears (an author, content manager, SEO specialist) restricting the interface stops being a "nice to have" and becomes protection against human error. One accidental click in "Settings → General" can change the site address and take it down for hours. And a hidden "Tools" menu item means one less scenario where a client accidentally launches a demo data import and overwrites the content.
WP Admin UI Customize requires no code, installs in two clicks, and can be configured in 15 minutes. For multi-author sites and client WordPress projects, this is one of those plugins installed by default during deployment, alongside backup and brute force protection.

A professional team of writers and editors specializing in creating quality content.