














🔍 Guide to installing and configuring Yoast SEO for WordPress
Search engine optimization is not magic. It is a set of specific actions that either bring traffic or do not. And if your WordPress site is not finding new visitors through search, the problem is almost always the same: the SEO plugin is not configured or was configured half-heartedly.

Yoast SEO is the most popular SEO plugin in the WordPress directory: according to wordpress.org statistics, it has more than 10 million active installations and 14 years of continuous updates. The free version covers the vast majority of tasks for a typical site: from XML sitemap generation to readability analysis. But installing a plugin and configuring it are not the same thing. Without configuration, it just sits in the menu and does absolutely nothing for your rankings.
In this guide, you will find a complete breakdown of every Yoast SEO tab: what to enable, what not to touch, and how to get the most out of the free version. No fluff, just concrete settings for a live site.
💡 Quick overview:
- Install the plugin and complete the first-time configuration wizard
- Configure titles, meta data, XML sitemaps, and breadcrumbs
- Fill in the SEO title, meta description, and focus keyphrase for each post
- Connect Google Search Console and track your rankings

Step 1. Installing the plugin
Yoast SEO is installed through the standard WordPress admin interface:
- Go to Plugins → Add New
- Type "Yoast SEO" in the search box; the plugin with the traffic light icon will appear first
- Click Install, then Activate
That's it. A new SEO menu item will appear in the admin sidebar; this is your entry point to all settings.
After activation, Yoast automatically launches the First-time Configuration wizard. Complete it; in about 5 minutes it will cover the basics: site type (company or personal blog), organization name, and Google Search Console connection. You can change any setting manually later.
Step 2. Dashboard and main settings
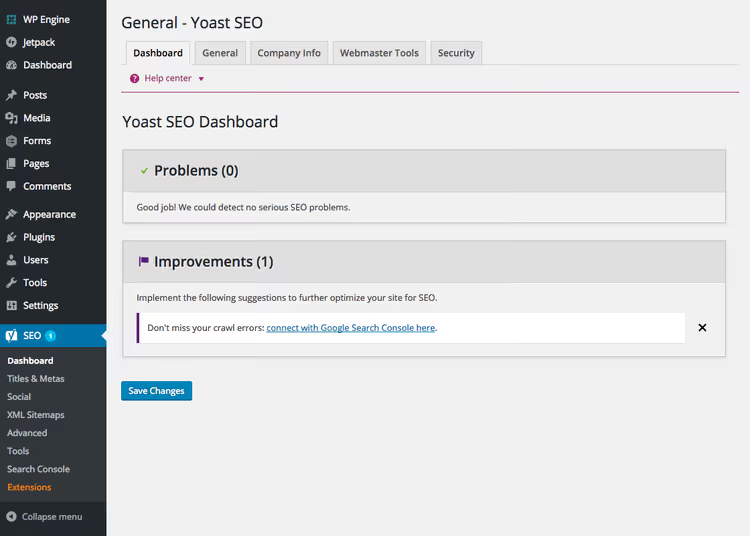
The dashboard is the first screen you see after entering the SEO section. There are five tabs here, and the order in which you review them matters.
General. This tab shows a summary of SEO issues on your site: broken links, missing meta descriptions, duplicate titles. Check it once a month; it is faster than running an audit in a third-party service.
You will also find a button here to reset all Yoast settings to factory defaults. Useful if you have been experimenting and want to start fresh.
Organization info. At minimum, fill in the site name and organization name (or personal name for a blog). The plugin embeds this data in structured data (schema.org Organization), and Google pulls it for the Knowledge Graph. The logo is optional but worth uploading.
Webmaster tools. This tab is for verification codes from Google Search Console, Bing Webmaster Tools, Yandex.Webmaster, and Baidu. Paste the code from Google; it is required for indexing. The other three are optional.
Security. There is only one option here: enabling the advanced Yoast meta box. Regular users do not need this; the feature is for developers working with noindex content and canonical URLs.
Step 3. Titles and meta data
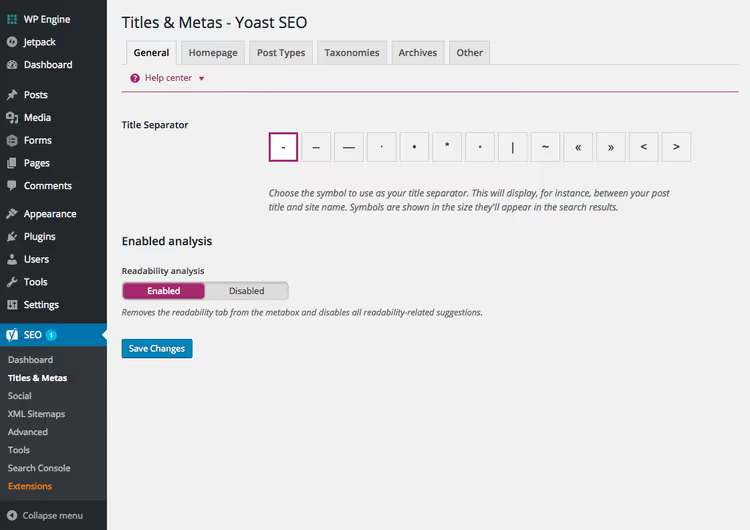
The Titles & Metas section is the heart of the plugin. This is where you define how your site's pages appear in search results.
General. First, choose a title separator. We recommend a hyphen - or a vertical bar |; Google handles both equally well. The separator is used in templates that build the "Post Title | Site Name" structure.
Homepage. Fill in the title and meta description for your homepage. This is what users will see in search results when searching for your brand. The title should be up to 60 characters with the main keyword; the description should be 120-155 characters with a call to action. Do not simply write "Welcome to our site"; that is wasted real estate.
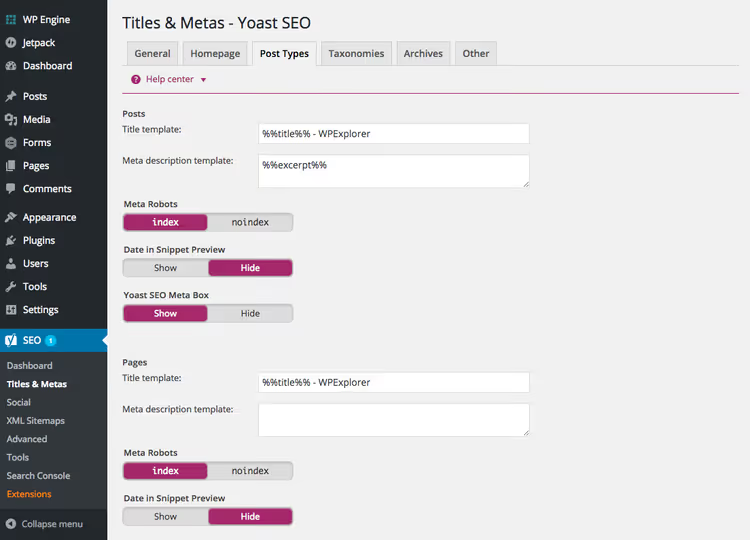
Post types. Here you will find title templates for posts, pages, media files, and custom post types. Standard Yoast variables:
%%title%%for the post title%%sep%%for the separator%%sitename%%for the site name%%page%%for the page number (for pagination)
The default template %%title%% %%page%% %%sep%% %%sitename%% works for the vast majority of sites. For pages, you can remove %%page%% since pagination is rare on them.
Taxonomies. The same principle applies to categories and tags as to posts. Important note: if you do not use tags as landing pages, set them to noindex. This removes junk pages from the index and saves crawl budget.
Archives. You can also disable date archives here. For content sites (blogs, news outlets), dates in URLs are normal. For commercial and corporate sites, they are unnecessary: visitors search by topic, not by publication month.
Other. Three site-wide checkboxes: noindex for archive subpages, meta keywords output (do not enable this; Google has ignored this tag since 2009), and blocking snippets from DMOZ/Open Directory. The last one is no longer relevant since DMOZ shut down, but checking it does no harm.
Step 4. Social networks and Open Graph
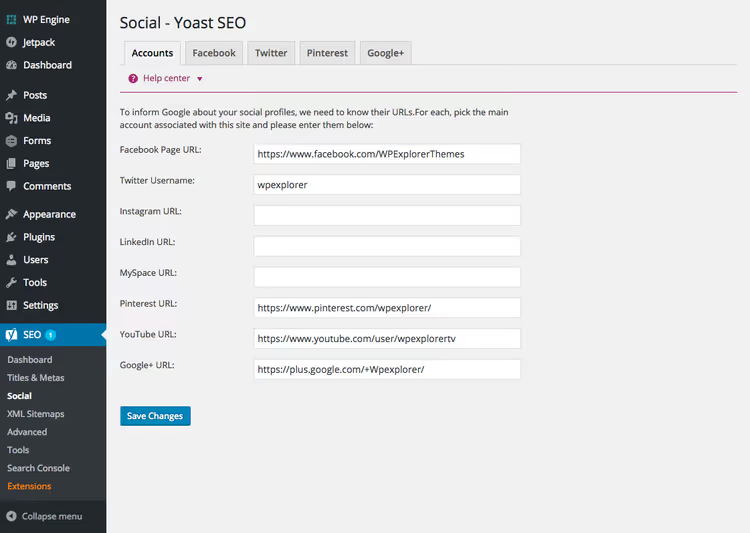
The Social section controls how your links appear when shared on social networks and messengers. Minimum setup: on the Accounts tab, paste links to your site's profiles on Facebook, Twitter/X, Instagram, and other platforms. This helps associate your brand in search engines' eyes.
On the individual social network tabs, you enable Open Graph meta data. Yoast adds this automatically upon activation; you usually do not need to configure anything extra. The plugin inserts the post's title, description, and image into markup that Facebook, Twitter, LinkedIn, and messengers read.
A separate option is the default Open Graph image. Upload your logo or site cover image: it will be shown if a specific page does not have its own image.
Step 5. XML sitemaps
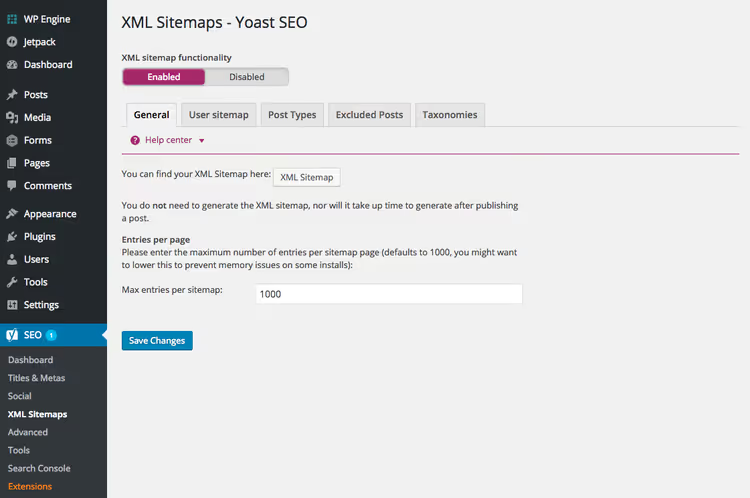
An XML sitemap is a file that tells search engines which pages should be indexed. Without one, new posts can take weeks to appear in the index.
Yoast automatically generates a sitemap at yoursite.com/sitemap_index.xml. In the settings, choose which content types to include: posts, pages, media files. Media files are usually disabled; for image SEO, alt text and the loading="lazy" attribute are sufficient, and a separate image sitemap is redundant.
If your site uses a separate sitemap plugin (for example, Google XML Sitemaps, which is still updated and compatible with the latest WordPress versions), it is better to disable Yoast's sitemap feature: two sitemaps at once create conflicts. Choose one or the other.
Step 6. Advanced settings
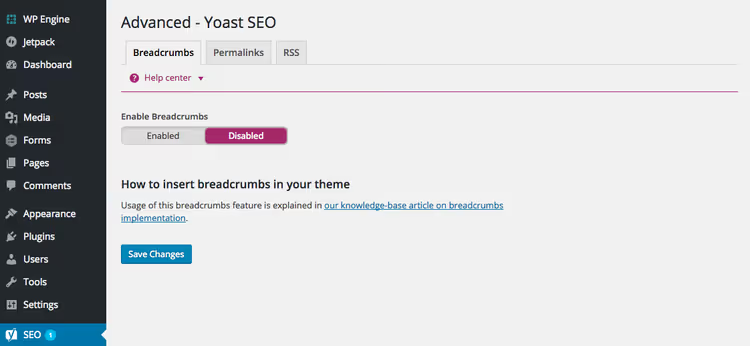
The Advanced section contains three groups of settings that directly affect usability and indexing.
Breadcrumbs. The navigation trail "Home → Category → Post" is a must-have for any site. It improves internal linking and provides Google with BreadcrumbList structured data. To enable breadcrumbs:
- Turn on the toggle on this tab
- If your theme does not support Yoast Breadcrumbs out of the box, add a call to the
yoast_breadcrumb()function in your theme template, following the official Yoast instructions
Permalinks. Three useful options: remove /category/ from category URLs, redirect media attachment URLs to the parent post, and strip stop words ("and", "the", "of") from slugs. Enable the first two right away. The third requires caution: after changing a slug, the old URL must return a 301 redirect, otherwise you will end up with broken links.
Keep the "redirect ugly URLs" option disabled. If you have been using human-readable URLs from the start (Settings → Permalinks → Post name), the "ugly URL" problem simply does not exist.
RSS. Adds content before and after each post in the feed. Use this for two purposes: inserting a link to the original (protection against scrapers) and a standard-format ad banner with HTML code. But do not overload the feed: subscribers should not see more advertising than content.
Step 7. Tools, import, and Search Console
The Tools tab offers bulk editing of SEO titles, convenient when you need to fix a template across hundreds of posts at once. You will also find editors for robots.txt and .htaccess here; do not touch these files unless you are a developer. An error in .htaccess will take down your site.
The main value of this tab is Import & Export. When migrating from another SEO plugin (Rank Math, AIOSEO, All in One SEO), Yoast picks up old meta data automatically. After importing, be sure to spot-check 10-15 posts: migration does not always go perfectly. Settings export is useful if you manage multiple sites with identical SEO configurations.
Search Console. Connect Google Search Console via authorization code, and Yoast will start pulling data directly into your admin panel: which queries your site appears for, which pages are not indexed, who links to you. A free replacement for part of Google Analytics functionality for quick SEO diagnostics.
Step 8. SEO at the post and page level
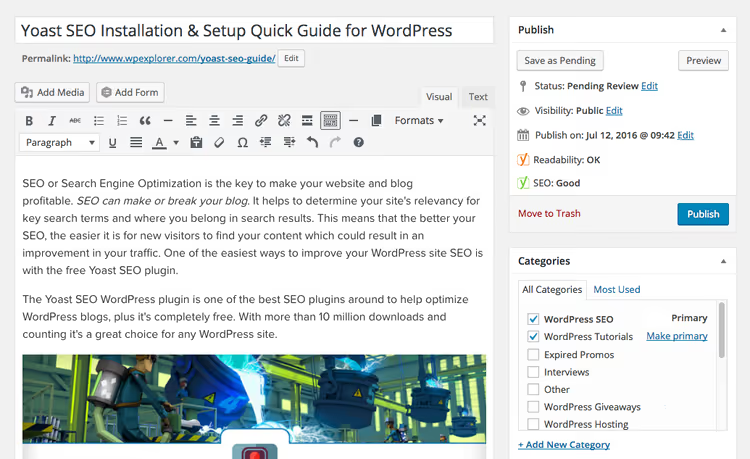
The most useful part of Yoast is the SEO meta box below the post editor. There are four tabs here, and each contains specific actions.
SEO title and meta description
The form above the editor: enter an SEO title (different from the post's H1, for example with an added keyword or year) and a meta description of 140-160 characters. Below, you set the focus keyphrase, the one you want to rank for. Yoast will analyze the post and highlight whether the phrase is used in the title, in the first paragraph, in subheadings, and in image alt texts.
Readability analysis
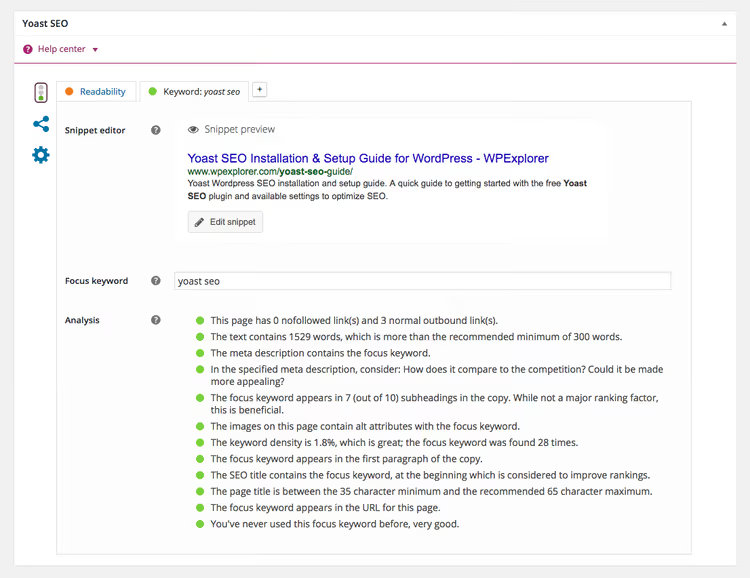
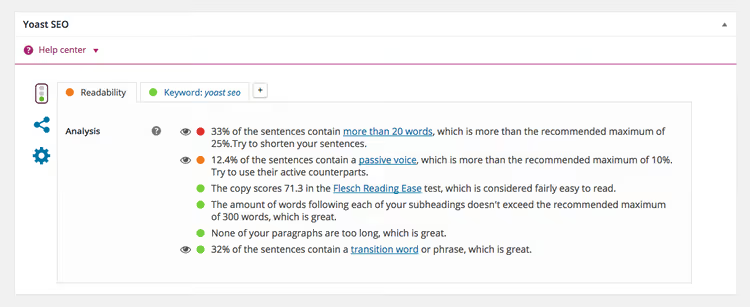
The second tab is readability based on the Flesch Reading Ease score. Yoast checks sentence and paragraph length, passive voice percentage, and the presence of transition words. A green indicator means the text is comfortable to read. This is not a direct ranking factor, but it is an indirect one: a visitor who stumbles over convoluted sentences leaves, and Google notices behavioral bounces.
Social previews
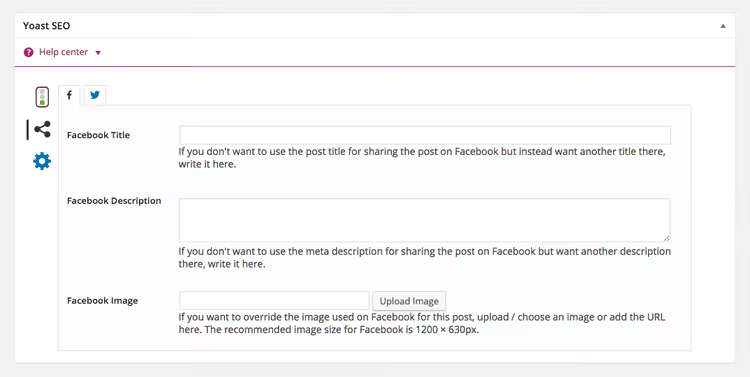
The Social tab lets you override the title, description, and image for Facebook and Twitter separately from the main meta data. This is useful for announcements: the SEO title is optimized for search, while the social title is optimized for clicks from a scrolling audience.
Advanced
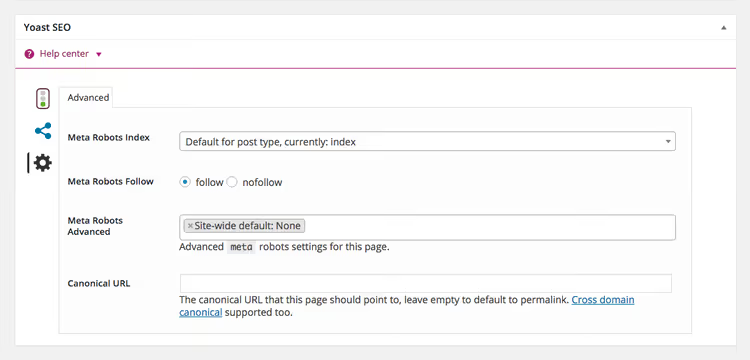
On the Advanced tab, you control indexing for a specific post: noindex, nofollow, canonical URL. For a typical post, you do not need to change anything. The canonical URL is useful if the same content is accessible at multiple addresses (URL parameters, duplicate categories).
The traffic light block (red/yellow/green) at the top of the editor deserves special mention. It summarizes two criteria: SEO score and readability. Do not blindly chase "green everywhere": Yoast is an advisor, not a boss. If the text is good but the traffic light is yellow due to "insufficient keyword density," ignore the traffic light. Write for people, and use the indicators as a checklist: did you forget alt text on images, did your introduction drag on for three paragraphs without the keyword.
⁉️🤔 Frequently asked questions
Does a typical blog need the premium version of Yoast SEO?
For 90% of sites, the free version is sufficient. Premium adds analysis for multiple focus keyphrases (instead of one), automatic internal linking suggestions, broken link tracking, Google Docs integration, and round-the-clock support. The upgrade is justified for commercial sites with a content strategy spanning dozens or hundreds of pages. For a blog with 30-50 posts, the difference does not pay off.
Does Yoast SEO conflict with other SEO plugins?
Yes, and seriously. Two active SEO plugins at the same time guarantee conflicts: duplicate meta tags, two sitemaps, two canonicalization systems. If you are switching from Rank Math or AIOSEO to Yoast, first deactivate the old plugin, then install Yoast and run the data import. The order matters.
How often should I update my Yoast SEO settings?
Basic configuration (separator, templates, social networks): once when launching the site. SEO titles and meta descriptions for individual posts: with every publication. Check Search Console metrics once a month: the plugin will show new queries and pages with indexing errors.
Does Yoast SEO help with local SEO?
The free version does not. For local SEO (LocalBusiness schema, address, hours, geolocation), Yoast offers a separate premium extension called Local SEO. An alternative is plugins like Rank Math, where local schemas are available for free.
What should I do if Yoast shows a red or yellow traffic light, but the text is objectively good?
Nothing. Yoast's traffic lights are automated heuristics, not the law. They do not account for topic specifics (technical writing is always less "readable" by Flesch scores), authorial style, or page purpose. Treat them as a reminder to check alt texts, titles, and keywords in subheadings, and nothing more.
Is it worth configuring Yoast SEO manually in 2026?
Yes, despite the abundance of SEO plugins with "one-click" auto-configuration. The reason is simple: automatic configuration sets safe average values, and average values produce average results.
Yoast SEO remains the standard not because it is the only option, but because it is predictable. Every setting is documented, every update is backward compatible, and bug fixes come out every two weeks. There are no surprises when you update WordPress to a major version, whereas with newer plugins, there can be.
The main rule for working with Yoast: do not enable everything. Half of the checkboxes in the advanced settings are needed by only a handful of sites. The basic workflow (installation, title templates, homepage meta description, sitemap, breadcrumbs, Search Console) covers the main needs and can be done in one sitting. Everything else comes as you grow.

A professional team of writers and editors specializing in creating quality content.