













 AIIllustrative image: AI-generated
📸 Family photo archive: step-by-step guide to adding and processing new photos
A new batch of photos has accumulated from your phone, camera, and three flash drives from vacation. You open the folder: three hundred shots, some already in the archive, some with incorrect orientation, dates jumping across three different years.
Throwing everything into one pile is a path to losing track of what's where within a year. Sorting through an unorganized mess is many times harder than immediately integrating new shots into the structure.
Below is a step-by-step algorithm for adding a new batch of photos to an existing archive. Each step is shown with screenshots: you can repeat it exactly.
💡 Quick overview:
Determine the earliest date among new photos
Copy the needed range from your photo library and remove exact duplicates
Clean up visual duplicates through VisiPics or Czkawka
Organize photos into Year/Date folders through Total Commander
Apply auto-rotation, write keywords and ratings
What you'll need: the toolset
The entire process uses four programs.
Program | Task | Cost |
|---|---|---|
ACDSee Photo Studio Ultimate | Categories, metadata, rotation, rating, database | Paid |
Duplicate & Same Files Searcher | Exact duplicates (byte-by-byte) | Free |
VisiPics / Czkawka | Visual duplicates | Free |
Total Commander + wdx-jpg-comment | Auto-arrangement by dates via EXIF | Shareware |
ACDSee. The original guide was written for ACDSee 6.3 (2004), but all techniques work in ACDSee Photo Studio Ultimate 2026 (build 19.1.0). The categories, metadata, and database mechanics haven't changed: screens in the guide will match any version.
Duplicate & Same Files Searcher. Free utility, compares files byte-by-byte: size, name, modification date. Download from MajorGeeks, version 10.8.1 (.NET 7.0).
VisiPics or Czkawka. VisiPics hasn't been updated since 2012, but works on Windows 11. Modern alternative: Czkawka on GitHub, version 11.0.1 (February 2026), open source, Rust, cross-platform. Finds visual duplicates, broken images, empty folders.
Total Commander with wdx-jpg-comment plugin. File manager and plugin that reads EXIF dates. The combination arranges hundreds of photos into Year/Year-Month-Day folders with one command. Official Total Commander site, plugin at totalcmd.net.
Step 1. Importing photos into ACDSee and creating a category
Before touching files, add them to a separate ACDSee category. Originals remain untouched, all new photos gathered in one place, group operations applied to them.
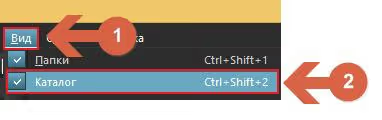
Enable category display: "View" → "Catalog" menu or Ctrl+Shift+2 combination.
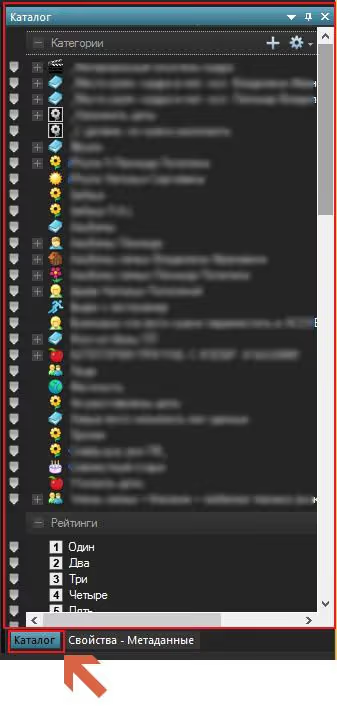
After enabling, the catalog panel appears on the right side of the window.
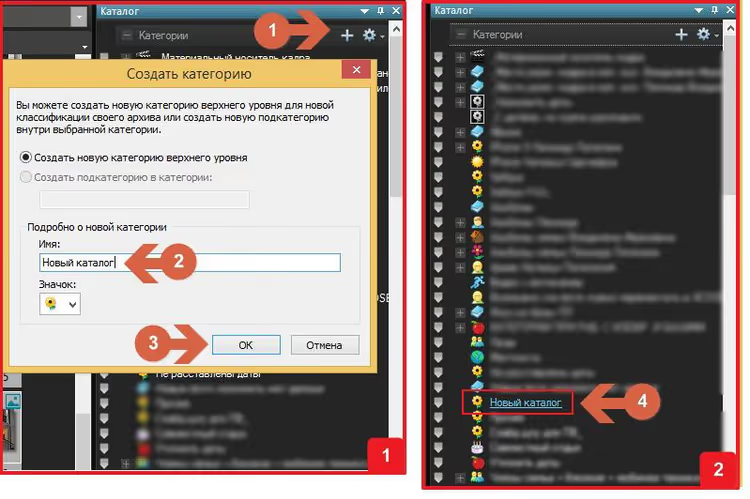
Create a new catalog: name it "New Photos" or "Import June 2026". We'll temporarily collect all added shots here.
On the "Folders" tab, find the directory with new photos. Select all files and folders inside, drag them onto the name of the newly created catalog in the catalog panel.
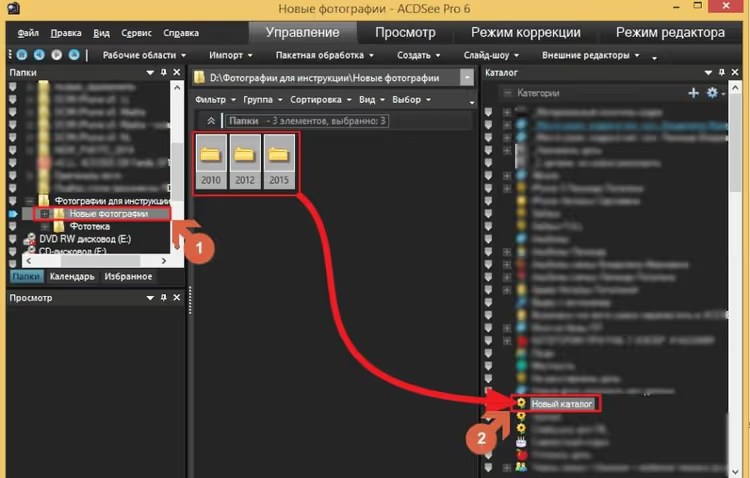
Release the mouse. In the window that appears, choose "Add items from folder and its subfolders to category".
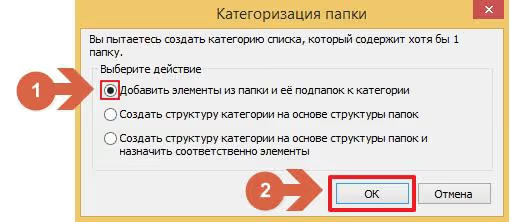
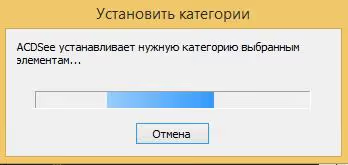
Wait for completion. Progress displays in a separate window.
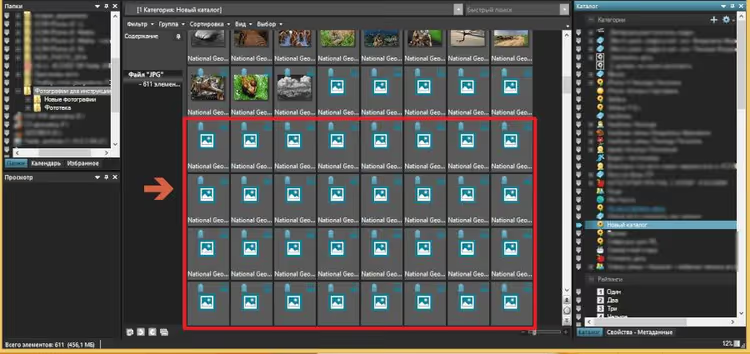
After finishing, navigate to the created catalog and wait while ACDSee builds all thumbnails. No standard placeholder icons should remain: each thumbnail should show the actual image content.
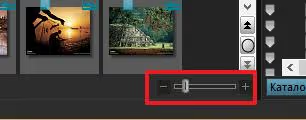
To speed up thumbnail generation, reduce their size with the slider to minimum.
Step 2. Determining the earliest date among new photos
Critically important step. The earliest date shows which year to start duplicate comparison from. If the oldest shot is from 2019, there's no point comparing with the archive from 2005-2018: duplicates can't exist there.
Navigate to the category with new photos. On the view panel, click "Group" and select "Date Created".
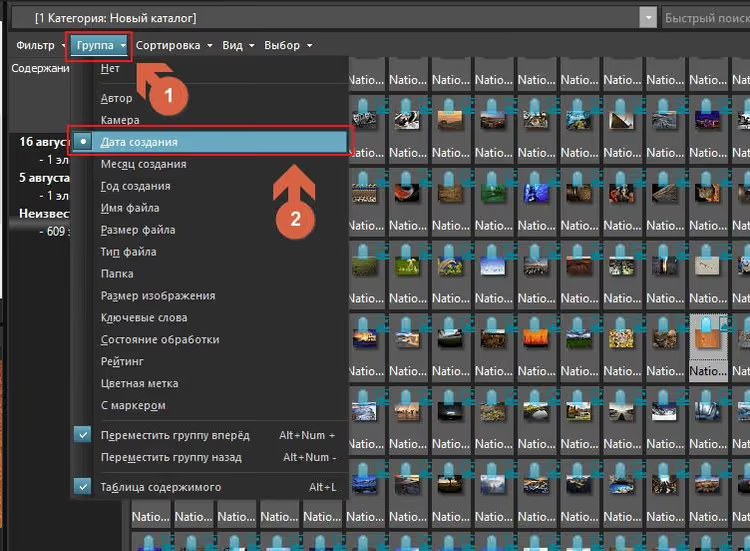
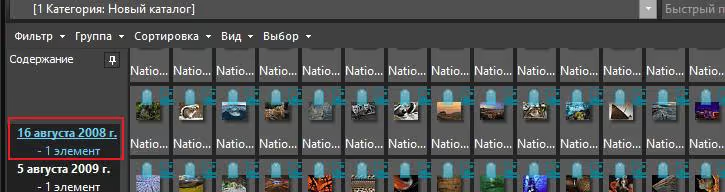
All photos will group by creation date. The top group shows the earliest date. Remember the year.
Step 3. Preparing the photo library for safe filtering
You need to copy part of the main photo library to the same disk where new photos are located. Why copy instead of working directly? To avoid accidentally deleting an original during filtering: all deletion operations are performed on the copy.
Copy range: from the year of the earliest new photo to current. If the oldest shot is from 2019, copy photo library folders from 2019 through 2026.
Step 4. Removing exact duplicates through Duplicate & Same Files Searcher
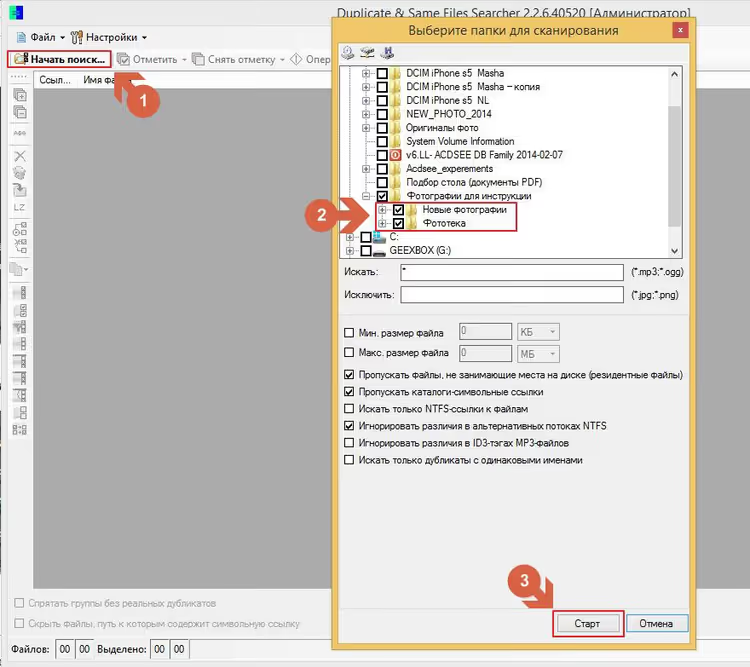
Download and install DSFS from MajorGeeks. Launch the program, in the main window click "Start Search".
In the next window, check two folders: the copied part of the photo library and the folder with new photos. Click "Start".
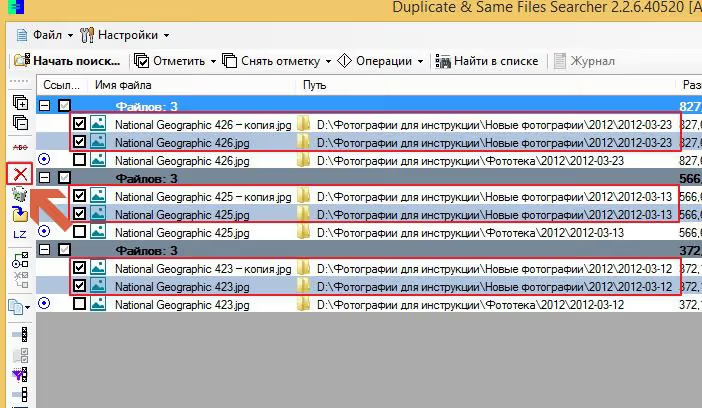
When the program shows the list of found duplicates, on the left panel click "Select by filter" (button with funnel). Set the "Mark" checkbox, then "Path contains string". From the dropdown menu, select the path to the folder with new photos. Click "OK".
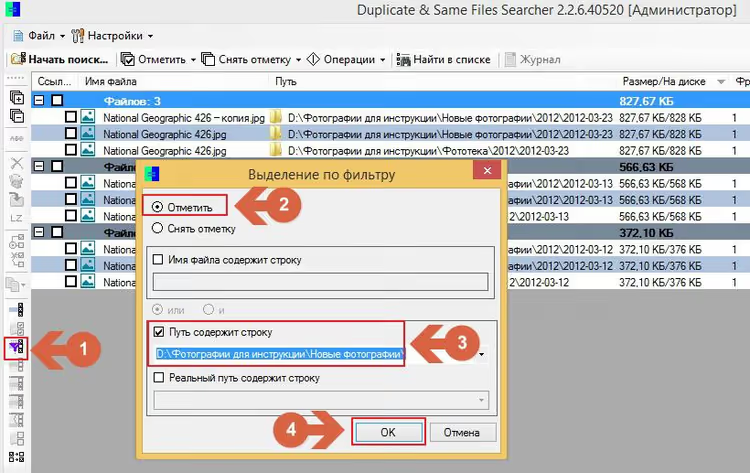
The program will highlight all duplicates located in the new photos folder, not in the photo library. Delete them with the red X button.
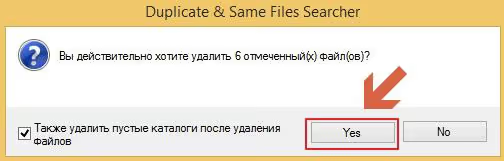
Confirm deletion by clicking "Yes".
Common mistake. Sometimes when selecting by filter, an error appears: "Operation interrupted to preserve your data".
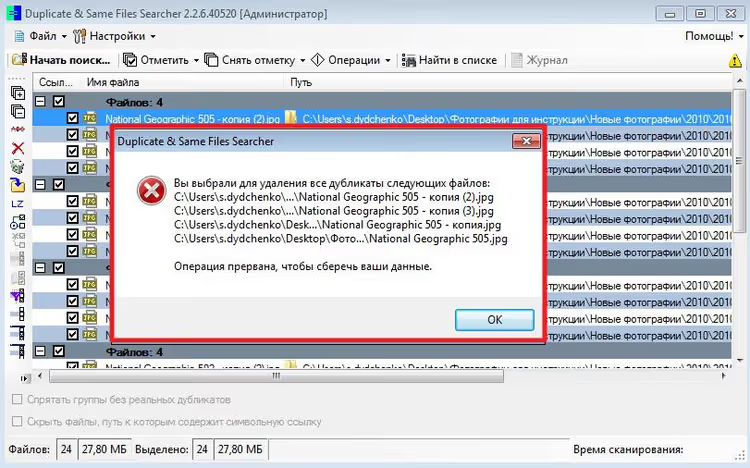
This occurs when the folder has internal duplicates. Solution: "Unmark" → "Unmark first files in groups".
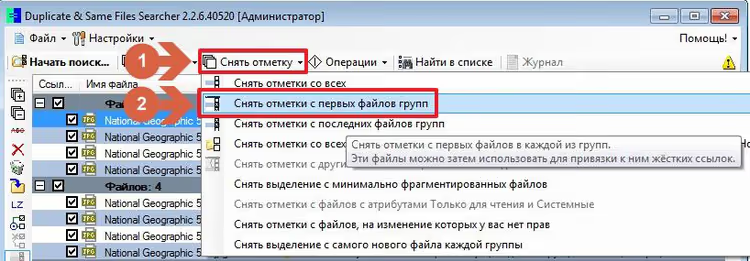
Marks from the first files in each group will be removed. After deletion, originals remain in the folder.
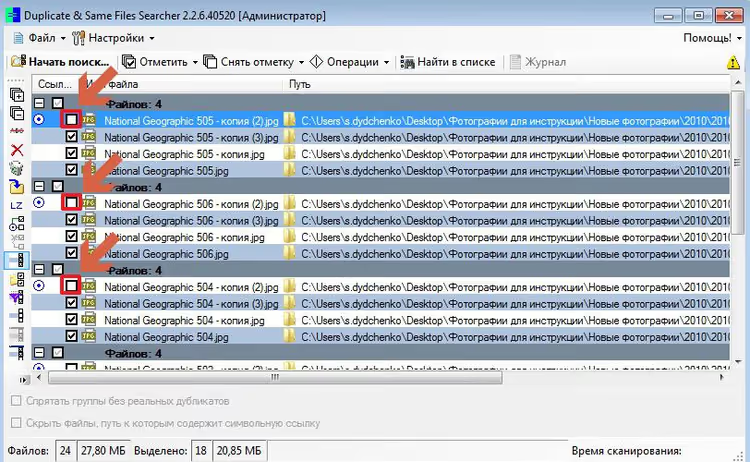
Run the search again. DSFS will skip burst shots: it compares only size, name, and date, not visual similarity.
Step 5. Visual duplicates: VisiPics or Czkawka
Download VisiPics and launch. Add the folder containing both new photos and the copied part of the photo library with the arrow and plus button. Press the green "Play" button to start scanning.
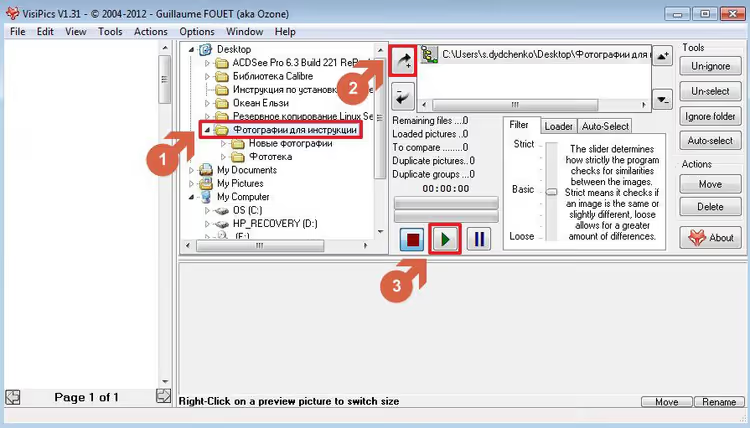
Found visual duplicates will display in the left window. Highlight them with a mouse click and press "Delete".
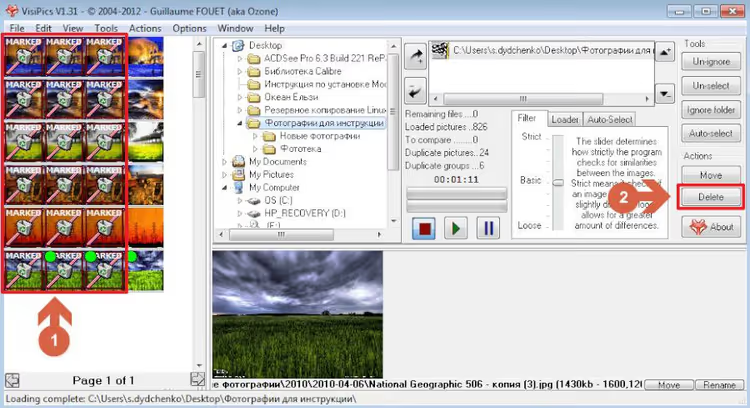
If you need a modern replacement. VisiPics hasn't been updated since 2012. On Windows 11 it works, but crashes happen. Install Czkawka, version 11.0.1 (February 2026), open source, Rust, cross-platform. Finds visual duplicates, broken images, empty folders. Same logic: folders → scan → delete.
Step 6. Installing the Total Commander plugin
Install Total Commander as administrator. Download the wdx-jpg-comment plugin. Place the plugin folder in C:\Program Files\TC\Plugins\wdx and rename it to Photo.
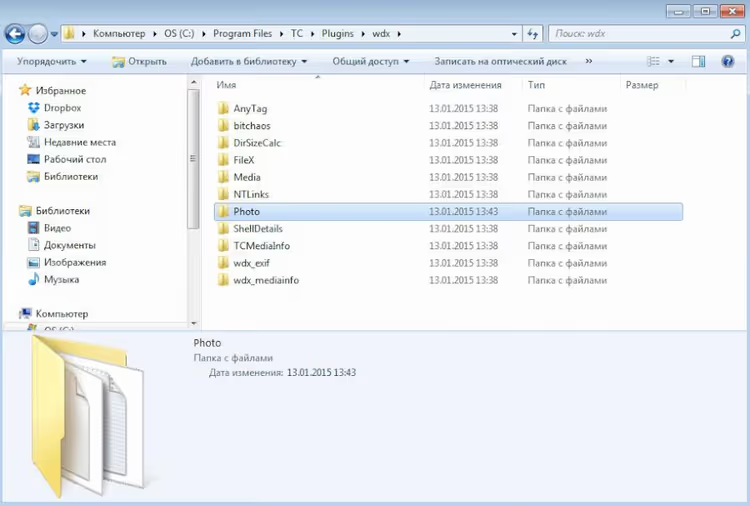
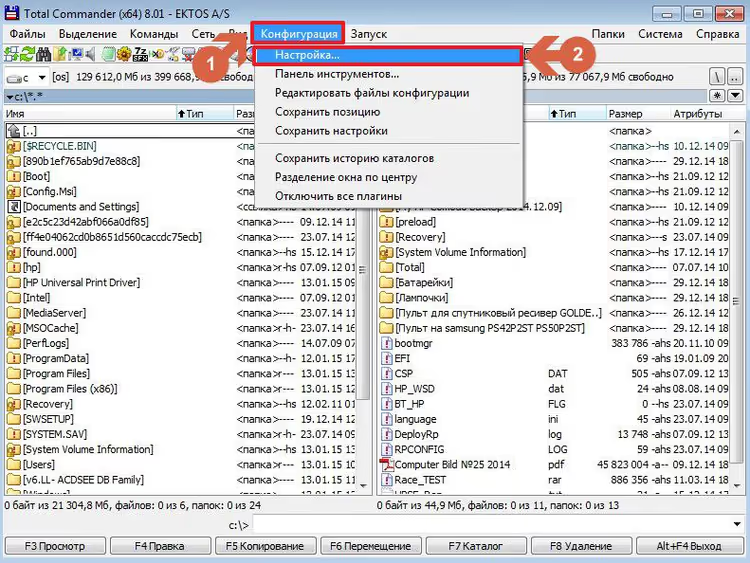
Launch Total Commander (for 64-bit systems use the TC64 shortcut). Go to "Configuration" → "Options...".
In the settings window, select "Plugins" → "Configure", add the .wdx file from the Photo folder with the "Add" button.
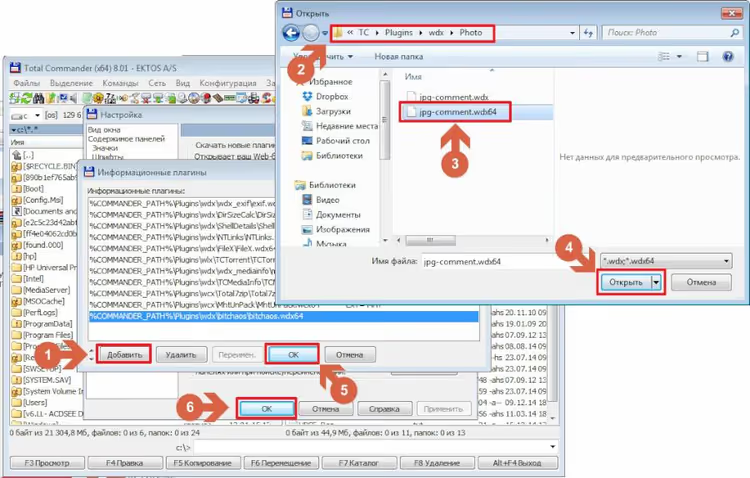
After adding, restart Total Commander.
Step 7. Automatic photo arrangement by dates
Before arrangement, we recommend writing the source device name in the comment.
Navigate to the main folder with new photos.
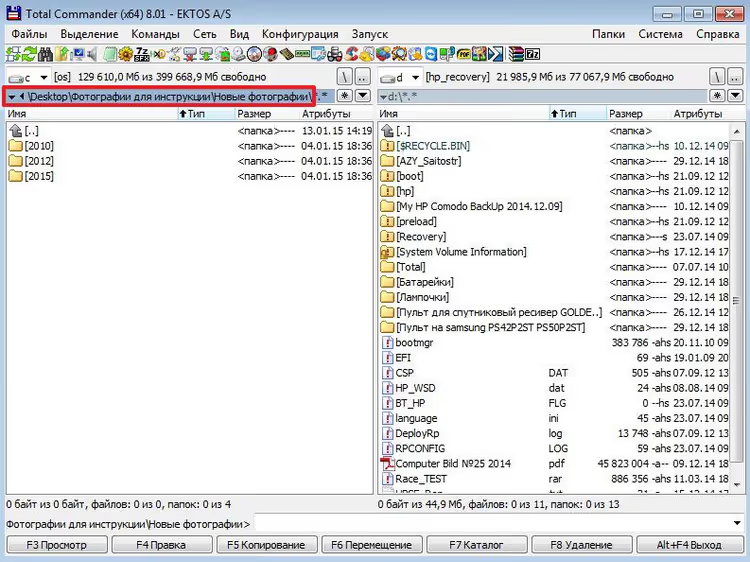
Press Ctrl+B: Total Commander will show contents of all nested folders in a flat list.
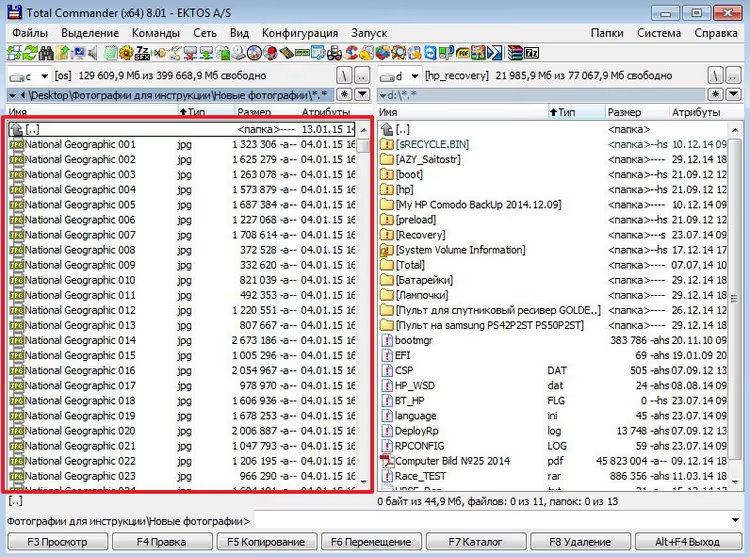
Select all files: Ctrl+A.
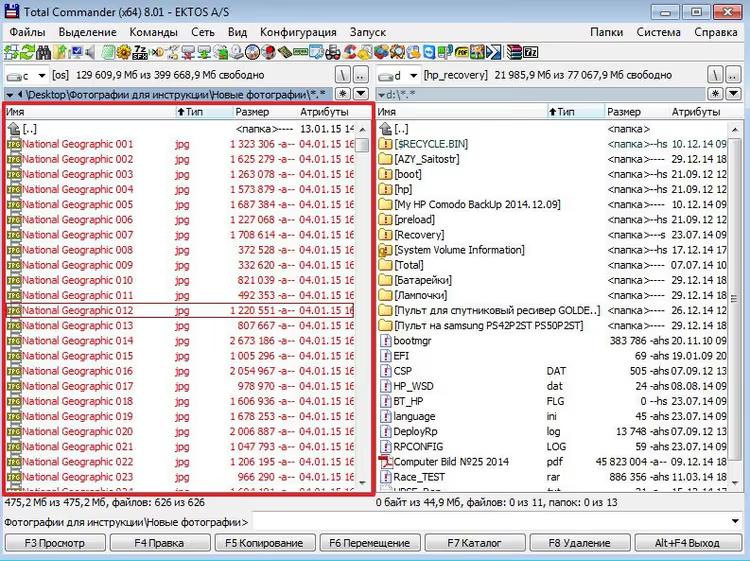
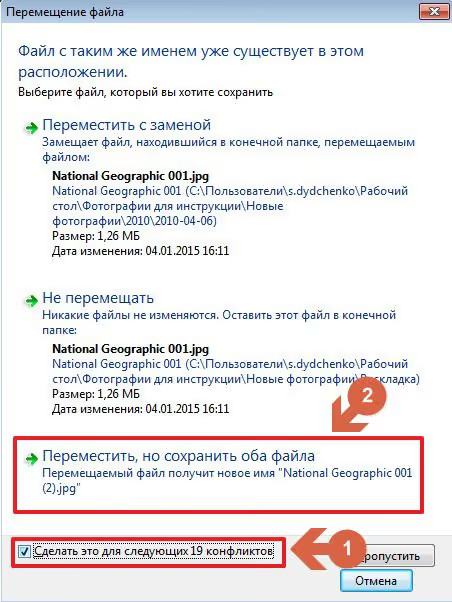
Cut (Ctrl+X), press Backspace, create a "Raskladka" folder and paste files (Ctrl+V).
Select all files again (Ctrl+A) and invoke the multi-rename tool: Ctrl+M. In the "File name mask" field, enter:
1 [=jpg-comment.DateTimeOriginal.Y][=jpg-comment.DateTimeOriginal.Y-M-D][N]
The mask creates a path like 2015/2015-05-19/img119: each file goes into a folder for its shooting date.
If metadata lacks creation date, use modification date:
1 [=jpg-comment.ModifyDate.Y][=jpg-comment.ModifyDate.Y-M-D][N]
Or EXIF date:
1 [=exif.Date.Y] [=exif.Date.Y-M-D][N]
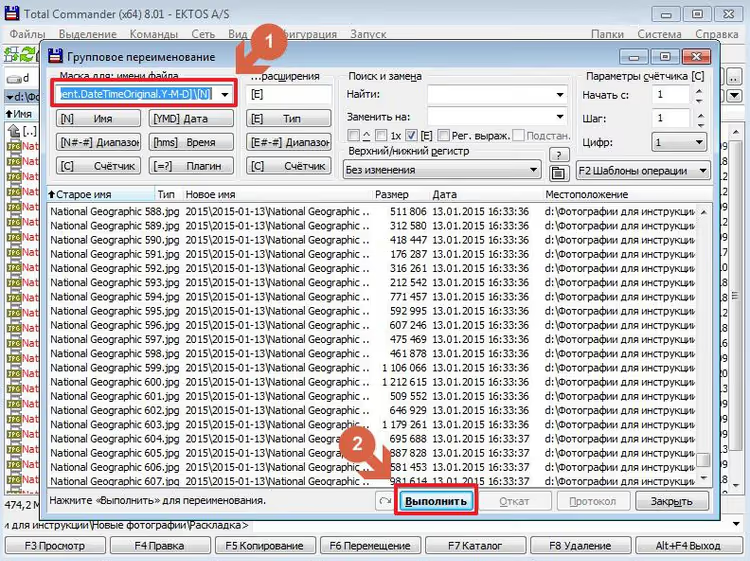
Click "Start". Each photo automatically moves to a folder corresponding to its year and creation date.
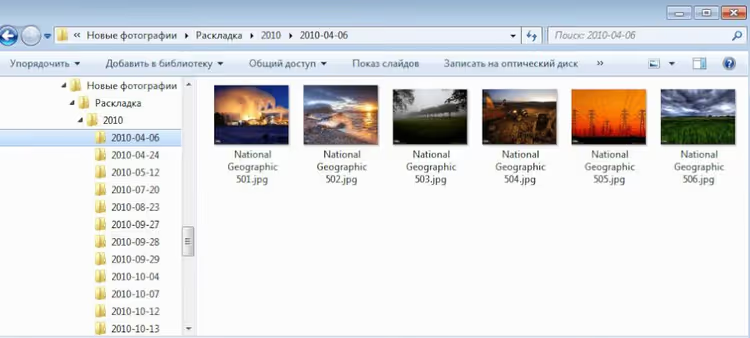
Step 8. Batch auto-rotation of images
After arrangement by dates, fix orientation. ACDSee automatically detects incorrectly rotated shots. Signal: curved arrow icon on the thumbnail.
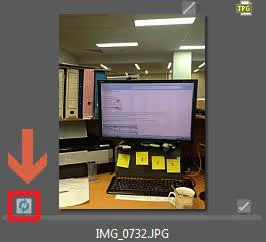
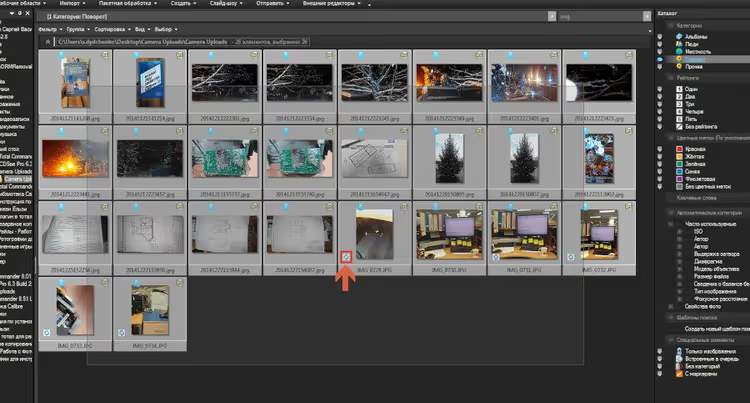
Create a "Rotation" category, add all new photos as in step 1. Select all (Ctrl+A) and click the curved arrow icon on any thumbnail.
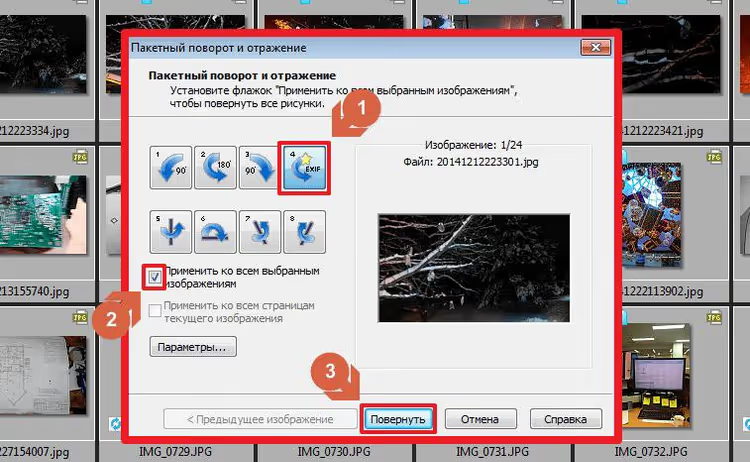
In the opened window, click "4 EXIF", check "Apply to all selected images" and click "Rotate".
ACDSee will apply rotation only to shots that need it. The program skips correctly oriented images, and the report window will indicate which files didn't require the operation.
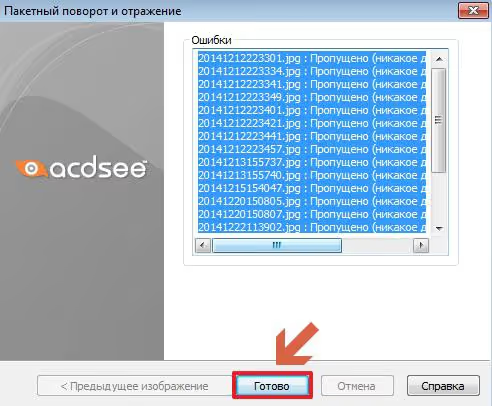
Click "Done". In the vast majority of cases, auto-rotation is sufficient, incorrect orientation detection is extremely rare.
Step 9. Keywords: assignment, database, and search
Keywords transform a pile of files into a searchable archive: instead of scrolling through thousands of thumbnails, one click in the catalog panel is enough.
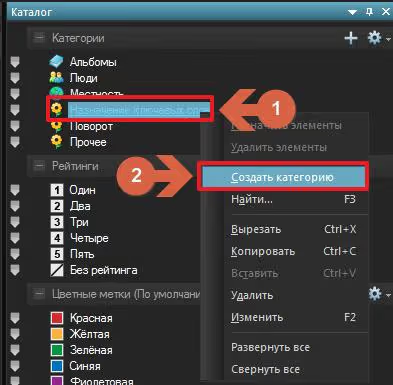
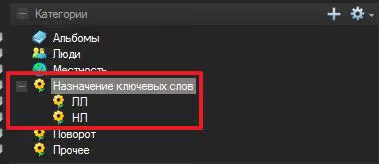
Create a category "Keyword Assignment" and inside it subcategories with initials: LL for Lev Lavrov, NL for Nadezhda Lavrova. Right-click the main category, choose "Create Category".
You should get a tree structure: main category with subcategories for initials inside.
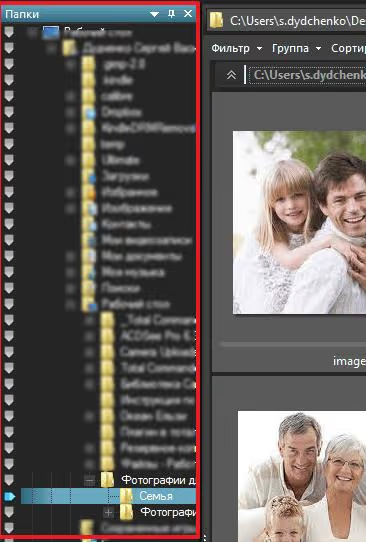
Through the right "Folders" panel, navigate to directories with new photos.
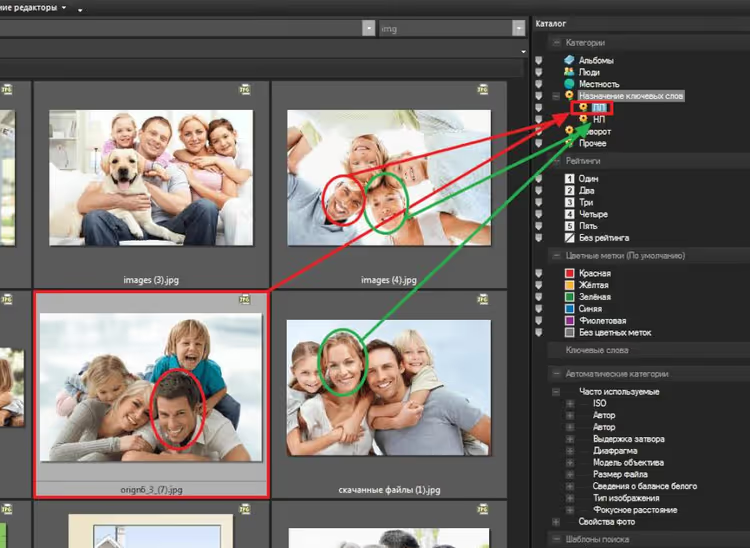
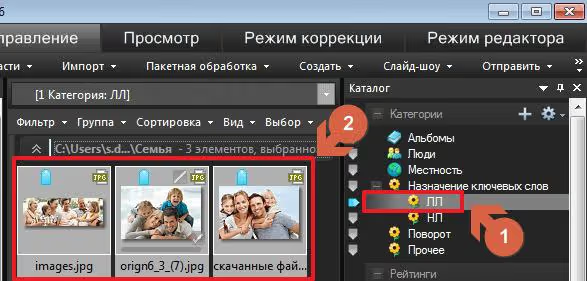
Drag photos with people into corresponding subcategories: Lev Lavrov into LL, Nadezhda Lavrova into NL.
Open the subcategory of a specific person, for example LL, select all photos (Ctrl+A).
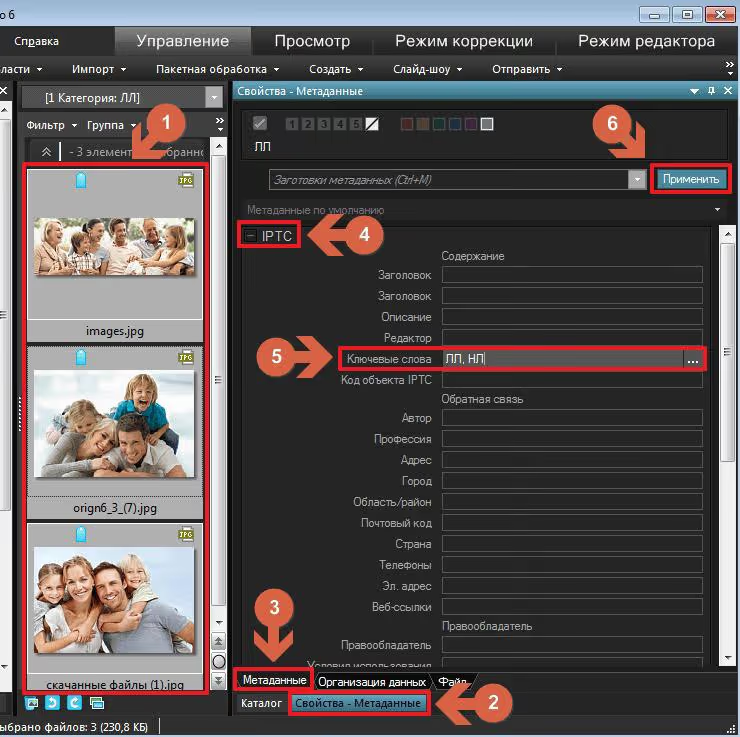
Go to "Properties, Metadata", expand the "IPTC" block. In the "Keywords" field, enter initials separated by commas, for example LL. Click "Apply": words will write to metadata of all selected files.
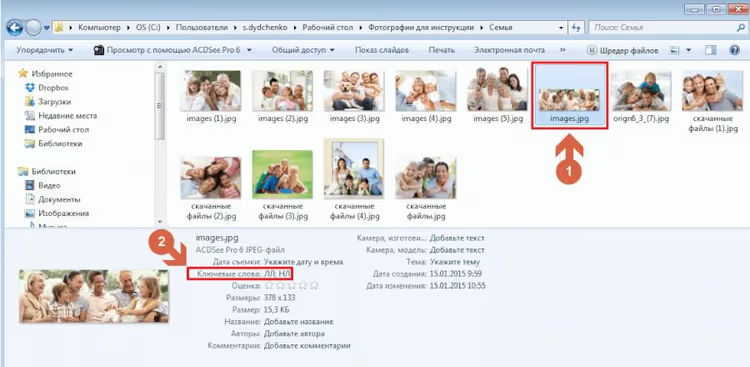
After writing, keywords appear in each file's metadata. You can search for a person through ACDSee and through Windows Explorer.
Adding keywords to ACDSee database
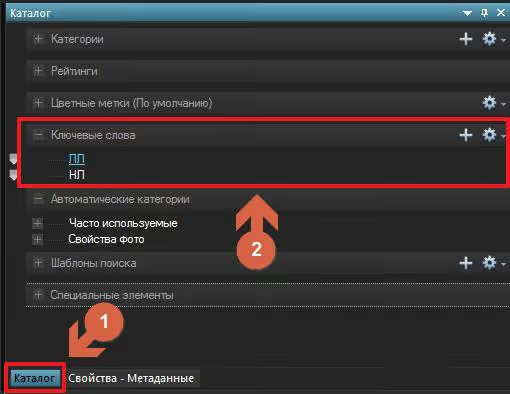
For search to work inside ACDSee, keywords need to be added to the program's database. On the "Catalog" tab, expand the "Keywords" menu: clicking a word shows all photos with it in the browser.
On the "Metadata" tab, in the "Metadata Templates (Ctrl+M)" dropdown, select "Manage Templates".
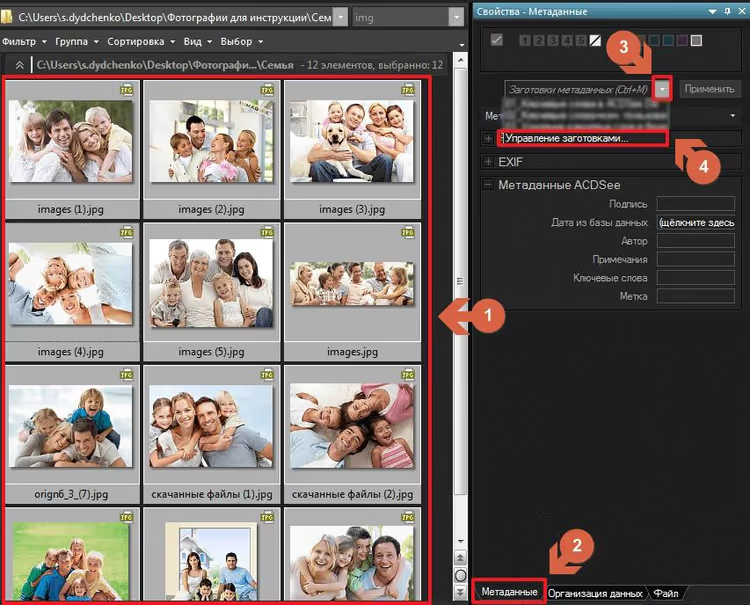
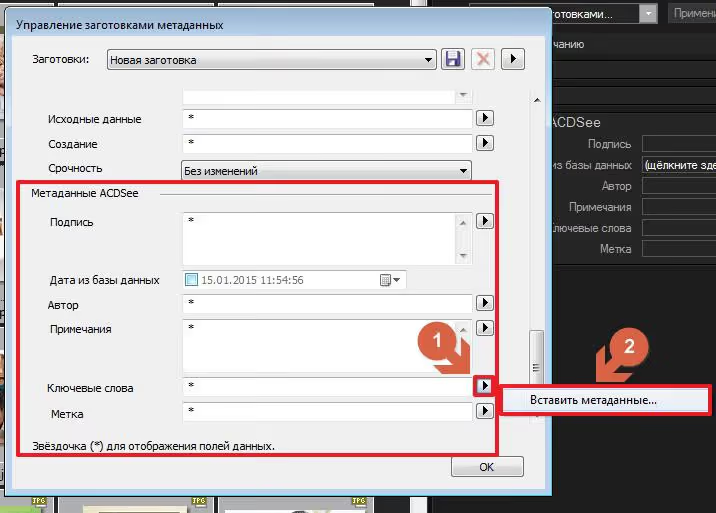
In the template management window, go to the "ACDSee Metadata" panel, find the "Keywords" row, click the triangle button and choose "Paste Metadata...".
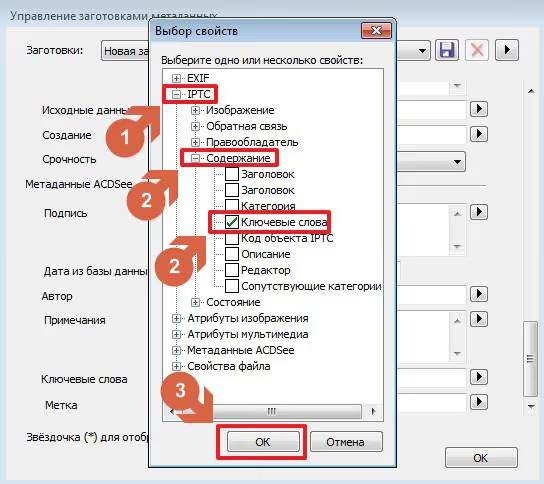
In the "Select Properties" window, select "IPTC" → "Content" and check "Keywords". Click "OK".
A new value appeared in the template's "Keywords" field.
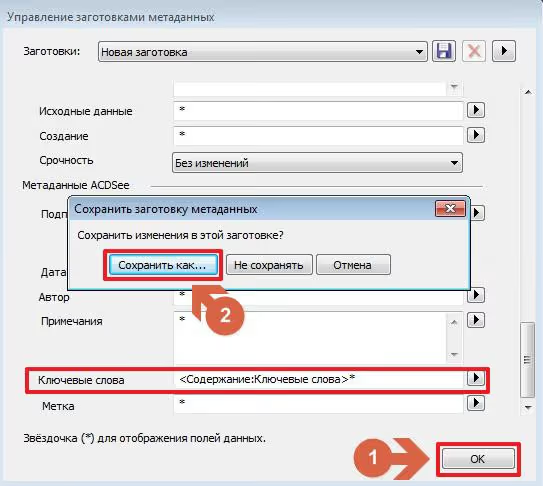
Save the template under the name "Keywords to database". On the "Properties, Metadata" tab, select it and click "Apply" for needed photos.
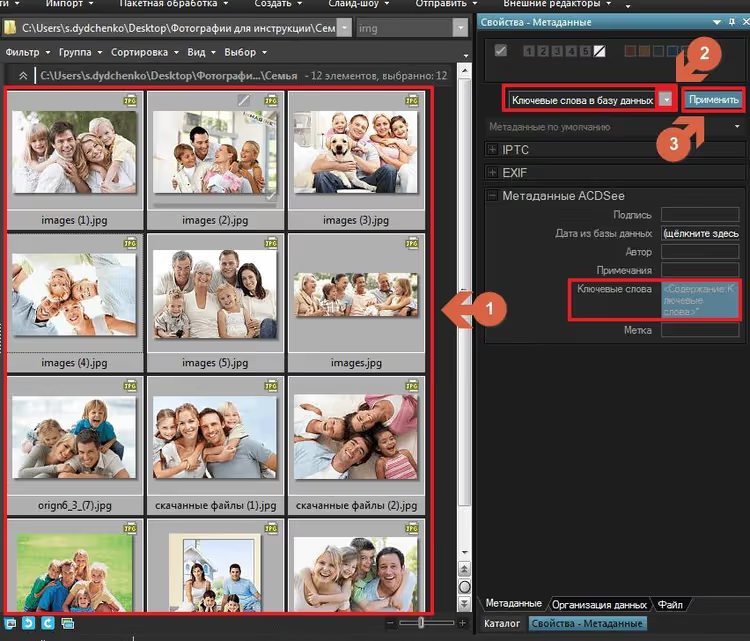
After applying, keywords appear in the ACDSee database.
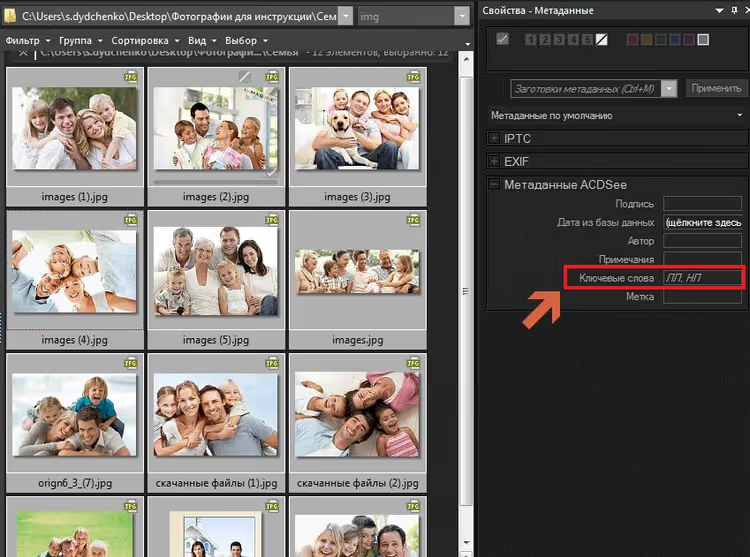
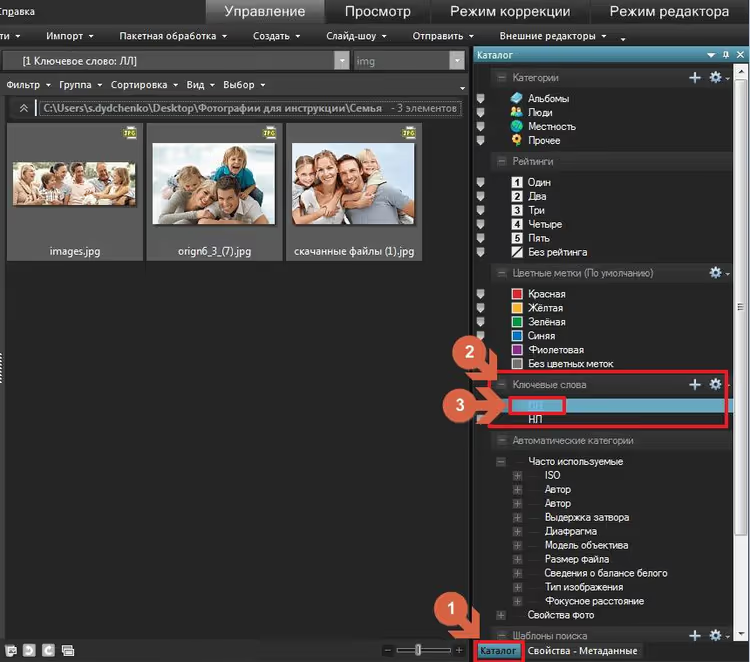
Searching by keywords in ACDSee
Go to the "Catalog" tab, expand the "Keywords" menu and click the needed word. The browser instantly filters photos.
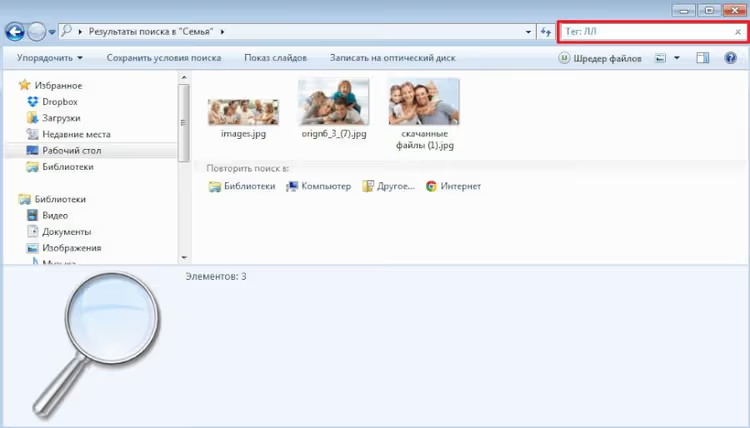
Searching through Windows Explorer
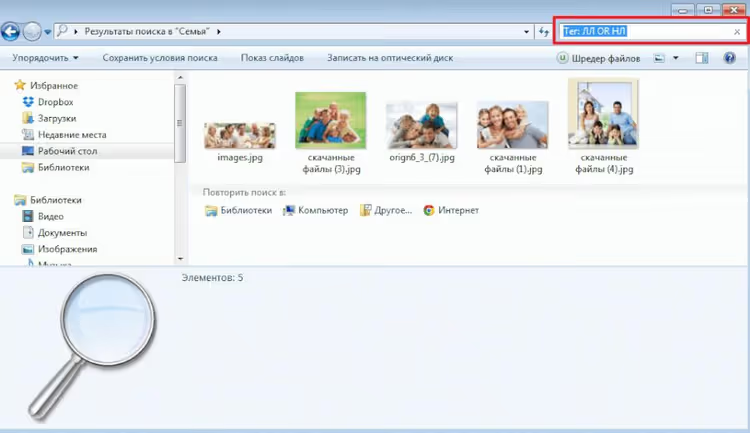
Tag search is built into Explorer starting with Windows 7. Open the folder with photo archive and in the search field enter:
1 Tag:LL
Windows shows all photos with the LL keyword in their metadata.
If you need to find photos with one of several keywords, use the OR operator:
1 Tag:LL OR Tag:NL
Step 10. Setting ratings
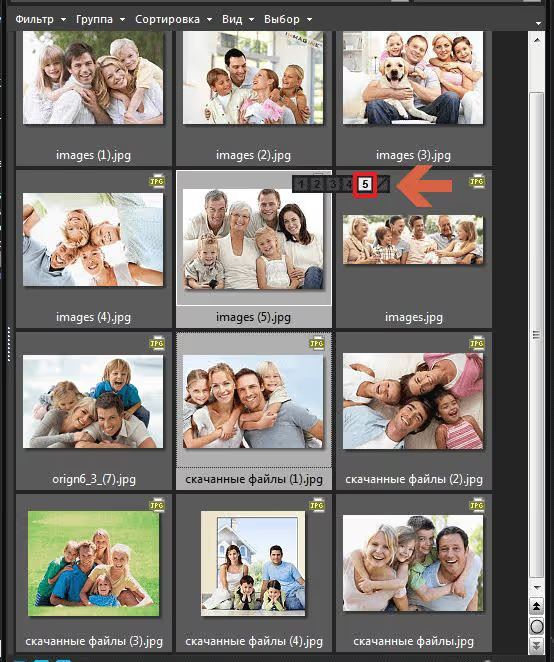
Rating highlights the best shots from the general mass. In ACDSee, the scale goes from 1 to 5. Select needed photos and click the label shaped like a crossed quadrilateral on any thumbnail.
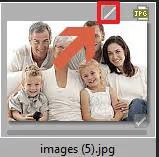
Choose a value from 1 to 5 according to shot quality.
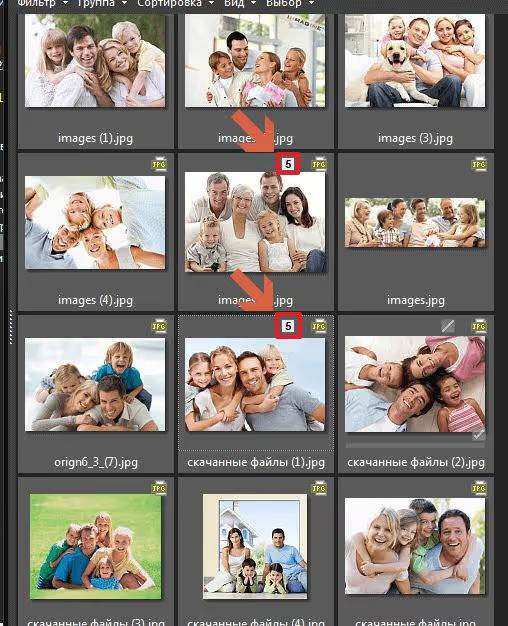
After selection, the rating number appears at the top of the thumbnail.
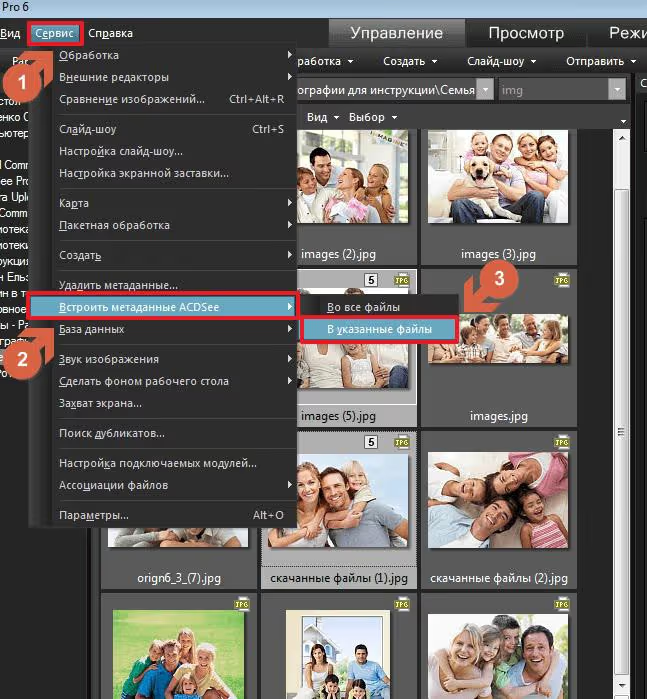
Rating through the thumbnail panel goes only into ACDSee database, not into file metadata. For Windows Explorer to see the rating: "Tools" → "Paste ACDSee Metadata" → "Into Specified Files".
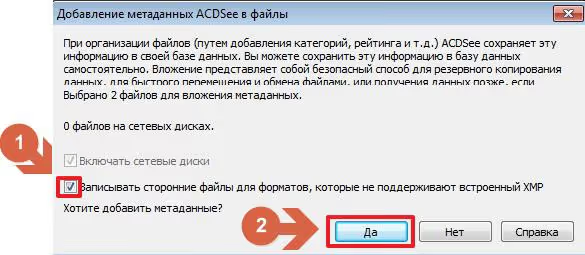
In the opened window, check "Write third-party..." and click "YES".
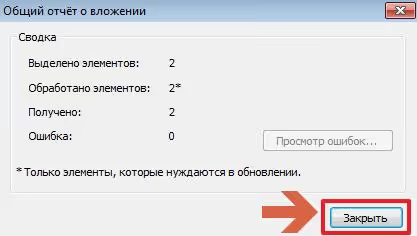
Wait for completion and click "Close".
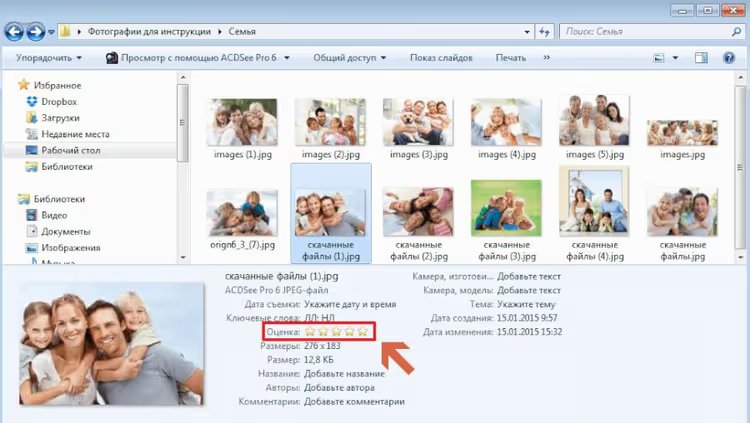
Now rating displays in Windows Explorer, in the "Rating" column.
Step 11. ACDSee database: connection and binding change
Database in ACDSee gives quick search by keywords and rating. For a family archive it's indispensable: found all photos of a person for a specific year in a second.
Connecting database
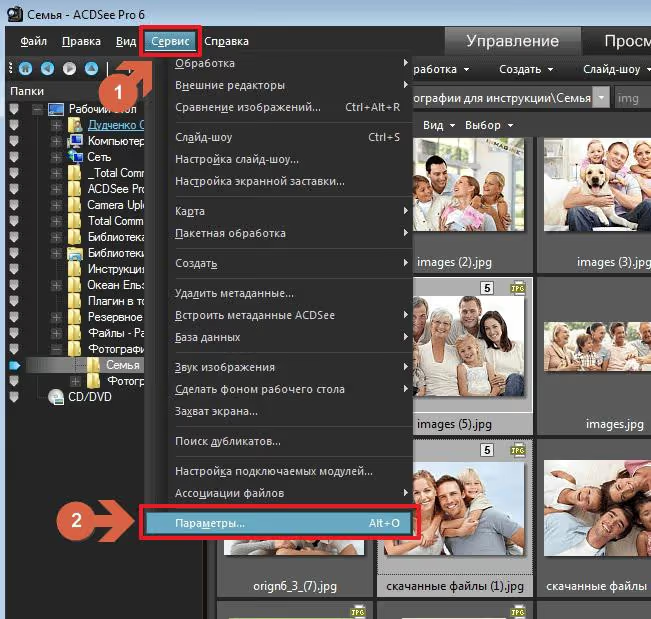
Click "Tools" → "Options...".
In the "Options" window, select the needed database and click "OK".
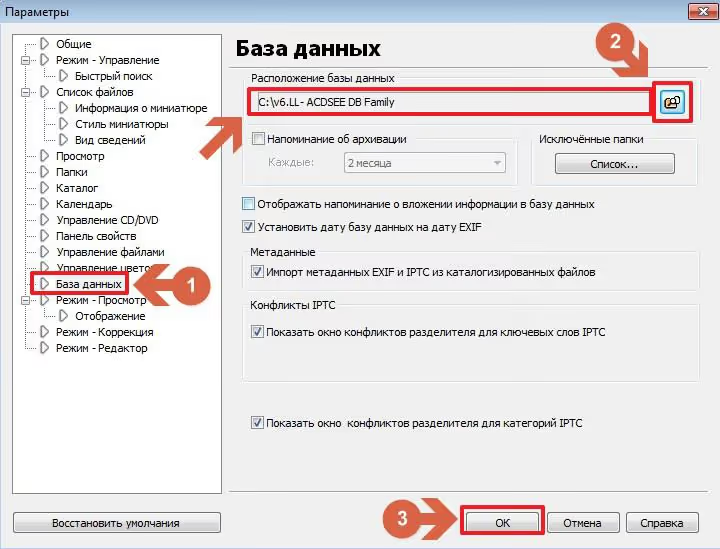
On next launch, ACDSee will connect the database automatically.
Changing folder binding
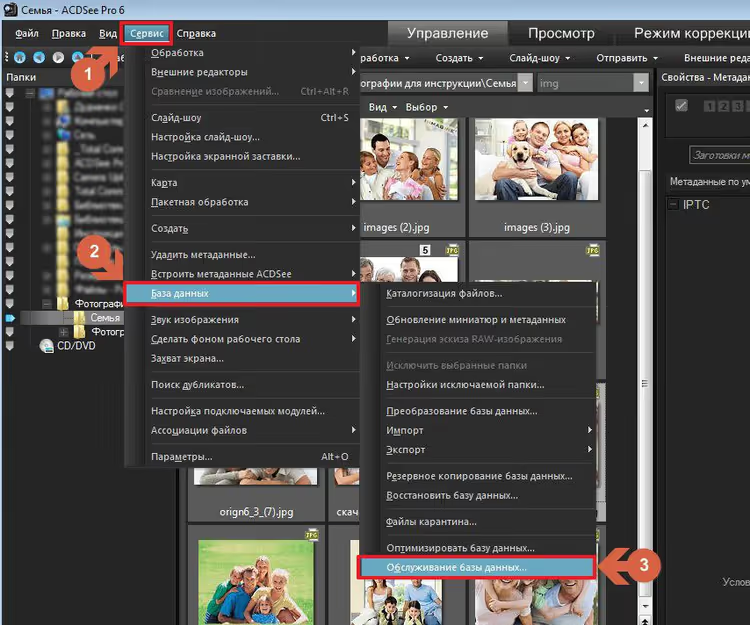
If the drive letter changed, point the database to the new location. Click "Tools" → "Database" → "Database Maintenance...".
Wait for indexing. Select the folder whose binding needs changing and click "Change Binding".
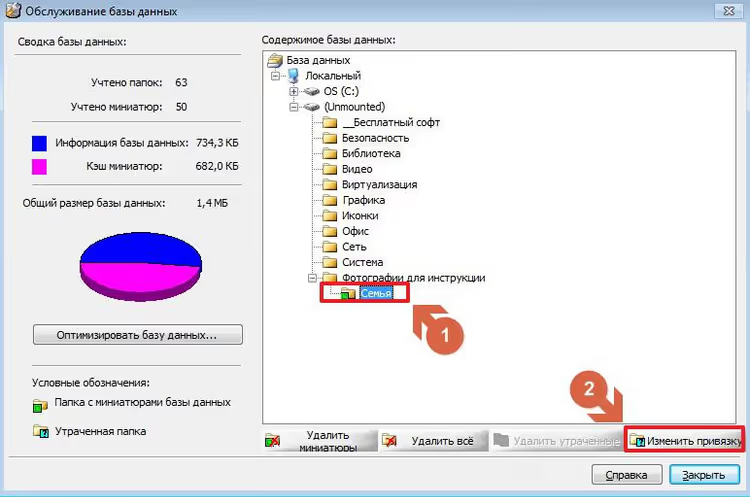
In the "Folder Binding" window, select the new location and click "OK" twice.
Restart ACDSee: folder binding will work at the new path.
Video: full photo archive organization cycle
If it's more convenient to see the entire process at once, watch this video: full workflow from first import to finished catalog with metadata.
⁉️🤔 Frequently asked questions
Why can't I compare new photos directly with the entire photo library?
Technically possible, but takes hours instead of minutes. Determine the earliest date in the batch (step 2), copy the photo library starting from that year and compare only that range. If the earliest photo was taken in 2023 and the archive starts from 2005, the program will run through 18 unnecessary years with no benefit.
Duplicate & Same Files Searcher found no duplicates. Can I skip VisiPics?
No. DSFS compares files byte-by-byte: size, name, modification date. Two burst shooting frames are visually almost identical, but byte size differs, DSFS will skip them, while VisiPics or Czkawka will find them by pixel similarity. Skip visual filtering only if you're certain there's no burst shooting in the batch.
ACDSee 6.3 is outdated. Does the guide work in newer versions?
Yes. Check the Ultimate 2026 page on ACDSee site: ribbon interface, but functions are in place: categories, IPTC metadata, templates, database. "Tools" menu is now "Tools". Look in the ribbon: "Manage" for categories and database, "Properties" for metadata, "Batch" for group operations.
What's wrong with ACDSee's built-in duplicate search?
It finds only exact copies by checksum. Built-in search doesn't see visual duplicates. ACDSee is paid, while DSFS and Czkawka repository on GitHub are free: the DSFS + Czkawka combination closes the question with no additional costs.
What if the Total Commander plugin doesn't read the date from EXIF?
This happens with screenshots, messenger files, files processed in editors without EXIF preservation. If
[=jpg-comment.DateTimeOriginal...]doesn't work, try[=jpg-comment.ModifyDate...]. If that's also empty, group photos by date in ACDSee (step 2) and arrange manually.
Can I do without ACDSee?
You can. The DSFS + Czkawka + Total Commander combination covers duplicates and arrangement by dates. Without ACDSee there's no EXIF auto-rotation, IPTC keywords, rating in Explorer, and database search. For a small archive this isn't critical, for large collections the license pays for itself.
When manual photo archive sorting stops working
Manual sorting works up to the first batch of several hundred shots. Beyond that without automation, you'll either abandon archiving or spend an evening on sorting that you could have spent with family.
The ACDSee, Duplicate & Same Files Searcher, VisiPics (or Czkawka), and Total Commander combination closes the full cycle: duplicates filtered at two levels, files arranged by dates, keywords and ratings in metadata. In a year you'll find the needed shot in seconds.
If the archive starts from scratch, the algorithm is the same: just skip the photo library comparison stage.
Start with free DSFS download on MajorGeeks: it will show in a few minutes how many exact duplicates settled in your batch.

A professional team of writers and editors specializing in creating quality content.