














🔧 Guide to the TranslatePress WordPress translation plugin
Your site is on WordPress, and your audience comes from ten countries. Manual translation of every page by copying and pasting into Google Translate? By the third day, you'll hate this work.
Good news: you can translate a site into 200+ languages without a single freelancer call and without exporting XML files. One plugin, a visual editor, and 20 minutes of setup.
Below is a step-by-step guide to TranslatePress: from installation to multilingual SEO. With real screenshots of every screen, current pricing, and an honest breakdown of the free version's limitations.
💡 Quick overview:
- Install
TranslatePressfrom the WordPress.org repository or upload the ZIP manually and activate the license - Select target languages on the general settings tab and add a language switcher to your site menu
- Open the visual editor on the frontend and translate any text with a click, saving in place
- Connect Google Translate API (free) or DeepL (Business plan) for automatic translation
- Configure translation of SEO titles, meta descriptions, and URL slugs via the SEO Pack addon
What TranslatePress is and what it can do

TranslatePress is a WordPress translation plugin from the Cozmoslabs team. Unlike most alternatives, it lets you translate your site directly on the frontend: you see the page as a user would, click any text, and enter the translation in the sidebar. No switching between the admin panel and the site.
The plugin works with any theme, page builder (Elementor, Gutenberg, Beaver Builder), and WooCommerce. Everything gets translated: from posts and pages to dynamic plugin strings, shortcodes, and forms. At the time of writing, TranslatePress is used by over 400,000 sites, and WPBeginner calls it the best choice for your first multilingual project.
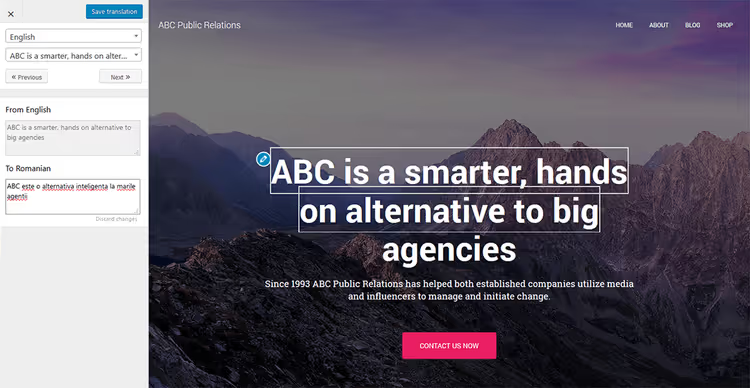
What you get out of the box:
- Visual translation editor: click on text → translate → save. Everything on the frontend.
- Automatic translation via Google Translate v2 API (free) or TranslatePress AI (proprietary engine, Personal+). On Business and Developer plans, DeepL is added, the most accurate machine translation on the market.
- SEO Pack: translation of titles, meta descriptions, URL slugs, and social media tags (Open Graph, Twitter Cards). The plugin plays nicely with Yoast SEO, Rank Math, and AIOSEO.
- 221 languages and the ability to display language names in their native script (Español, not Spanish).
- Translation of dynamic strings: content added by other plugins and themes via gettext.
- Translator accounts: a separate user role that can translate content without access to site settings.
- Auto-detection of visitor language by IP or browser settings and redirect to the appropriate version.
- GPL plugin: translations are stored locally in your database, not on a third-party server. You own the translations, not rent them.
Step 1: installing TranslatePress
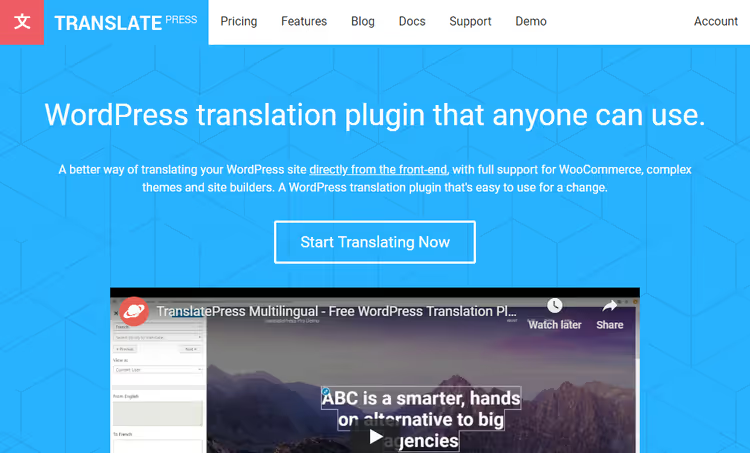
You can start in two ways. First, install the free version from the WordPress.org repository directly from the admin panel. Second, buy a license at translatepress.com/pricing and get access to premium addons.
Current pricing as of June 2026:
Plan | Price per year | Sites | AI words | Key feature |
|---|---|---|---|---|
Personal | €99 | 1 | 50,000 | TranslatePress AI and SEO Pack |
Business | €199 | 3 | 200,000 | DeepL, translator accounts |
Developer | €349 | ∞ | 500,000 | Everything included + all future addons |
All plans include one year of updates, premium support, and a 15-day no-questions-asked refund.
After purchase, you'll receive an email with download links for the main plugin and addons.
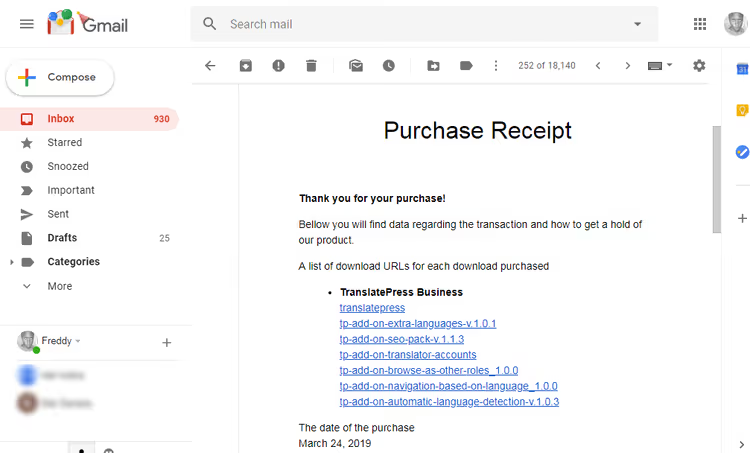
Downloaded ZIP files are also available in your account on the TranslatePress site, along with the license key.

Installing the main plugin
In the WordPress admin, go to Plugins → Add New and click the Upload Plugin button.
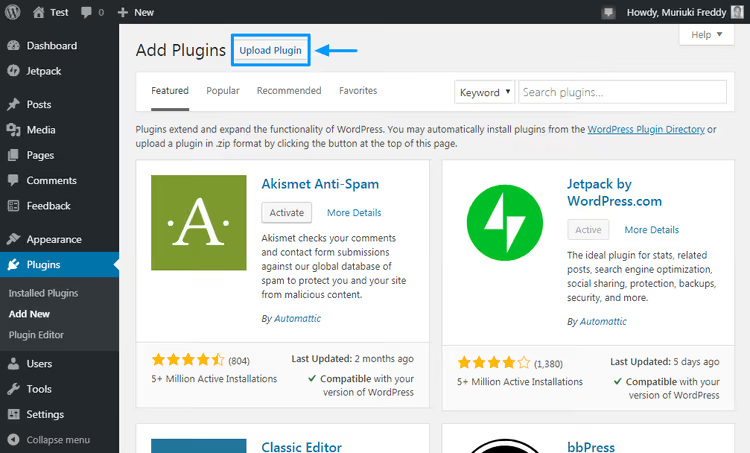
Select the main plugin ZIP archive (translatepress-multilingual.XXX.zip) and click Install Now.

Wait for installation to complete and click Activate Plugin.

The main plugin is ready. The settings page is available at Settings → TranslatePress.

Note: the License tab will only appear after installing at least one paid addon. Install addons the same way (Plugins → Add New → Upload Plugin).

After installing an addon, the License tab will appear on the settings page. Copy the license key from your TranslatePress account, paste it into the field, and click Activate License.

Paste the license key into the appropriate field and click Save Changes.

After saving, an activation button will appear below the field.
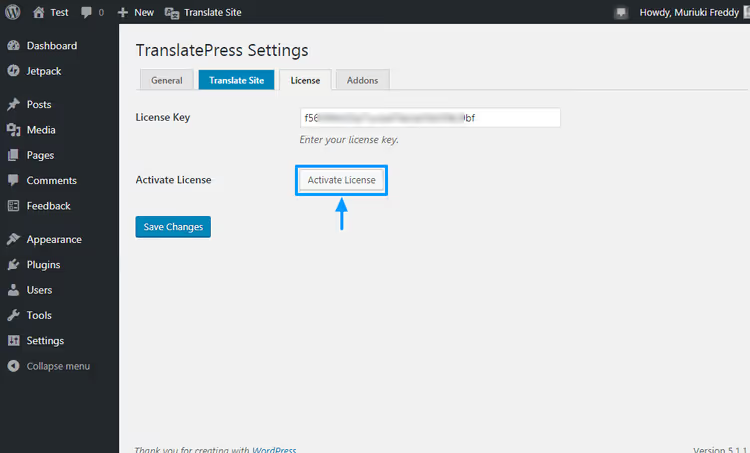
The license is activated, all addons are unlocked and ready to work.
Step 2: configuring the plugin
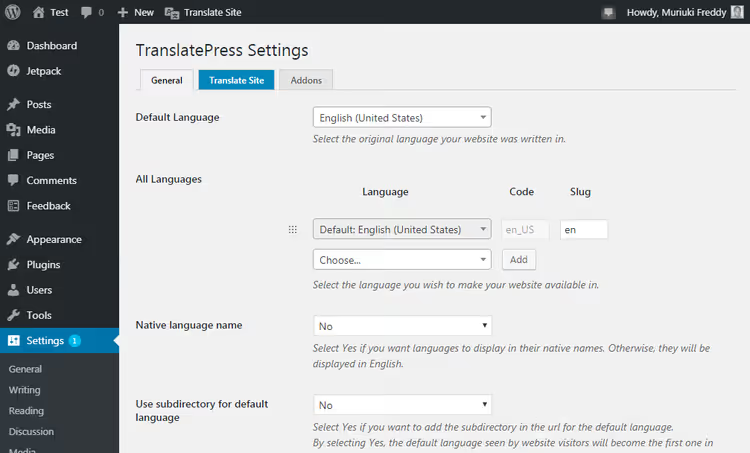
The settings page consists of several tabs: General, Automatic Translation, and License.

On the General tab (Settings → TranslatePress), you set the basic parameters:
- Default language. The language your site is written in. For us, this is Russian.
- All languages. Select the languages you're translating the site into. At the time of writing, 221 languages are available.
- Use a professional account for DeepL. If enabled, the switcher shows "English", "Español", not "English", "Spanish".
- Language switcher. Can be added to a menu via Appearance → Menus or displayed with the
[language-switcher]shortcode anywhere on the page. - Language detection method. By IP, browser settings, or first in the list. Useful for auto-redirect.
After selecting settings, click Save Changes at the bottom of the page. Your site is now ready for translation.
Step 3: translating the site via the visual editor

This is the main feature of TranslatePress. Click Translate Site in the admin bar, and you're on the frontend with the translator panel open.
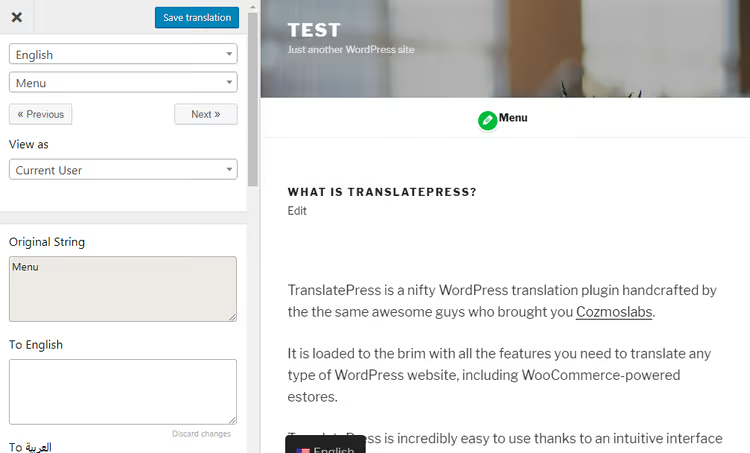
You see your site exactly as a user would, but with an additional translator panel on the left. Any text on the page is available for translation with a single click.
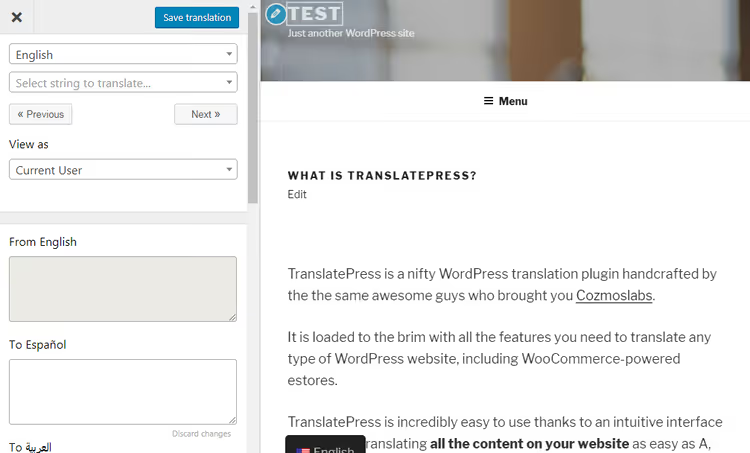
How it works:
- Hover over the text you want to translate and click. A blue border will highlight the selected element.
- In the left panel, enter the translation manually, or use auto-translation if Google Translate API or TranslatePress AI is connected.
- Click Save Translation at the top of the screen.
- Switch to another element and repeat.
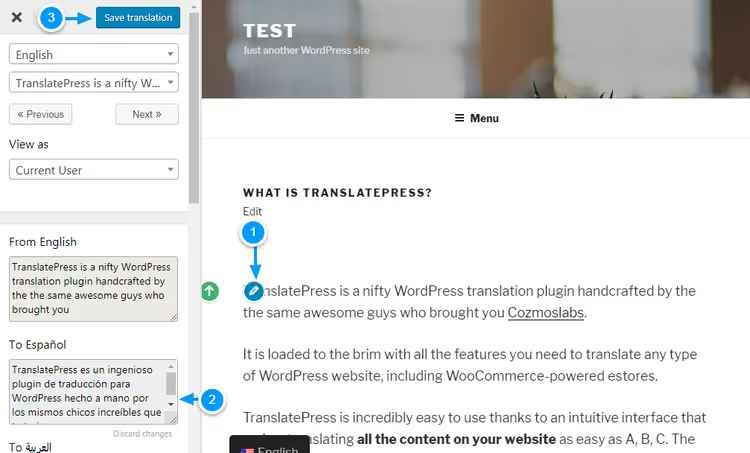
In practice, translating a typical 500-word page takes 5 to 7 minutes with manual entry. With automatic translation, less than a minute for proofreading and editing.

In the screenshot above, the language switcher is in the top menu and a duplicate switcher at the bottom of the page. Both are configured on the General tab. The top one is added via Appearance → Menus, the bottom one appears automatically.
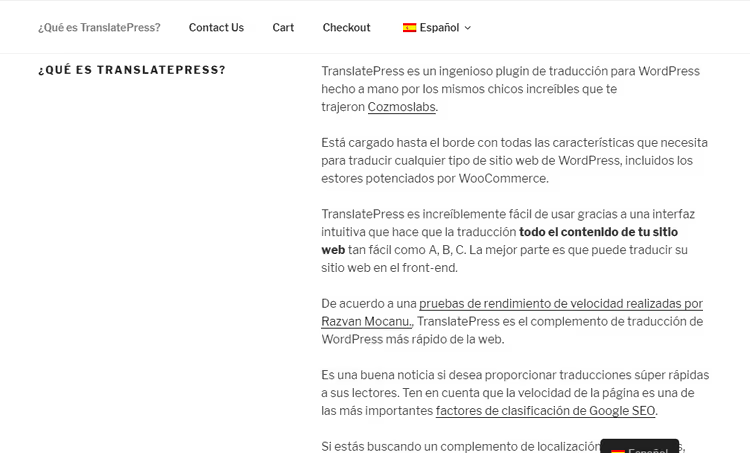
Done. The page is translated. Repeat the same process for the remaining languages, one at a time, selecting the target language in the editor dropdown.
Automatic translation: Google Translate, DeepL and TranslatePress AI
Manual translation works well for small sites. But if you have 50+ pages and 5 target languages, automatic translation saves days of work.
Setup, one time:
- Go to Settings → TranslatePress → Automatic Translation.
- Select an engine: Google Translate v2 (free, available on all plans, including the free version), TranslatePress AI (Personal+), or DeepL (Business and Developer).
- For Google Translate: get an API key in Google Cloud Console, specify a billing method (Google charges $0.00 for volumes up to 500,000 characters per month, which is free for a typical site).
- For DeepL: register a key on DeepL API (Free tier, 500,000 characters per month at no charge).
- Paste the key into the appropriate field and save.
Once connected, each new click on untranslated text in the visual editor automatically fills the field with a translation. You just need to proofread and adjust the style; in practice, machine translation covers most of the work, leaving minimal manual editing.
Important nuance: TranslatePress stores translations locally in the database. Even if you disconnect the API, translated pages remain on the site and continue to work. This is a fundamental difference from cloud services like Weglot, where translations live on third-party servers.
Multilingual SEO: setup in 5 minutes
TranslatePress with the SEO Pack addon translates not only visible text, but also SEO metadata for each page:
- Title and Description (what's visible in Google search results)
- URL slugs (example.com/about/ → example.com/es/sobre-nosotros/)
- Open Graph tags for Facebook and Twitter Cards
- hreflang tags, automatically, without code editing
The plugin works correctly with Yoast SEO, Rank Math, and AIOSEO. The Yoast sitemap automatically includes translated pages, and hreflang markup tells Google: "this page is the Spanish version of this Russian one."
Result: a multilingual site is indexed in each language version separately. According to TranslatePress's own data, users' organic traffic grows by an average of 260% after launching a multilingual version, due to appearing in search results for queries in new languages.
Check that everything is working: after translation, open the page source and make sure there's a block of <link rel="alternate" hreflang="..."> in the <head> for each language.
Video: visual translation in 15 minutes
Setup from scratch to a finished multilingual site, in one video:
⁉️🤔 Frequently asked questions
Does TranslatePress slow down the site?
In a speed test conducted by the developers,
TranslatePressshowed the best result among WordPress translation plugins. Translations are stored in dedicated database tables and loaded via the standard WordPress mechanism, without external API requests on page load. In practice, the speed difference between the original and translated page is less than 100 ms.
Do I need to pay for each language separately?
No. The number of languages is unlimited on any plan. You only pay for the number of sites and the volume of AI translation in words. The free version of
TranslatePresssupports one additional language (i.e., a bilingual site), the Personal plan supports an unlimited number of languages on one site.
What happens to translations if I disable the plugin?
Content in the primary language remains untouched;
TranslatePressdoesn't change original posts. Translations are stored in separate database tables (wp_trp_*). After deactivating the plugin, translated pages become unavailable, but the translations themselves aren't deleted. If you re-enable the plugin, all translations are in place.
Can I translate a site to RTL languages (Arabic, Hebrew)?
Yes.
TranslatePresscorrectly handles RTL languages. The language switcher changes not only the text, but also the layout direction (dir="rtl"attribute on<html>). Most modern WordPress themes support RTL out of the box; check in your theme settings.
How is TranslatePress better than WPML?
The main difference is the translation process. WPML requires switching between the admin panel and frontend via a separate Translation Management interface.
TranslatePressdoes everything on the frontend visually. Plus WPML is more expensive: the Multilingual CMS plan costs $99 per year for one site without automatic translation (AI translation is paid separately per character), while the Personal plan ofTranslatePressfor €99 per year includes 50,000 words of AI translation.
How do I translate a WooCommerce store?
TranslatePressworks with WooCommerce out of the box: it translates product names, descriptions, categories, attributes, cart, and checkout. Dynamic strings (price, "Add to Cart", variations) are also available for translation via the dropdown in the visual editor. No separate plugin for WooCommerce translation is needed.
Is TranslatePress worth installing in 2026: conclusion
TranslatePress is a plugin that solves exactly one task and does it without unnecessary complexity. The visual editor saves hours compared to switching between the admin panel and frontend, and local storage of translations gives independence from third-party servers.
Get the free version if you have a small site and one additional language. Google Translate API is free within 500,000 characters per month; for 10 to 15 pages, this is more than enough.
Get Personal for €99 per year if you need SEO Pack (translation of slugs and meta tags) and more than one additional language. TranslatePress AI on this plan delivers translation quality higher than Google Translate.
**Get Business for **€199 per year if you have multiple sites and need DeepL quality. Translator accounts on this plan let you hire a native speaker who can edit translations without access to the rest of the admin panel.
Try it: 🔗 TranslatePress on WordPress.org, the free version installs in a minute and gives a complete picture of how the plugin works.

A professional team of writers and editors specializing in creating quality content.