













 AIIllustrative image: AI-generated
🌐 How to change the default language in WordPress
You installed WordPress, logged into the admin panel, and everything around you is in English. Menus, settings, button labels. If you don't read English fluently, every click becomes a guessing game: "where are the drafts?", "how do I publish a post?".
The problem isn't you. WordPress installs in English by default, and it has always been this way. But the good news is that the system has long been ready to work in any of 200+ languages. You don't need to be a developer to switch the interface. You just need to know where to click.
Below are three proven ways to change the WordPress language. From the simplest (two clicks in the admin panel) to manually installing a language pack and setting up a full-fledged multilingual site.
💡 Quick overview:
- The easiest path: "Settings" → "General" → "Site Language", select from the dropdown list and save. Works for most translated languages.
- If the language you need isn't in the list: download the
.mofile from the WordPress translator teams website and upload it to the/wp-content/languages/folder via your hosting file manager. - For a multilingual site: install the free plugin Polylang, add the languages you need, and set up a switcher. Visitors will choose their language themselves.
How to change language through WordPress settings
This method is the main one. It changes the language of the entire site at once: both the admin panel and the front-end interface. Works for any language that is fully or almost fully translated on WordPress.org.
Log into the WordPress admin panel and navigate to Settings → General. Scroll down the page to the "Site Language" field, which is a dropdown list with all available language packs.

Select the language you need from the list. Click the "Save Changes" button at the bottom of the page. WordPress will automatically download the language pack and apply it; no need to reload anything. The admin interface and public portion of the site will immediately switch to the selected language.
If after saving you see a mix of Russian and English text in the admin panel, don't panic. This means the language pack isn't fully translated, and WordPress displays missing strings in English. Over time, translators will fill the gaps: language pack updates arrive automatically along with core updates.
How to install a language manually
Sometimes you open the language dropdown and the one you need isn't there. For example, Albanian, Uzbek, or Swahili are not fully translated, and WordPress doesn't show them in the general settings list. But the language pack for them exists; you just need to install it manually.
The first step is to download the .mo file for the language you need from the official WordPress translator teams website. Go to the Polyglots Teams page and find your language team.

Click on the translation completion percentage next to the language you need. A page with translation statistics will open. Find the "Install / Sub-project" column and select your WordPress version.

On the page that opens, find the "Export" button at the bottom. In the format dropdown, select "Machine Object Message Catalog (.mo)" because this is the format WordPress understands. Click "Export" and save the file to your computer.
Now you need to upload this file to the server. Log into your hosting file manager (cPanel, DirectAdmin, or any other) and navigate to your site's directory.

Inside wp-content, find or create a folder called languages. If the folder doesn't exist, right-click, select "Create folder", and name it languages (case matters). Open this folder and upload the downloaded .mo file to it.

Done. Now return to the WordPress admin panel: Settings → General, scroll to "Site Language", and the manually installed language will appear in the dropdown list. Select it and save changes.
How to create a multilingual site
The previous two methods change the site's language entirely. But what if you need the same content to be available in two, three, or ten languages simultaneously? For this, you need to turn WordPress into a multilingual site, and this is where the Polylang plugin comes in.
Polylang is a free, open-source plugin installed on more than 700,000 sites. It allows you to add languages and create separate versions of each page, post, category, and tag. Visitors see a language switcher in the menu or widget and choose which language to read in.
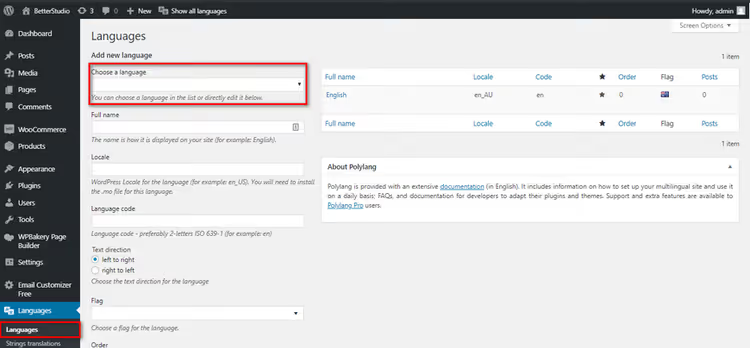
Install Polylang via Plugins → Add New, type "Polylang" in the search, click "Install" and then "Activate". After activation, the setup wizard will launch automatically, or you can go to Settings → Languages.
On the "Languages" tab, add all the languages you need on the site. For each one, specify: the name (how it will appear in the switcher), the locale (for example, ru_RU for Russian), and the flag (you can upload your own or choose from the built-in set).

The "String translations" tab lets you translate the site title and description into all added languages. Fill in the fields for each language; this data is used by search engines and displayed in <title> and <meta description> tags.

On the "Settings" tab, it's important to enable the "Detect browser language" option. Then Polylang will automatically show visitors the site version in their browser's language: a user from France will see the French version, from Brazil the Portuguese version.
Don't change the "Modify URL for each language" setting unless absolutely necessary. If the plugin is ever deactivated or breaks, links with language prefixes (/ru/, /en/) will stop working and content will become inaccessible. The standard "Language determined by content" mode is safer and doesn't depend on the plugin.
The final step is creating content. For each post or page, a "Languages" block will appear in the editor: click "+" next to the language you need to create its version. The interface is convenient: you switch between languages, translate content, and publish.
⁉️🤔 Frequently asked questions
Can I change the language of just the admin panel while keeping the site in English?
Yes, this is done in the user profile settings. Go to Users → Your Profile and in the "Language" field, select the one you need. The site language won't change. Each user can set their own admin panel language independently of others.
What should I do if some strings remain in English after changing the language?
The language pack isn't fully translated. Check the translation percentage on the Polyglots teams page. If the translation is 100% complete, try updating the language files: go to Dashboard → Updates, scroll to the "Translations" section, and click "Update translations".
Polylang or WPML: which is better for a multilingual site?
Polylang is free and covers most scenarios: posts, pages, categories, menus, widgets. WPML is paid (from $39/year according to findstack.com) and is needed when a project requires compatibility with WooCommerce Multilingual, ACF field translation, SEO plugins out of the box, and professional support. For a personal blog or small business site, Polylang is more than enough.
Do I need to install a language pack for each plugin separately?
No. Plugins and themes use the same core WordPress language pack. If a plugin is translated into the selected language, it will pick it up automatically. If not, it will display its interface in English.
I uploaded the.mo file, but the language didn't appear in the list. What's wrong?
Check two things. First: the file must be located strictly in
/wp-content/languages/, not in a subfolder. Second: the filename must be correct; for example, for Albaniansq_AL.mo, for Uzbekuz_UZ.mo. If the name doesn't match the locale, WordPress won't see the file.
Which language change method is right for you
The choice comes down to a simple fork. If you need a site in a single language that isn't in the standard WordPress list, download the .mo file manually and upload it to the server. If the language is in the settings dropdown, just select it and save; this will take 10 seconds.
And if you want to reach an audience in multiple languages, install Polylang. It's free, actively updated, and doesn't overload the site. 700,000 installations don't lie: the plugin handles both a bilingual blog and a corporate site in five languages. Start with two, add a language switcher to the menu, and visitors will figure it out themselves.

A professional team of writers and editors specializing in creating quality content.