













🌐 How to change WooCommerce language: complete guide with SEO tips
You've installed WooCommerce, configured products and payment methods, and the store interface is still in English. Sound familiar? WordPress seems to be translated, but the cart, "Add to cart" button, and checkout stubbornly refuse to speak the customer's language.
This happens because WooCommerce follows the site language by default but doesn't always pick it up automatically. And if the language you need isn't on the list at all, you're in for a dance with files, hosting, and plugins.
Below are three working methods to change the WooCommerce language, from the simplest to fully custom. Each has been tested on the current version of the plugin, with no deprecated instructions like "download from the GitHub repository" (it's been closed). Plus, we'll look separately at how manual translation affects SEO and conversion.
💡 Quick overview:
- WooCommerce language is changed through WordPress settings (Settings → General → Site Language), suitable if the language you need is on the list and has sufficient translation coverage.
- If the language is missing or the translation is incomplete, download the language pack from translate.wordpress.org and upload it manually to
wp-content/languages/plugins/. - For partial edits and custom button text, use the Loco Translate plugin: line-by-line interface translation straight from the admin panel, without editing files on the server.
Why change the WooCommerce language at all
A store in an unfamiliar language loses trust instantly. A customer who sees "Proceed to checkout" instead of their native equivalent is very likely to close the tab, especially in countries where English isn't the primary language. According to industry research, 65% of consumers prefer to buy in their own language, even if they speak English at an acceptable level.
Technically, WooCommerce is tied to WordPress language files. When you change the site language in Settings → General, WordPress tries to load a ready-made translation for WooCommerce from the official repository. If the translation exists and has reached the 90% threshold (according to WooCommerce documentation), it installs automatically. If not, you need a manual method.
The main thing to remember: the WordPress core language pack and the WooCommerce language pack are two different sets of files. Changing one doesn't guarantee changing the other. That's exactly why after translating the admin panel, the store can remain in English.
Method 1. System language change through WordPress settings
The cleanest path is to use WordPress's built-in mechanism. It works for languages included in the WooCommerce Translation Project and translated at more than 90%.
Steps:
- In the WordPress admin panel, go to Settings → General.
- Find the Site Language dropdown and select the language you need.
- Click Save Changes.
- Go to Dashboard → Updates, scroll to the Translations section, and click Update Translations.

After updating translations, the store interface will switch to the selected language, provided the language pack exists. If the language is on the list but the translation is incomplete, WordPress will still apply the available strings, and the missing ones will remain in English.
If your language is missing from the Site Language dropdown, you first need to add it to WordPress. We covered this process in detail in the article about changing the default WordPress language.
⚠️ Important note: some WooCommerce strings (for example, shipping and payment method names) are saved to the database when the plugin is first installed. If you installed WooCommerce in English first and then changed the site language, these strings will remain untranslated. You need to edit them manually in WooCommerce settings (Shipping, Payments sections, etc.).
Method 2. Manual WooCommerce language pack upload
If your language is translated at less than the required threshold or is completely missing from the Site Language list, you'll have to download and install the language pack manually.
The woocommerce/woocommerce-language-packs GitHub repository used to be used for this, but it's been declared deprecated. Now all WooCommerce translations live on the translate.wordpress.org platform. Here's the current workflow:
- Open the WooCommerce translations page on translate.wordpress.org.
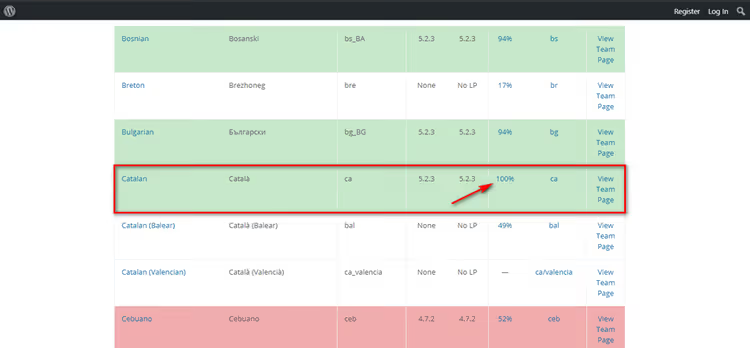
- Find your language in the list and click on its name.
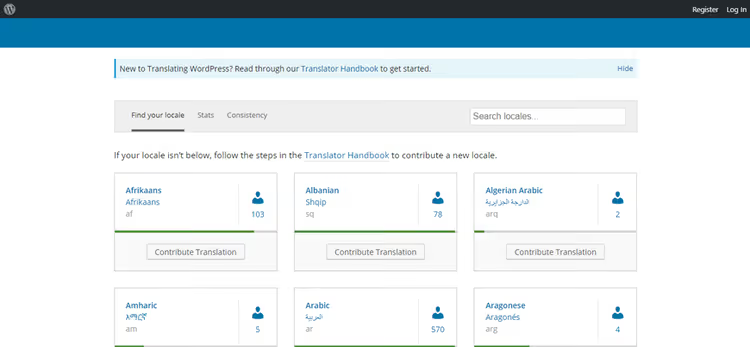
- On the page that opens, click the heading in the Set / Sub Project column to open the stable translation version.

- Scroll down the page to the export section. In the format dropdown, select Machine Object Message Catalog (.mo) and click Export.

In the same block below is the export button that delivers the ready .mo file.

Rename the downloaded file following the pattern
woocommerce-{language_code}.mo. For example:woocommerce-es_ES.mofor Spanish,woocommerce-fr_FR.mofor French.Upload the file to the
wp-content/languages/plugins/folder on your server (via FTP, hosting file manager, or cPanel). If thepluginsfolder doesn't exist insidelanguages, create it.Return to the WordPress admin panel and make sure the translation has been applied. If necessary, go to Dashboard → Updates and click Update Translations.
Done. The store now speaks the language you need. If WooCommerce updates later with new strings, repeat the export procedure and replace the old .mo file with the new one.
Method 3. Fine-tuned translation through Loco Translate
System methods work well when you need a complete interface translation. But what if you only want to translate call-to-action buttons, change the cart wording, or adapt specific phrases to match your brand tone? That's where you need Loco Translate.
Loco Translate is a free plugin that provides a browser interface for line-by-line translation of any WooCommerce text strings. Here's a step-by-step guide:
- Install and activate the Loco Translate plugin.
- In the admin panel, go to Loco Translate → Plugins and select WooCommerce.

- Click + New Language.
- In the dropdown, select the target language.
- In the Choose a location section, select Custom. This is important: the translation will be saved in
wp-content/languages/loco/, and WooCommerce updates won't overwrite it. The Author and System options aren't suitable for this task. - Click Start translating.
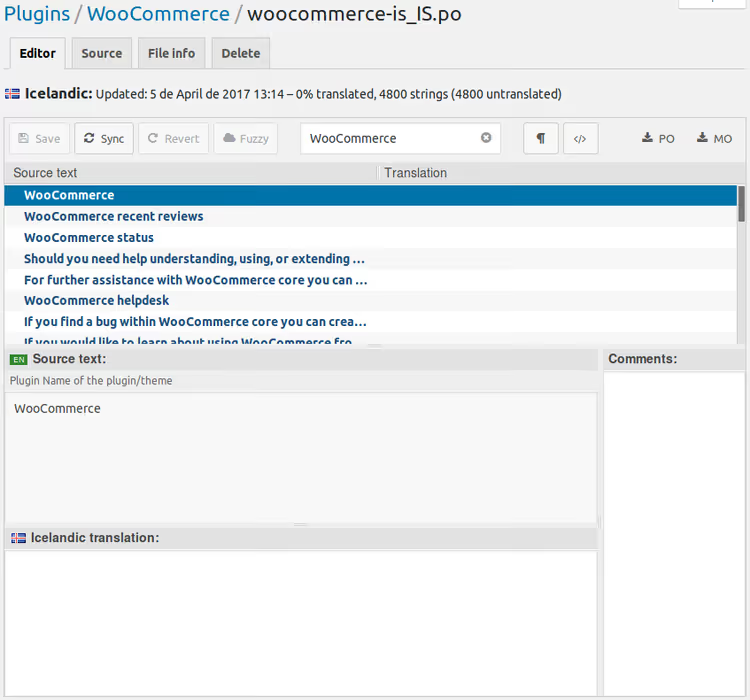
- Translate the strings you need one by one and click Save. The plugin will automatically generate
.poand.mofiles.
When WooCommerce gets an update, go into Loco Translate and click Sync. The plugin will pull in new strings without touching the ones already translated.
Loco Translate is especially useful when you're using a ready-made language pack (Method 1 or 2) but want to selectively replace individual phrases. For example, you can change the standard "Add to cart" translation to something more emotional, and it won't break on the next update.
How manual translation affects SEO and conversion
Machine translation of a language pack is the baseline. It provides an understandable interface but doesn't account for search queries and doesn't adapt calls to action for a specific audience.
When you edit translations manually (through Loco Translate or your own .po file), you can:
- Embed keywords in interface strings. The phrase "Place order" in a button isn't just UX, it's micromarkup and an internal anchor that search engines see. Replace the generic "Checkout" with a precise phrase from your semantic core.
- Adapt CTAs for local buyers. In German e-commerce, direct wording works ("Jetzt kaufen"), while in Japanese, more polite forms are preferred. Ready-made language packs don't know these nuances.
- Eliminate duplicates in the index. If part of the interface remains in English while part is translated, the search bot sees two versions of the same page. Manual translation solves this problem completely.
- Increase trust. A spelling error or unnatural phrase in the cart is a trigger for purchase abandonment. A Wyzowl study showed that 75% of users judge a company's reliability by interface quality.
It's worth separately mentioning multilingual plugins like WPML and Polylang. They translate content (products, categories, pages), not the WooCommerce interface. So even with configured multilingual content, you'll still need one of the three methods above to translate buttons, cart, and checkout.
Below is a video with a visual demonstration of all three methods. The author shows the process on a real site: from system language change to manual pack upload and edits in Loco Translate.
⁉️🤔 Frequently asked questions
Why did part of the interface remain in English after changing the language?
The most likely reason: strings were saved to the database when WooCommerce was installed in English. This applies to shipping method names, payment options, and privacy policy text. Go to the corresponding WooCommerce settings sections and replace the text manually. Second option: the language pack is incomplete and some strings are physically missing, in which case Loco Translate will help.
What's the difference between translating WooCommerce and translating store content?
WooCommerce translation changes interface strings: buttons, cart, checkout, notifications. Product names, descriptions, and categories are content. To translate content, you need separate multilingual plugins: WPML, Polylang, or TranslatePress. They work in parallel with the WooCommerce language pack, not replace it. So for a fully multilingual store, you need both layers: interface translation (one of the three methods above) and content translation (multilingual plugin).
Can I use automatic translation through Google Translate or DeepL?
Technically yes, but not recommended for store interfaces. Automatic translation doesn't distinguish context: the "Checkout" button might turn into the wrong word in your language. Plus, search engines may consider auto-generated interface text low quality. If you do use machine translation, manually proofread cart, checkout, and CTA button strings.
Is it mandatory to buy WPML to translate WooCommerce?
No. WPML is a plugin for multilingual content, not for interface translation. The WooCommerce interface is translated for free using any of the three methods described. WPML is only needed if you plan to run a store in multiple languages simultaneously with translated products, categories, and pages.
What should I do if the language pack is outdated after a WooCommerce update?
With the system method, WordPress automatically loads updated translations through Dashboard → Updates → Update Translations. With manual upload, download a fresh
.mofile from translate.wordpress.org and replace the old one. When using Loco Translate, click the Sync button inside the plugin, and it will pull new strings while preserving already translated ones.
What to choose for your store: quick breakdown
Choosing a method comes down to a simple matrix:
- Language is in the Site Language list and translation reaches the threshold per official requirements → Method 1 (system change, 2 minutes).
- Language is not on the list or translation is below the threshold → Method 2 (manual upload of
.mofile from translate.wordpress.org). - Need to replace specific phrases or edit machine translation → Method 3 (Loco Translate), can be used together with Method 1 or 2.
- Planning a multilingual store with content translation → Method 1 or 2 for interface + WPML / Polylang for products and pages.
Main advice: don't leave the interface halfway. A half-English cart with native language products kills conversion more than a fully English site. Check every element, from the product card button to the order email, and make sure it speaks the customer's language.

A professional team of writers and editors specializing in creating quality content.