














🎨 How to add a custom shape divider in Elementor: a guide from SVG to filter
The standard Elementor dividers are sufficient for typical layouts, but when a design calls for a unique wave contour, a branded bevel, or a diagonal that matches the mockup exactly, the built-in set of 26 shapes falls short. The designer creates a custom transition between sections, and the developer is left wondering: how do you add your own SVG to Elementor so it picks up the color from settings and survives the next plugin update?
The problem is not a lack of mechanism: the elementor/shapes/additional_shapes filter has existed in the core for a long time. The problem is that most tutorials online suggest placing the SVG in the plugin folder itself, which is a direct path to losing the file during auto-updates. And the url/path parameters are often omitted; without them, the divider simply does not render in the editor.
Below is a tested workflow: from preparing the vector file to registering it via a filter with placement in the child theme. After this, your custom shape divider will appear in the dropdown alongside the standard ones and will persist independently of Elementor updates.
💡 Quick overview:
- Prepare a raster sketch in Photoshop: crop the required area and fill it with black.
- Convert the PNG to SVG via an online service, simplifying to a single color.
- Clean up the SVG code: remove unnecessary tags, add elementor-shape-fill and preserveAspectRatio.
- Place the file in the child theme folder and register it via add_filter with the url, path, and has_negative keys.
- Test the divider in the Elementor editor, change the color and height.
What is a shape divider and why add your own
A Shape Divider is an SVG shape overlaid on the top or bottom edge of a section in Elementor. It creates a smooth transition between blocks: a wave, bevel, arc, or pointed edge. The standard library includes 26 shapes: mountains, drops, clouds, curves, and so on.
A custom divider is needed in three cases. First, when the design contains a unique shape not found in the standard set. Second, for branding purposes (for example, a transition shaped like a logo or a signature wave). Third, when multiple projects use the same custom set; in that case, dividers are added centrally via a child theme or a custom plugin.
Technically, the mechanism is implemented through the elementor/shapes/additional_shapes filter. The hook accepts an array where each element describes one divider: the name, file path, flip capability, and negative option. After registration, the shape appears in the editor dropdown.
Creating an SVG file for the divider
The principle behind how shape dividers work is that the visible area is whatever you fill in the SVG. So first you need to understand which part of the sketch will become the shape.
Suppose the designer created a transition with a blue lower section and a white upper "wave." The white contour should become the shape; that is what you need to cut out and fill with a solid color.

Key point: if you make a mistake and select the blue area instead of the white one, the divider in Elementor will look inverted or cropped. Always determine what exactly should be the visible shape.
Steps in Photoshop
Open the sketch in Photoshop and complete three steps:
Delete the background area that should NOT be the divider. In the example above, delete the blue part.
Fill the remaining area (the white "wave") with black. Black simplifies subsequent vector tracing; the converter does not get confused by different shades.
Crop the canvas to the shape boundaries and export to PNG. Photoshop generates SVGs with extra wrappers and artifacts, so PNG as an intermediate format is more reliable.
Why black instead of the site color right away? Elementor applies the divider color from its own settings; the SVG fill does not matter. And a black silhouette on a white background produces the cleanest vector after auto-tracing.
Result after processing in Photoshop:

Converting PNG to SVG
Next, you need a clean vector. Use the online converter pngtosvg.com; it requires no registration and handles single-color shapes without unnecessary noise in the code.
Upload the PNG and set the parameters:
Maximum simplification, one color. This removes "junk" curves and keeps the SVG compact.
Number of colors: 1 (or 2 if you need a transparent background; in that case, set the second color as transparent).
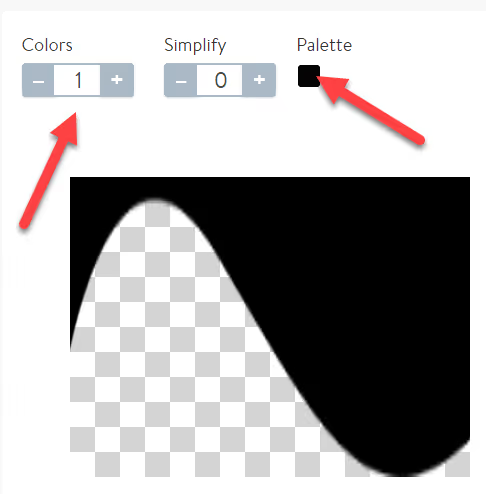
Download the resulting SVG and open it in a code editor: Notepad++, VS Code, or a plain text editor. Next comes manual cleanup.
Adjusting the SVG to Elementor requirements
To make the divider pick up the color and scale correctly, make three edits directly in the file code:
Add the class elementor-shape-fill. Without it, Elementor cannot recolor the SVG. Find the <path> or <polygon> tag and add the attribute class="elementor-shape-fill".
Remove width and height. Keep only viewBox and add preserveAspectRatio="none"; this allows the divider to stretch across the full section width. If the width/height attributes are not present, leave them alone and just make sure viewBox is there.
Remove everything unnecessary. Delete <?xml...>, <!DOCTYPE...> constructs and any XML headers outside the <svg> tag. Keep only clean code inside <svg>...</svg>; Elementor parses such files more reliably.
The final SVG should look approximately like this:
1 <svg xmlns="http://www.w3.org/2000/svg" viewBox="0 0 1200 120" preserveAspectRatio="none"> 2 <path class="elementor-shape-fill" d="M0,0 C300,100 900,0 1200,120 L0,120 Z"/> 3 </svg>
Where to place the SVG file
The crudest and most common approach is the /wp-content/plugins/elementor/assets/shapes/ folder. It works exactly until the first Elementor auto-update, which silently overwrites the plugin folder contents along with your file.
The correct approach is a child theme. Create an assets/shapes/ folder inside it and place the SVG there:
1 /wp-content/themes/your-child-theme/assets/shapes/shape-custom.svg
Almost all modern themes (Hello Elementor, GeneratePress, Astra, Kadence) support child themes. If you do not have one, create it: in the theme root, you only need a style.css with a header /* Theme Name: My Child Theme Template: parent-theme */ and a functions.php.
An alternative is a custom plugin. But for one or two dividers, a child theme is simpler and does not create extra entities.
Code for registering the divider
In the functions.php file of the child theme (or via the Code Snippets plugin), add the following code:
1 /** 2 * Registers a custom shape divider in Elementor. 3 * SVG is located in the assets/shapes/ folder of the child theme. 4 */ 5 add_filter( 'elementor/shapes/additional_shapes', function( $additional_shapes ) { 6 7 $additional_shapes['shape-custom-wave'] = [ 8 'title' => esc_html__( 'Custom Wave', 'my-child-theme' ), 9 'url' => get_stylesheet_directory_uri() . '/assets/shapes/shape-custom.svg', 10 'path' => get_stylesheet_directory() . '/assets/shapes/shape-custom.svg', 11 'has_flip' => true, 12 'has_negative' => true, 13 'height_only' => false, 14 ]; 15 16 return $additional_shapes; 17 18 } );
Key breakdown:
title: the divider name in the editor dropdown. Write in Latin characters; this is an internal identifier displayed as-is in the interface.url: the public file URL, used for editor preview.get_stylesheet_directory_uri()points to the child theme folder.path: the server path to the file. Required for server-side rendering and some checks.has_flip: enables vertical flip of the divider (the Flip button in the editor).has_negative: needed if you have two files:shape.svg(direct) andshape-negative.svg(with inverted colors). If there is no negative, set it tofalse.height_only: whentrue, Elementor only allows changing the divider height; whenfalse, width can be changed too.
The key difference from instructions floating around forums: the presence of url and path is mandatory. Without them, the divider will not render; Elementor simply will not find the file.
Important note about the divider ID
The identifier shape-custom-wave (the array key) must be unique. If another plugin registers a divider with the same key, yours will be overwritten. Always use a prefix: for example, mytheme-wave-1 instead of just wave.
Testing in the editor
After adding the code, open any page in the Elementor editor, select a section, and go to the Style tab → Shape Divider. Your divider should appear in the dropdown below the standard ones.
Test three scenarios:
- Color: change the divider color in settings. The SVG should be recolored. If not, check for the presence of
class="elementor-shape-fill"in the file. - Height: adjust the height with the slider. The divider should scale without distortion.
- Flip: if
has_flipis enabled, the flip button should be active.
If it does not appear at all, first check the URL: open get_stylesheet_directory_uri() . '/assets/shapes/shape-custom.svg' in the browser. It should display clean SVG code, not a 404.
Watch the entire process from mockup to working divider in real time; in this video the author walks through the whole path, including nuances with preserveAspectRatio and debugging broken paths:
⁉️🤔 Frequently asked questions
Will the custom divider disappear when Elementor is updated?
No, if the SVG is in a child theme or custom plugin. Elementor updates only overwrite its own folder
/wp-content/plugins/elementor/. Theme files are not touched. However, if you placed the SVG in/wp-content/plugins/elementor/assets/shapes/, it will be deleted on the first auto-update.
Can I create a divider with a gradient?
Not directly through Elementor settings; only solid colors are available there. But you can define a gradient directly in the SVG, inside
<defs>and<linearGradient>. In that case, Elementor will not recolor the shape (do not add theelementor-shape-fillclass to that path), and the divider will display with the "baked-in" gradient.
Why does the divider not appear in the editor even though there are no errors in the code?
The three most common causes: forgotten
url/pathin the registration array, a broken file path (check direct URL access), or missing theelementor-shape-fillclass in the SVG; without it, Elementor silently skips the divider.
Is Photoshop required?
No, any raster editor will work: GIMP, Figma (export to PNG), Photopea, even Paint.NET. The key is to get a clean black silhouette on a transparent or white background before converting to SVG. The tracing itself is done not in the editor, but via pngtosvg or a similar tool.
How many custom dividers can I add?
There is no quantity limit; register as many as you need in the same
add_filtercall. Each with its own key, path, and settings. The practical limit is convenience: more than 10-15 dividers in a dropdown becomes cumbersome to search through.
Is it worth the effort to create a custom shape divider
If the project is a one-off and the standard "wave" is sufficient, it is not. The built-in 26 Elementor shapes cover most typical layouts, and the time spent preparing SVG and debugging code is better invested in content.
But when the design requires an exact match to the mockup, or you have a series of sites with the same branded transition between sections, a custom divider pays off from the first use. You add it once via the child theme, and it becomes available on all pages across the network without any hassle.
The main takeaway: **do not place the SVG in the plugin folder, always specify url and path in the filter, and do not forget **elementor-shape-fill. These three points are the root of most problems that come up in forum threads and GitHub issues.

A professional team of writers and editors specializing in creating quality content.