














🗄️ How to connect Google Drive to WordPress media library: complete guide
Hosting storage isn't unlimited. Sooner or later, images, videos, and PDF files eat up all available space, and WordPress starts to slow down. The admin panel loads for 10 seconds, backups weigh gigabytes, and hosting bills grow.
You can endlessly optimize images and clean the media library. But there's a smarter way: move files to the cloud. Google Drive gives 15 GB for free, and that's enough for most sites for years ahead. Files remain accessible directly from the WordPress media library, as if they were stored on the server.
We'll show you how to connect Google Drive to the WordPress media library in two ways: through a free plugin (simple) and through manual Google API setup (full control).
💡 How to connect Google Drive to the WordPress media library
- Upload images to Google Drive and place them in a separate folder for site media files.
- Share the folder ("Anyone with the link"), so files are publicly readable.
- Get a direct link to each image through the Google Drive file ID.
- Install the External files in Media Library plugin and the Google Drive add-on.
- Authorize the connection and select files from Drive, they'll appear in the WordPress media library.
- Insert images into posts like regular media files while physically storing them in the cloud.
Why move media files to Google Drive
The standard WordPress media library stores everything on the server. While there are few files, there are no problems. But when the count reaches hundreds and thousands, difficulties begin.
Hosting providers cut storage even on "unlimited" plans. Fine print almost always includes limits: by total number of files (inodes) or by database size. Images and videos are the main consumers of both.
Server bandwidth isn't infinite either. Each image load consumes bandwidth. If someone hotlinks to your image, traffic doubles. On cheap hosting, this ends either with an additional bill or temporary site blocking.
Google Drive solves both problems:
- Files are stored in the Google cloud, not on your server. 15 GB free, images up to 2048×2048 pixels don't count toward the quota.
- Traffic goes through Google's infrastructure, your hosting isn't in the chain.
- You can give team access to files on Drive, and editors can upload images without entering the WordPress admin panel.
There's also a downside: Google Drive doesn't automatically generate image thumbnails, unlike the built-in media library. If your theme uses multiple sizes, you'll need to either upload them manually or use a plugin that can create thumbnails on the fly.
Step 1: Connecting through the free External files in Media Library plugin
The easiest way to integrate WordPress with Google Drive is the External files in Media Library plugin. It's free, actively updated, and supports dozens of external sources: Google Drive, AWS S3, Dropbox, FTP, and even other WordPress sites.
The plugin adds a new item to the media library, "Add external file." You paste a link to a file in Google Drive, and it appears in the library alongside regular uploads. You can insert it into posts, use it in galleries, and even import into WooCommerce as product images.
Important: to connect Google Drive, you'll need to install an additional service plugin from the same developer, "External files from Google Drive in Media Library." It adds Google Drive to the list of available sources and lets you browse folders directly from the admin panel.
Steps:
- Install and activate External files in Media Library.
- Install and activate the Google Drive add-on.
- Go to Media → Add External Files, select Google Drive, and authorize the connection.
- After authorization, you'll see the Google Drive folder structure directly in the WordPress admin panel.
- Select files and click "Add," they'll appear in the media library.
The plugin also supports bulk directory import and automatic scheduled synchronization. Files can be either linked (they stay on Drive) or physically imported to the server, your choice.
Step 2: Manual setup through Google Cloud Console
If you prefer working directly with the Google API, here's a step-by-step guide. This method requires more steps but gives full control over what and how you connect.
There used to be a popular Google Drive WP Media plugin for this scenario, but it was closed in February 2025 due to a vulnerability and hadn't been updated for over 9 years. Don't use it, it's unsafe. The Google API setup process described below is universal and works with any modern integration plugin.
Step 1: Create a project in Google Cloud Console
Go to Google Cloud Console and create a new project. Name it so you don't confuse it with others later, for example, by site domain.
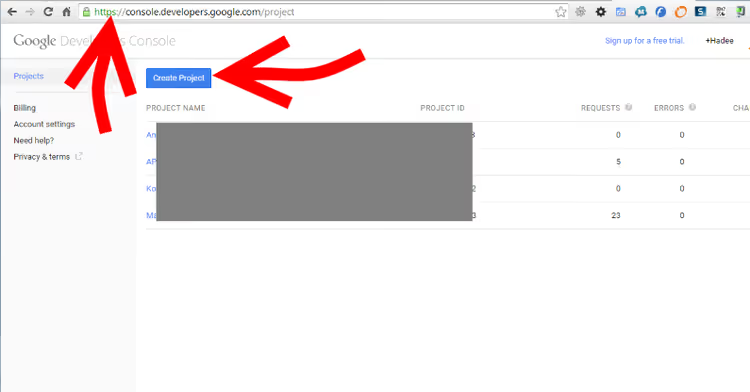
If this is your first time in the console, click "Create Project" and enter a name. It's better to create a separate project for each site, so you isolate access and in case of problems, only one site suffers, not all at once.
Step 2: Enable Drive API
After creating the project, open the side menu → APIs & Services → Library. Find "Google Drive API" and click Enable.
Step 3: Create service account credentials
Go to APIs & Services → Credentials → Create Credentials → Service Account. Give the account a name and save.
The system will offer to download a JSON file with the private key, save it in a secure place. This file will be needed by the plugin to access your Drive.
Copy two values to a notepad: Client ID and Email of the service account. They'll be useful when configuring the plugin.
Step 4: Upload the key to Google Drive
Open Google Drive, create a separate folder (for example, "Google API Keys"), and upload the JSON file with the private key to it.
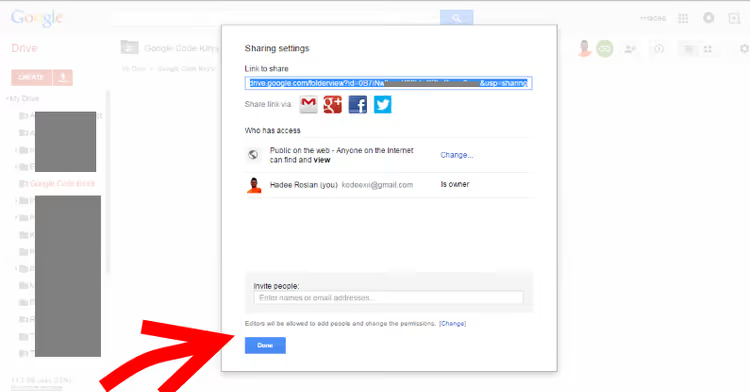
Set up public access to the folder, "Public on the web." This is needed so the plugin can read the key.
Open the "Details" panel, find the link to the folder in the Hosting section, and copy it. Then right-click on the key file inside the folder and copy the direct link to the file. Write it down in the same notepad.
Step 5: Configure the plugin
In the WordPress admin panel, go to Media → Google Drive WP Media (or the equivalent section of your plugin) and fill in the fields:
- Client ID, from Google Cloud Console
- Service Account Email, the service account email
- Private Key URL, direct link to the JSON file in Google Drive
Click "Save." If all data is correct, the plugin will connect to Google Drive.
Step 6: Create a folder for WordPress media files
In the plugin interface, create a new folder on Google Drive, for example, yourdomain-WPMedia. All files uploaded through the plugin will go here.
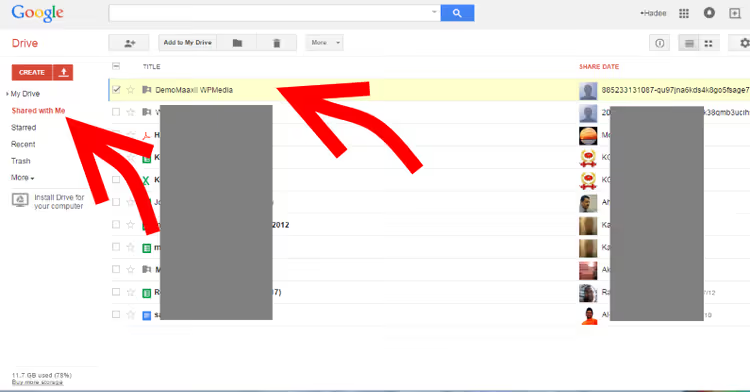
If desired, you can create multiple folders for different content types and select the needed one when uploading.
Step 7: Upload files
Now everything is ready. To upload an image or document:
- Open Media → Google Drive WP Media → Upload.
- Select files from your computer.
- Optionally add a description.
- Check "Add to media library."
- Click "Upload to Google Drive."
The file will be sent to Google Drive and simultaneously appear in the WordPress media library. When editing a post, you can use the standard "Add Media" button, files uploaded to Drive are visible in the general library.
If you enable the "Google Drive as default media location" option, all standard uploads through the media library will automatically be saved to Google Drive, a separate upload tool won't be needed.
Limitation: thumbnails are not created
This approach has an important nuance. The standard WordPress media library automatically creates 3-4 thumbnails of different sizes when uploading an image. Plugins working through Google Drive don't do this, the image is stored in a single, original size.
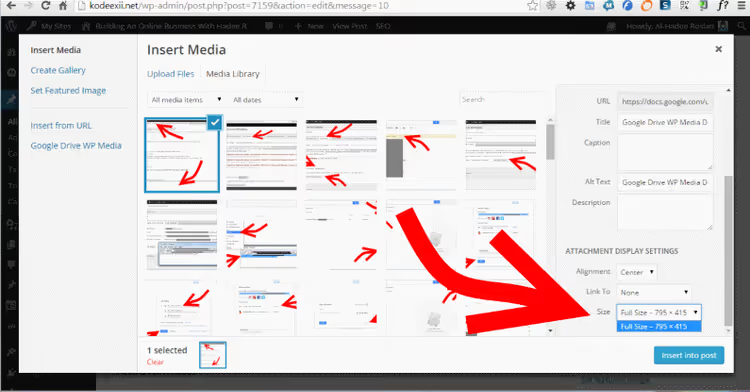
If your theme actively uses thumbnails (for example, in post grids or sliders), there are two solutions:
- Prepare images in the needed sizes in advance and upload them manually.
- Use a plugin that can generate thumbnails on the fly, for example, WP Media Folder from JoomUnited with the Google Drive cloud addon. It's paid but completely solves the problem: both synchronization with Drive and thumbnails work out of the box.
Video tutorial
If you prefer watching over reading, here's a visual guide to connecting Google Drive to the WordPress media library:
⁉️🤔 Frequently asked questions
Is it safe to store site images on Google Drive?
Yes, provided you configured access correctly. The folder with files should be publicly readable, but store the API private key (JSON file) in a separate protected folder. Google Drive security is the security of your Google account. Enable two-factor authentication, don't share the password with third parties, and use a separate service account with minimum necessary permissions for the site.
What happens to images if Google Drive becomes unavailable?
Images will temporarily not load on the site, instead alt texts or placeholders will show. This happens rarely (Google Drive has 99.9%+ uptime), but it's worth having backup: keep local backups of critical images or use a CDN proxy that caches files. Mass Google Drive outages occur no more than once every few years and usually last minutes, not hours.
Can Google Drive be used for video on WordPress?
Technically yes, but in practice it's inconvenient. Google Drive isn't optimized for streaming: video loads slowly, there's no adaptive bitrate, and the player looks foreign. For video, it's better to use YouTube or Vimeo, they both stream fast and provide an embedded player. Google Drive is ideal for images, PDF files, ZIP archives, and documents.
Is there a way to automatically sync a Google Drive folder with the media library?
Yes, both described methods support this. External files in Media Library can sync on a schedule, you specify the interval and the plugin automatically pulls new files from Google Drive into the media library. WP Media Folder also supports two-way synchronization: upload a file to Drive, it appears in the media library, delete in the media library, it's deleted on Drive too. For large volumes, External files in Media Library is more convenient: it supports WP CLI for bulk import.
Why shouldn't you use the old Google Drive WP Media plugin?
The plugin was closed on WordPress.org in February 2025 with a "Security Issue" label. It hadn't been updated for 9 years, was only tested up to WordPress 4.7.33, and contains unresolved vulnerabilities. Installing such a plugin on a modern site is a direct path to being hacked. 46 reviews in the repository aren't a reason to risk security. Replace it with External files in Media Library or WP Media Folder.
What to install on a site in 2026
The final choice depends on how many files you upload and whether thumbnails are needed.
If the site is small and thumbnails aren't critical, use External files in Media Library. Free, actively updated, supports many sources, and Google Drive connects in 5 minutes through the service plugin. For 90% of tasks, this is more than enough.
If your theme is tightly tied to thumbnails and you upload dozens of images weekly, look at WP Media Folder. It's paid but saves hours of manual work with sizes and synchronization. The cloud addon connects Google Drive automatically, without manual fiddling with API keys.
And the old Google Drive WP Media, delete it if you still have it installed. Nine years without updates and closure due to a vulnerability is a final verdict.
And most importantly: whatever plugin you choose, set up Google two-factor authentication for the main account. Cloud storage is only as secure as your Google account is protected.

A professional team of writers and editors specializing in creating quality content.