













 AIIllustrative image: AI-generated
🖥 How to turn on your computer from anywhere in the world: setting up Wake-on-LAN with Android and Raspberry Pi
You urgently need a file from your home computer, yet you are hundreds of kilometers away. Or you want to start a heavy task before you get home. Sound familiar?
Wake-on-LAN theoretically solves this problem. One "magic packet" and the machine powers on. In practice, though, everything hinges on the router: most home models either cannot forward WoL packets from the internet or do so unreliably.
We have put together a working method that bypasses the limitations of a typical ISP router. You do not need an expensive router with magic packet forwarding support. You need a Raspberry Pi (or any Linux server running 24/7), an Android phone, and two apps.

💡 Quick overview:
- Set up port forwarding on the router: 22 for the PC and 2222 for the Raspberry Pi
- Enable Wake-on-LAN in BIOS and the network adapter driver, obtain the MAC address
- Install OpenSSH Server on Windows and Etherwake on the Raspberry Pi
- Create two tasks in Tasker: sleep mode and PC wake-up via SSH
- Place both buttons as widgets on the Android home screen
How it works
The scheme is simple. You tap a Tasker widget on your phone's home screen. The SSH Tasker plugin connects via SSH to the Raspberry Pi over the internet. The Raspberry Pi sends a local Wake-on-LAN packet to your computer, and it powers on.
The second button does the opposite: it connects via SSH directly to Windows and runs the shutdown -h command for sleep mode.
Why doesn't a simple "WoL for Android" app work? Because Wake-on-LAN is designed as a local protocol. A magic packet is a broadcast frame that the router does not route to the WAN by default. You need an intermediary inside the network (a Raspberry Pi or another always-on server) to receive the command from the internet and send the packet locally.
What you will need:
An Android phone with Tasker and SSH Tasker Plugin installed
A router with port forwarding capability (the vast majority of models have this)
A Raspberry Pi or any home Linux server running around the clock
A desktop PC with Windows 10 or 11, connected via Ethernet (Wi-Fi adapters rarely support WoL)
Step 1: port forwarding on the router
The only thing required from the router is opening two ports for incoming SSH connections. Magic packet forwarding is NOT needed; the Raspberry Pi will handle that.
Log into the router's web interface and find the Port Forwarding section. The exact location depends on the model; instructions for your router are easy to find via search.
Create two rules:
Port 22 → local IP address of the Windows desktop PC. To prevent the address from changing after a reboot, reserve it in DHCP settings (usually called DHCP Reservation or Static Lease)
Port 2222 → local IP address of the Raspberry Pi. Reserve it the same way
Port 2222 is not chosen for "security through obscurity" but simply to separate two devices behind a single external IP. Each device gets its own port.
Step 2: accessing the home network from the internet
To connect from outside, you need to know the external IP address assigned by the ISP. If the address is dynamic (and for most people it is), it changes once a day or when the router restarts.
The solution is dynamic DNS. On the Raspberry Pi, which is already running 24/7, you can set up a DDNS client. Cloudflare provides an API for updating DNS records, and cloudflared or a Python script can handle the automation. After setup, you will have a permanent address like home.example.com that always points to your network's current IP.
If you do not want to set up DDNS, check whether your ISP offers a static IP as an add-on service. But DDNS on a Raspberry Pi is free and runs for years without intervention.
Step 3: preparing the computer for wake-up
Enabling WoL in BIOS/UEFI
Reboot the PC and enter BIOS (usually the Del, F2, or F10 key during startup). Find the Wake-on-LAN or Power On by PCI-E setting and enable it. BIOS interfaces vary among different manufacturers; if you cannot find the option, search for instructions specific to your motherboard model.
Configuring the network adapter in Windows
The network adapter can also block wake-up. Check the following:
Press Win + R, type
ncpa.cpl, and press Enter to open the "Network Connections" windowRight-click the Ethernet adapter → Properties → Configure button → Advanced tab
Find Wake on Magic Packet in the list and set the value to Enabled
Go to the Power Management tab and enable both checkboxes: "Allow this device to wake the computer" and "Only allow a magic packet to wake the computer"
Obtaining the MAC address
The MAC address is the "destination" for the magic packet. Without it, wake-up will not work.
Press Win + R, run cmd /k ipconfig /all. Find the Ethernet adapter and copy the "Physical Address" line; it looks like 01-23-45-67-89-AB. Replace the hyphens with colons: 01:23:45:67:89:AB. This is the exact format Etherwake requires.
Step 4: installing the SSH server on Windows
OpenSSH Server is built into Windows 10 and 11 but is not installed by default. Open Settings → System → Optional Features → Add a feature. Find OpenSSH Server and click Install.
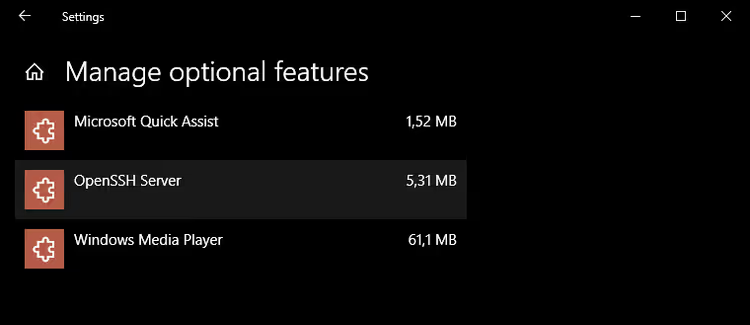
After installation, restart the computer. Then press Win + R, type services.msc, and find the OpenSSH SSH Server service. Open its properties and set the startup type to Automatic (Delayed Start). Start the service.
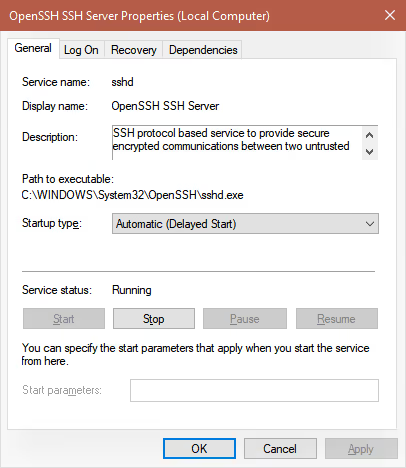
If the service does not start, verify that Windows is updated to the latest version. In older Windows 10 builds, OpenSSH Server was a beta feature and worked unreliably.
Password for SSH access to Windows
SSH requires authentication. The simplest approach is to use your Windows account password. If you normally log in without a password (automatic login), you need to set one.
The SSH password must be strong: it opens full access to the computer from the internet. Use at least 12 characters with mixed-case letters and numbers.
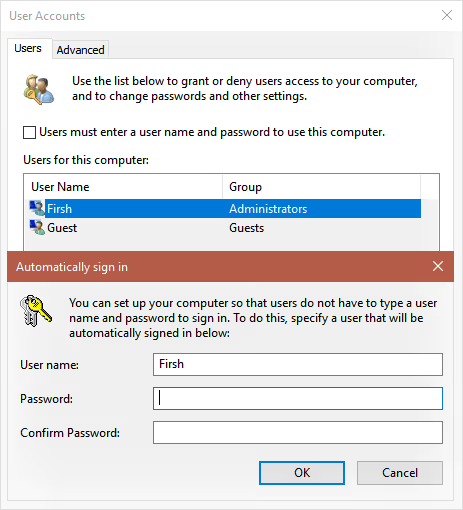
If you do not want to enter a password every time the PC starts, set up automatic login: Win + R → netplwiz → uncheck "Users must enter a user name and password to use this computer" → enter the password twice.
Step 5: configuring the Raspberry Pi
Enabling SSH and changing the port
If the Raspberry Pi runs Raspberry Pi OS (formerly Raspbian), enable SSH via Menu → Preferences → Raspberry Pi Configuration → Interfaces tab: set the SSH toggle to Enabled.
Now change the port from 22 to 2222. Open a terminal and run:
1 sudo nano /etc/ssh/sshd_config
Find the line #Port 22, uncomment it (remove the #), and replace 22 with 2222:
1 Port 2222
Press Ctrl + X, then Y, and Enter to save. Reboot the Raspberry Pi.
Installing Etherwake
Etherwake is a tiny utility that sends a magic packet over the local network. Install it with a single command:
1 sudo apt-get install etherwake
Test it: shut down or put the PC to sleep and run from the Raspberry Pi:
1 sudo etherwake 01:23:45:67:89:AB
Replace 01:23:45:67:89:AB with your computer's actual MAC address (obtained in step 3). If the PC powers on, everything is configured correctly. Do not proceed until this test passes.
Raspberry Pi password
The SSH username is pi (not root). Set a password if you have not already. Simply run passwd in the terminal. Unlike the Windows password, this one will not complicate your daily routine; you only enter it during setup.
Step 6: configuring Android
Installing Tasker and SSH Tasker Plugin
You will need two paid apps from Google Play:
Tasker, an Android automation platform capable of far more than just running commands
SSH Tasker Plugin, a plugin that adds an SSH connection action to Tasker with the ability to save multiple connections
We have not found reliable free alternatives to the Tasker + SSH Plugin combination. Tasker pays for itself through dozens of automation scenarios, and the plugin is worth its price for stability.
After installation, Tasker will appear in the notification bar. As long as you are not using triggers and sensors, constant operation is unnecessary. Disable the persistent notification: Settings → Monitor → uncheck "Run in Foreground" and "Show Notification Icon".
Task for sleep mode
Create a task that will send the PC to sleep or shut it down:
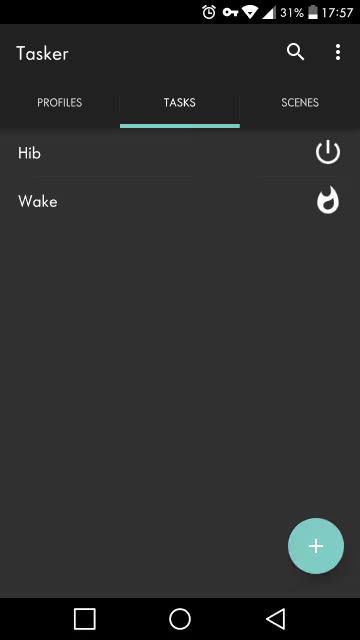
Open the Tasks tab, tap +, and name the task (for example, Hibernate)
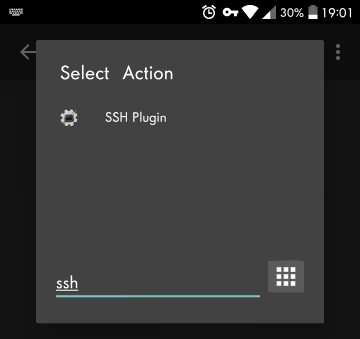
Add an action: tap + → type
sshin the filter → select SSH Plugin
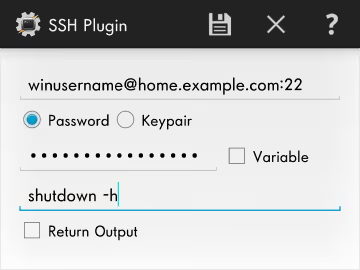
- Tap Configuration and fill in the fields:
1 Address: winusername@home.example.com:22 2 Password: your Windows password 3 Remote Command: shutdown -h
winusername is your Windows account name. home.example.com is your DDNS domain (replace with the actual one). Port 22 is the one forwarded to the PC in step 1.
For a full shutdown instead of sleep, use the command shutdown -f.
Task for waking the computer
Create a second task named Wake:
Add an SSH Plugin action and tap Configuration
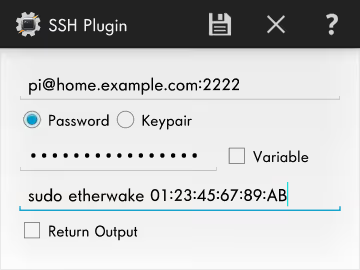
Fill in the details for the Raspberry Pi:
1 Address: pi@home.example.com:2222 2 Password: password for the pi user on the Raspberry Pi 3 Remote Command: sudo etherwake 01:23:45:67:89:AB
Note that the port is 2222, the username is pi, and the command is sudo etherwake with your PC's MAC address.
Widgets on the home screen
All that remains is to place both tasks as buttons. Long-press an empty spot on the home screen → Widgets → find Tasker → select Task (not "Task Shortcut," which works worse). Choose the Wake task, then repeat for Hibernate.

The buttons work over mobile data; they do not need Wi-Fi. All communication goes via SSH through the external IP address.
Alternative: SSH client for manual execution
If you do not want to pay for Tasker and entering two commands manually is not a problem, install an SSH client. JuiceSSH was unfortunately removed from Google Play at the end of 2025, but alternatives exist: ConnectBot (free, open source) or Termius. They let you save connection details for the PC and Raspberry Pi. To wake the computer, open the connection to the Raspberry Pi and type sudo etherwake <MAC>; to shut down, connect to Windows and type shutdown -h.
One-tap widgets are not available in the free versions, and Termius's paid subscription costs more than buying Tasker outright. But keeping an SSH client as a backup tool for ad-hoc SSH commands is useful.
Video: step-by-step Wake-on-LAN setup via Android
A detailed video tutorial in English, from enabling WoL in BIOS to sending the packet from your phone:
⁉️🤔 Frequently asked questions
Does this method work with Windows 11?
Yes, all steps are identical. OpenSSH Server in Windows 11 is installed the same way via "Optional Features." The
ncpa.cplandservices.mscinterfaces have not changed. In some Windows 11 24H2 builds, port 22 is blocked by the firewall by default; add an inbound rule for port 22 in Windows Defender Firewall, otherwise Tasker will not connect to the PC.
Can I do without a Raspberry Pi?
You can if your router is capable of forwarding WoL packets from the WAN and has static ARP. Routers with OpenWrt, ASUSWRT-Merlin, or MikroTik allow this. On stock firmware from a typical ISP router, chances are slim, which is exactly why we added the Raspberry Pi as an intermediary. The router option is cheaper, but the Raspberry Pi gives full control and opens up dozens of other scenarios, from VPN to Pi-hole.
Why can't I use Wi-Fi instead of Ethernet?
Wake-on-LAN over Wi-Fi (Wake on Wireless LAN) exists but works unreliably. Most Wi-Fi adapters disable the radio chip in sleep mode and stop listening to the network. An Ethernet adapter remains on standby power and responds to a magic packet reliably. If the PC is far from the router, powerline adapters can provide an Ethernet connection over the electrical wiring.
Do I have to pay for Tasker and the plugin?
Tasker and SSH Tasker Plugin are paid apps but cost very little (check Google Play in your region for the exact price, as it varies by currency). There are no direct free replacements that work just as reliably. As a compromise, use ConnectBot (a free SSH client) for manual command entry, but you will not have one-tap buttons.
How secure is this?
The SSH tunnel is encrypted. The main risk points are that the password must be strong (especially on Windows, since it opens full access to the PC), and ports 22 and 2222 should not be used for anything else. For additional protection, you can switch to SSH keys instead of passwords, but that will complicate the Tasker setup.
What if the ISP uses CGNAT?
Behind CGNAT (Carrier-Grade NAT), the external IP address is unavailable for incoming connections, so port forwarding will not work. Solutions include requesting a public IP from the ISP (often for a small additional fee), using IPv6 (if supported on both ends), or setting up a tunnel via Tailscale/ZeroTier on the Raspberry Pi.
Is it worth the effort
The described chain looks cumbersome but can be assembled in an hour or an hour and a half. The result is two buttons on your phone that physically turn your PC on and off from anywhere with internet access. No middlemen, no subscriptions.
The most common scenario: you are on vacation and need a file from your home computer. Tap the Wake button, wait a minute, connect via remote desktop (Chrome Remote Desktop, VNC, or similar), and work as if you were at your desk. When finished, tap Hibernate.
Beyond that, the field is wide open for automation. Add a geolocation trigger in Tasker: as you approach home, the PC turns on automatically. Attach an NFC tag by the front door: tap your phone against it, and the PC goes to sleep. That is what Tasker is designed for.
If the method seems too complicated, start with the Raspberry Pi and Etherwake. Verify that the sudo etherwake <MAC> command wakes the PC locally. That is half the battle. The rest is sequentially adding links: DDNS, ports, Tasker.

A professional team of writers and editors specializing in creating quality content.