














🛟 How to restore WordPress from a backup: cPanel, FTP, plugin, phpMyAdmin
Your site is down. A white screen, a 500 error, or worse, a clean WordPress installation without a single page of yours. The hosting provider shrugs, and there's no "just in case" backup. Sound familiar?
But if you do have a backup, it's too early to panic. WordPress can be restored from a backup using four proven methods, and none of them require a server administrator. Access to the admin panel, cPanel, or FTP is enough.
We've compiled step-by-step instructions for all four methods: from the built-in XML import to manual file upload via FileZilla. Choose the one that matches the backup you have, and bring your site back to life.
💡 Quick overview:
- Restore your site using WordPress Importer if you have a WXR file from "Tools → Export"; the process takes 5-10 minutes.
- Use ManageWP for one-click restoration from the cloud if the Worker plugin was connected beforehand.
- Upload a
.sqldump via phpMyAdmin when the database is corrupted but site files are intact. - Use cPanel Backup to upload the database or home directory; the most reliable method when you have access to the hosting panel.
- Connect via FTP through FileZilla and upload files manually when the hosting panel is unavailable but you have FTP access.
Restoring via the WordPress Importer plugin (XML)
The simplest scenario: you wisely made an export via "Tools → Export" in the WordPress admin panel and received a WXR file with the .xml extension. This file contains posts, pages, comments, tags, and links to media files, but not the files themselves from the wp-content/uploads folder.
For restoration, you need the official WordPress Importer plugin. It's free and can be installed from the WordPress repository in a minute.
Step by step:
Install a clean WordPress on your hosting (if the site was completely deleted). Without the core, there's nowhere to import to; WXR doesn't contain system files.
Go to "Plugins → Add New", search for
WordPress Importer, install and activate it.Navigate to "Tools → Import", click "WordPress" and select your
.xmlfile.On the import screen, check the "Download and import file attachments" box; WordPress will attempt to download media files from URLs in the backup. This only works if the original site is still live and serving images.
Click "Submit" and wait for completion. For large files (over 10-15 MB), the process may take several minutes.
Limitation: XML files larger than the PHP maximum upload size won't go through. Check the limit in "Media → Add New", where max_upload_size is displayed. If your backup is larger, increase the limit via php.ini or .htaccess, or contact your hosting support.
Restoring via ManageWP (cloud service)
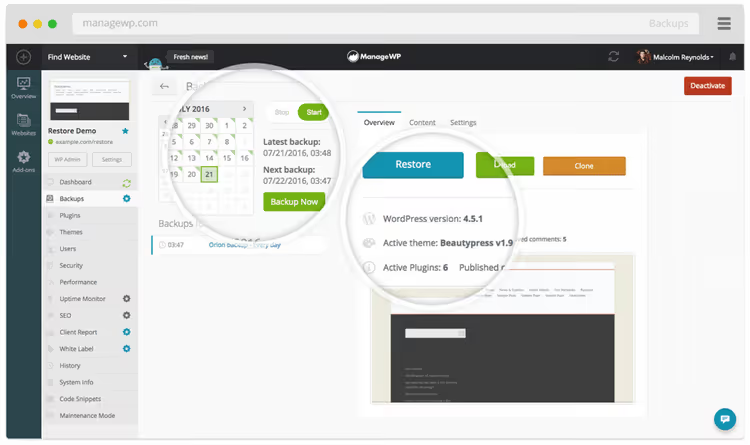
ManageWP is a GoDaddy cloud platform for centralized management of dozens of WordPress sites. The free tier includes monthly automatic backups with cloud storage; premium backups ($1 per month per site as of June 2026) add manual snapshots and flexible scheduling: daily, hourly, or on demand.
The ManageWP Worker plugin is required on each site. After connecting to the managewp.com panel, restoration takes three clicks:
- In the ManageWP dashboard, select the site you need to restore.
- Click "Backups" and choose the desired restore point.
- Click "Restore" and wait for the "Website restored successfully" message.
The backup is stored off-server, so restoration works even if the hosting is completely down. The downside is obvious: ManageWP needs to be connected in advance. If there are no backups in the panel, this method isn't for you; proceed to the manual options below.
Restoring via phpMyAdmin (database only)
If you have a .sql file (a database dump) and the theme and plugin files are in place, you only need to restore the content. Access to phpMyAdmin is available in any cPanel (under "Databases").
Full restoration of the entire database:
- Open phpMyAdmin and select the WordPress database in the left column.
- In the top menu, click "Import".
- Click "Choose File" and select your
.sqlbackup. - Scroll down and click "Go". The process will overwrite all tables with data from the backup.
Restoring a single table:
Situation: only wp_posts or wp_options is corrupted, everything else is intact. In that case:
- In the left column of phpMyAdmin, find the needed table and click on it.
- Click "Empty" (Truncate) to delete the current data.
- Then click "Import" and upload the
.sqlfile specifically for that table.
Key warning: phpMyAdmin only works with the database. The theme, plugins, media files, and WordPress core are in the file system. If the wp-content folder is damaged or missing, a .sql file alone isn't enough; you need a full backup (cPanel or FTP methods below).
Restoring via cPanel Backup
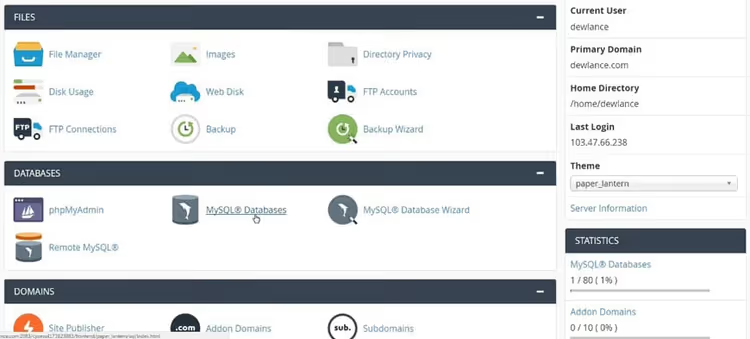
Many hosting providers create automatic backups via cPanel. If your plan includes backup services, the "Backup" (or "Backup Wizard") section contains archives ready for download.
cPanel offers two types of partial backups:
- MySQL Database Backup: a separate database dump (similar to
.sqlfrom phpMyAdmin). Restored by uploading in the same section. - Home Directory Backup: an archive of
public_htmlfiles, which includes themes, plugins, media files, and the WordPress core.
Restoration order: first upload the home directory, then the database. If you do it the other way around, the restored content may reference files that haven't been uploaded yet.
A Full cPanel backup includes the domain, subdomains, databases, email, SSL certificates, and configuration. However, you cannot restore it yourself through cPanel; only a server administrator can do this via WHM. If you have a full backup, contact your hosting support.
Restoring via FTP (manual file upload)
The last resort when the hosting panel is unavailable. You need an FTP client (the free FileZilla for Windows/Mac/Linux) and an FTP account, which you create in cPanel or obtain from hosting support.
Sequence of actions:
- Launch FileZilla and enter the connection details: host (usually
ftp.your-domain.comor the server IP), username, password, and port (21 for regular FTP, 22 for SFTP). - After connecting, files on your computer are on the left, the server is on the right. Find the
public_htmlfolder (orwww) on the server. - Drag the backup files from the left panel to the right. FileZilla will ask about overwriting; confirm for all files.
- Wait for the transfer to complete. Large backups (hundreds of megabytes) take tens of minutes to upload.
Important note: an FTP backup is files only. The database (.sql) must be restored separately via phpMyAdmin, as described above. Without the database, the site won't work; WordPress stores content and settings in it.
This 15-minute tutorial demonstrates in practice full backup and WordPress restoration using the Duplicator plugin, an alternative method that creates a migration archive (files + database) and doesn't require manual work with FTP and phpMyAdmin.
⁉️🤔 Frequently asked questions
Which restoration method should I choose?
If you have a WXR file from "Export", use WordPress Importer. If ManageWP was connected beforehand, three-click restoration from the cloud. If you only have a
.sqlfile, phpMyAdmin. If you have a full backup with files, cPanel Backup. If the hosting panel is unavailable but you have FTP access and a copy of public_html, manual upload via FileZilla plus separate database restoration. Combine methods based on what you actually have on hand.
Can I restore a site without the database?
No. The database (
.sql) contains content, settings, users, and the "page → template" mapping. Files are just the shell. Without the database, WordPress will create an empty site during installation and prompt you to go through the five-minute setup again.
What should I do if the backup is over a year old?
Restore it, then immediately update WordPress, plugins, and the theme to current versions. Older plugin versions may contain vulnerabilities; after restoration, check the site for security issues and run a full update from the admin panel.
How long does restoration take?
XML import: 5-15 minutes depending on size. ManageWP: 2-5 minutes. phpMyAdmin: 1-5 minutes. cPanel Backup: 5-15 minutes for upload. FTP: 10-40 minutes with a good connection. Full restoration of a large site (a gigabyte or more) via FTP + phpMyAdmin can take an hour or longer.
Why does the site look different after restoration?
Most likely, the
wp-content/uploadsfolder with media files wasn't uploaded. WXR import downloads images only if the original site is still live and serving them via URL. For manual restoration, verify that theuploadsfolder was completely copied towp-content. Also, after restoration, go to "Settings → Permalinks" and simply click "Save"; this resets the route cache.
What to do right now if your site is down
No panic and no chaotic clicking. Here's the action plan:
Check what you have available. Go to your hosting email and search for backup messages. Open cPanel → Backup and see if there are any ready archives. Check whether ManageWP or another backup service is connected.
Determine the backup type and choose the appropriate method above.
.xml→ WordPress Importer..sql→ phpMyAdmin.public_htmlarchive → cPanel or FTP. Nothing available → contact your hosting support, as they often store backups on their end.Restore files first, then the database. This is the golden rule: file structure first, then data. Otherwise, content will reference non-existent resources.
After restoration, update everything. WordPress, plugins, and the theme must be current. Run a site check through Site Health (a built-in tool in the WordPress admin panel) and make sure everything is green.
And most importantly, set up automatic backups right now if you haven't already. The free BackWPup sends backups to the cloud on a schedule. The more advanced WPvivid can migrate a site between domains with one click. We've covered both options in detail in separate guides; configure one of them so that the next time your site goes down, it's not a catastrophe but simply an occasion to calmly click "Restore".

A professional team of writers and editors specializing in creating quality content.