














⚙️ How to enable GZIP compression in WordPress: a complete guide
The site takes 4 seconds to open, and the visitor leaves. Sound familiar? More often than not the problem is not in the hosting or in images. Pages simply weigh more than they should because the server delivers them "as is" without compression.
GZIP compression cuts the size of HTML, CSS and JavaScript by 60-80% before they fly to the browser. For WordPress this is not a heavyweight plugin with lots of settings, but one directive in the config or a checkbox in the admin panel. According to W3Techs, compression is used by more than 85% of websites on the internet, and if your site is not among them, you are losing search rankings and conversions for no reason at all.
Below are seven working ways to enable GZIP: from manual editing of.htaccess to a couple of clicks in a plugin. At the end I will show you how to check the result and go over common questions about compatibility with CDN, Brotli and caching.
💡 Quick overview:
- Add compression code to
.htaccessvia FTP - Write
gzip onandgzip_typesinnginx.conf - Enable compression with a checkbox in W3 Total Cache or WP Rocket
- Check the result in Chrome DevTools or GiftOfSpeed
What is GZIP compression and why does a WordPress site need it
GZIP is a compression algorithm that works at the server level: before sending to the browser it "packs" text files into a more compact form. The browser unpacks them on the fly and renders the page as usual. The user notices no difference, while the volume of transmitted data is reduced several times over.

What exactly gets compressed: HTML page code, CSS stylesheets, JavaScript scripts, XML files, fonts and SVG. GZIP does not touch images; there are separate compression formats for them (WebP, AVIF) and optimization plugins.
The difference in numbers is easy to see in Chrome DevTools: the same page before and after compression differs in size by two to three times. Multiply that by the number of visitors per month and you get serious savings in traffic and load time.
An important nuance: GZIP is not the only option. Modern servers support Brotli, an algorithm from Google that compresses text files 15-25% better than GZIP. But Brotli is not available on all hosting providers, while GZIP works everywhere including the oldest configurations. Therefore it is always worth starting with GZIP, and connecting Brotli as the next level when the base is ready.
Method 1: via.htaccess on Apache
The most common scenario: the site runs on Apache, and all you need to do is add a few lines to the .htaccess file in the site root.
Where is.htaccess located. Connect to the server via FTP (for example through FileZilla) or go to the hosting file manager. In the root folder of the site (where wp-config.php and the wp-content, wp-admin folders are located) find .htaccess. Download it to your computer; we will edit locally so that in case of an error you can quickly roll back.
What to add. Open .htaccess in a text editor (Notepad++, VS Code, Sublime Text) and add the following block BEFORE the lines # BEGIN WordPress:
1 <IfModule mod_deflate.c> 2 AddOutputFilterByType DEFLATE text/html text/css text/javascript 3 AddOutputFilterByType DEFLATE application/javascript application/x-javascript 4 AddOutputFilterByType DEFLATE application/rss+xml application/xml application/xhtml+xml 5 AddOutputFilterByType DEFLATE image/svg+xml image/x-icon 6 AddOutputFilterByType DEFLATE font/ttf font/otf font/opentype application/x-font-ttf 7 AddOutputFilterByType DEFLATE application/vnd.ms-fontobject 8 9 BrowserMatch ^Mozilla/4 gzip-only-text/html 10 BrowserMatch ^Mozilla/4.0[678] no-gzip 11 BrowserMatch bMSIE !no-gzip !gzip-only-text/html 12 Header append Vary User-Agent 13 </IfModule>

What is happening here. The block <IfModule mod_deflate.c> checks whether the mod_deflate module is enabled on the server (on most hosting providers it is enabled by default). The AddOutputFilterByType DEFLATE directives specify which file types to compress. The BrowserMatch lines are a crutch for old versions of Internet Explorer that prevents gzip bugs in IE6 and below. Header append Vary User-Agent tells proxy servers to take the user's browser into account when caching.
Save the file and upload it back to the server with replacement. Before this be sure to make a backup copy of the original .htaccess; if the site goes down simply return the old version and everything will work as before.
If after uploading the site throws error 500, check whether there are extra spaces or line breaks before <?php or after closing tags in the file. An error in .htaccess breaks the entire site, so it is better to make edits one at a time and check after each one.
Method 2: on an NGINX server
NGINX handles compression differently than Apache. There is no .htaccess here, and all settings are written in the nginx.conf file or in the configuration file of a specific site (usually in /etc/nginx/sites-available/).
Add or uncomment the following lines in the http or server section:
1 gzip on; 2 gzip_vary on; 3 gzip_min_length 1000; 4 gzip_comp_level 6; 5 gzip_types text/plain text/css text/javascript 6 application/javascript application/x-javascript 7 application/rss+xml application/xml application/xhtml+xml 8 image/svg+xml image/x-icon 9 font/ttf font/otf application/x-font-ttf 10 application/vnd.ms-fontobject; 11 gzip_disable "MSIE [1-6]\.(?!.*SV1)";
After making changes check the config syntax with the command nginx -t and reload NGINX: sudo systemctl reload nginx.
The parameter gzip_comp_level 6 is a compromise between compression level and processor load. A value of 1 is minimum compression, 9 is maximum. In practice level 6 provides almost the same savings as 9 but consumes noticeably fewer server resources.
Method 3: on an IIS server (Windows Server)
IIS is a Microsoft web server used on Windows hosting. Enabling compression here is done in two ways: through the graphical interface or command line.
Through the IIS interface. Open IIS Manager. In the "Components" → "Services" section find "Compression". Check the boxes "Enable static content compression" and "Enable dynamic content compression". On the "Actions" panel click "Apply".
Through the command line (as administrator):
1 :: Static compression 2 appcmd set config /section:urlCompression /doStaticCompression:True 3 4 :: Dynamic compression 5 appcmd set config /section:urlCompression /doDynamicCompression:True
Static compression caches already compressed versions of files on disk, saving processor time. Dynamic compression compresses responses "on the fly" and is suitable for personalized pages but loads the processor. In practice for WordPress both modes are enabled: static handles CSS/JS while dynamic handles the HTML of each page.
Method 4: through the hosting provider panel
Most modern hosting providers enable GZIP by default. If you are on cPanel, go to the "Site Optimization" or "Performance" section and look for the "Compression" or "Compress content" toggle. On Plesk the path is similar: "Performance" → "Output Compression".
If you cannot find the toggle, write to hosting support. This is a standard request; technical support answers it in minutes and often enables compression at the server level in one response. You do not need to explain what GZIP is; it is enough to write "Please enable GZIP compression for my site".
You can check whether the hosting is already compressing pages before any edits; the method is described in the "How to check if compression is enabled" section below. If the check shows that GZIP is working, skip all server methods and move on to plugins only if you want to manage compression from the WordPress admin panel.
Method 5: W3 Total Cache plugin
W3 Total Cache is one of the oldest caching plugins in the WordPress repository with a million active installations and a 4.5 rating on WordPress.org. GZIP compression in it is enabled with a separate checkbox and does not require touching server files.

Install the plugin from the WordPress repository, go to Performance → Browser Cache and find the "HTTP (gzip) compression" section. Check the "Enable HTTP (gzip) compression" box and save the settings. The plugin will automatically add the necessary directives to .htaccess or configure NGINX rules depending on which server the site runs on.
- Pros: does not touch server files manually, a million installations confirms stability, compatible with CDN and Brotli
- Cons: interface is overloaded with options, a beginner can easily break caching with the wrong checkbox
Method 6: WP Rocket plugin
WP Rocket is a premium performance plugin that automatically adds GZIP rules to .htaccess after activation. There are no compression settings in it; it is enabled automatically upon installation.
- Pros: zero manual work, compression is enabled automatically, the plugin also solves a bunch of related tasks (caching, lazy loading, minification)
- Cons: paid (from $59 per year), overpaying for GZIP alone is not justified
If you have already bought WP Rocket for other tasks, compression is already working. If you are thinking of getting the plugin just for GZIP, do not: .htaccess or W3 Total Cache do the same thing for free.
Method 7: WP Super Cache plugin
WP Super Cache is a free caching plugin from Automattic (the same folks behind WordPress.com). It works simpler than W3 Total Cache: fewer settings, less chance of breaking something.
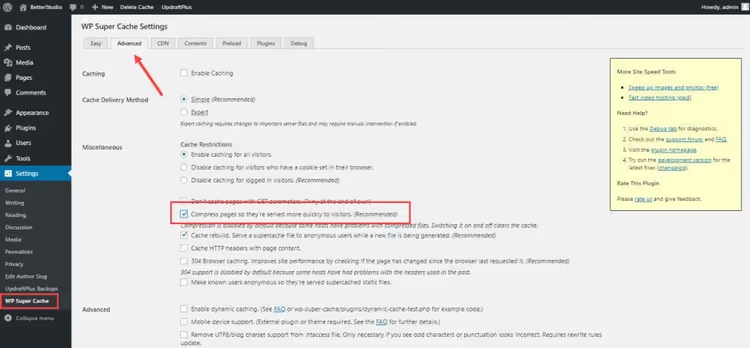
Install the plugin, go to Settings → WP Super Cache → Advanced and find the item "Compress pages so they're served more quickly to visitors". Enable and save.
- Pros: free, simple interface, stable code from Automattic
- Cons: inferior to W3 Total Cache in caching functionality, no fine-tuning of compression types
How GZIP compression works in practice
When a browser requests a page it sends the header Accept-Encoding: gzip, deflate, br, meaning "I understand gzip, deflate and brotli, send in any of these formats". The server sees this header, checks whether compression is enabled for the requested file type, and if so compresses the response and adds the header Content-Encoding: gzip.
The browser receives the compressed data, unpacks it in memory and renders the page. For the user everything happens instantly; gzip decompression takes fractions of a millisecond even on a weak mobile device.
This mechanism is universal: it works the same way for Apache, NGINX, IIS and any WordPress plugins. Plugins do not invent their own compression method; they simply add the same server directives that we wrote manually in the first three methods.
What Google PageSpeed Insights and GTmetrix show
Both services, PageSpeed Insights and GTmetrix, check for compression during each audit and explicitly highlight the problem if text resources are served without GZIP.
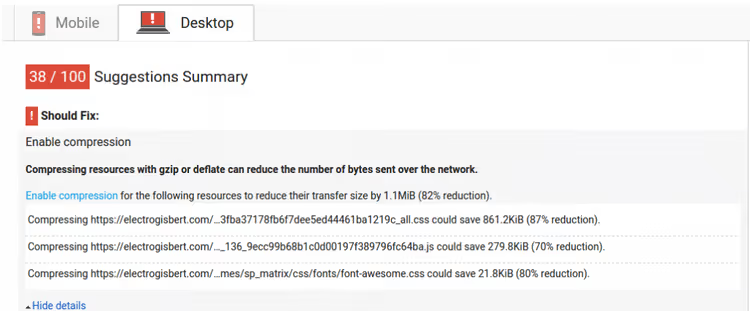
In PageSpeed Insights the warning appears as "Enable text compression" in the "Opportunities" section of the audit. Lighthouse (the PageSpeed Insights engine) directly estimates the potential savings in kilobytes for each uncompressed resource. In GTmetrix there is a similar check, "Enable GZIP compression" in the "Content" category.
An important point: neither PageSpeed Insights nor GTmetrix distinguishes between GZIP and Brotli at the recommendation level. If compression is enabled by either of these methods the audit will show a green checkmark. So GZIP is enough to pass the audit.
How to check if compression is enabled
Three methods from visual to low-level.
Method 1: Chrome DevTools. Open the site, press F12, go to the Network tab. Refresh the page, click on any row and look at the Headers tab. Find the line Content-Encoding: gzip in the Response Headers section.
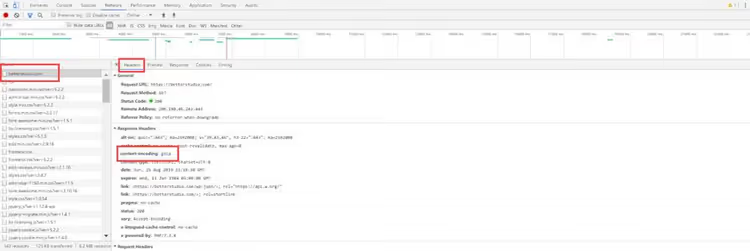
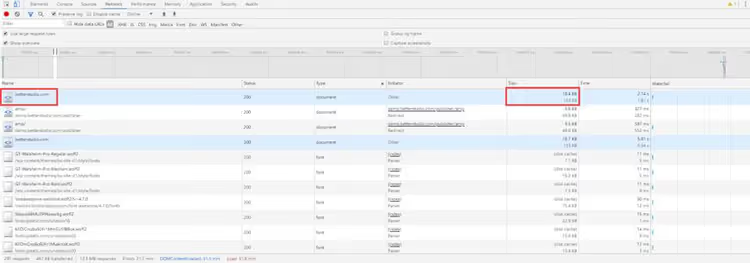
There you can also see the actual and compressed size: in the example above the page weighed 51.6 KB, and after compression 17.7 KB.
Method 2: online testers. GiftOfSpeed GZIP Test (giftofspeed.com/gzip-test) or Check GZIP Compression (checkgzipcompression.net): you paste the URL and get a verdict and compression percentage. Faster than DevTools if you need to check someone else's site or several pages in a row.
Method 3: curl from the command line. If you are on Linux/macOS or in WSL on Windows:
1 curl -I -H "Accept-Encoding: gzip" https://yoursite.com | grep Content-Encoding
Response Content-Encoding: gzip means compression is working. Empty response means no.
Short video explanation
To close the topic with a visual side, here is a short video showing the entire process of enabling GZIP via .htaccess and checking the result in Chrome DevTools:
⁉️🤔 Frequently asked questions
Does GZIP compression slow down the server?
On the contrary. Yes, the processor spends resources on compression, but this is a microscopic load compared to the gain from reducing transmitted data. At compression level 6 (the standard compromise) the processor handles it in milliseconds. The only scenario where compression can be noticeable is a very weak VPS with 512 MB of memory and thousands of simultaneous visitors. But in that situation you have problems more serious than GZIP. In practice compression does not slow down the server: a typical WordPress page is compressed in 2-5 milliseconds, while the savings on data transmission over the network amount to tens and hundreds of milliseconds for each visitor. Compression is always more beneficial than its absence.
GZIP or Brotli: what to choose in 2026?
Start with GZIP; it works on any hosting and is supported by all browsers without exception. Brotli compresses noticeably better but requires HTTPS (not a problem in 2026) and server-side support. If the hosting or CDN (Cloudflare, BunnyCDN) supports Brotli, enable it as an addition to GZIP. Most modern sites use both: the server serves Brotli to browsers that understand it and GZIP to everyone else.
Is GZIP compression compatible with CDN?
Fully. CDNs like Cloudflare or BunnyCDN compress content on their edge servers themselves, often in Brotli, even if your hosting does not support it. If the site is already behind Cloudflare, check that the option "Brotli" is enabled in "Speed" → "Optimization". In this scenario configuring GZIP at the server level is still useful as a fallback for direct requests to the origin server.
I have a caching plugin. Do I need to enable GZIP separately?
It depends on the plugin. WP Rocket enables GZIP automatically, W3 Total Cache with a separate checkbox, WP Super Cache with a separate checkbox. Check the settings of your plugin; almost all caching plugins have a compression option but not all enable it by default. Do not rely on "it should work"; check through DevTools after setup.
Can I compress pages through functions.php?
Technically you can, through the PHP function
ob_start('ob_gzhandler'), but we do not recommend it. This method compresses PHP output and does not affect static files (CSS, JS) which make up the bulk of traffic. Server-side compression (Apache/NGINX) works for all file types and does not load the PHP processor. Leave PHP compression for those rare cases when access to server configs is physically impossible.
Conclusions: what and when to enable
GZIP is not a "set and forget" option but basic hygiene for a WordPress site. If right now you do not know whether your server compresses pages, open DevTools and check the Content-Encoding header. Missing? Return to method 1 and add three lines to .htaccess.
Short decision matrix:
- Site on Apache and you are not afraid of FTP → method 1 (
.htaccess), 5 minutes - Site on NGINX and you have access to configs → method 2 (
nginx.conf), 10 minutes with syntax check - You do not touch server files on principle → W3 Total Cache or WP Super Cache, 2 minutes
- Already paying for WP Rocket → do nothing, compression works out of the box
- You do not want to configure anything at all → write to hosting support
Check the result using any of the three methods above and close this question forever. This is that rare optimization that really is done once and continues to save traffic and speed up the site years later, without updates, subscriptions and repeated configuration.

A professional team of writers and editors specializing in creating quality content.