













 AIIllustrative image: AI-generated
🔔 How to add push notifications to a WordPress site
You open your analytics and see traffic, but most visitors leave and never come back. You've tried email campaigns, but few subscribe. Social media takes time and money for ads. You want a simple channel that brings people back to your site without extra effort.
That channel exists, it's web push notifications. A visitor lands on your site, the browser offers to subscribe to notifications, and a second later you have a subscriber. No forms, no email, no registration. And when you publish a new post, the subscriber sees a notification, even if the browser is closed.
Today we'll configure push notifications on WordPress step by step using the OneSignal service. It's a free plugin with a tier up to 10,000 subscribers that works with Chrome, Firefox, Edge, Opera, and Safari. From plugin installation to test notification, about 10 minutes.
💡 Quick overview:
- Install the OneSignal plugin from the WordPress.org repository directly from the admin panel.
- Register a free OneSignal account and create a Web Push application.
- Copy the App ID and API Key to the plugin settings on your site, notifications will work immediately.
- Configure Safari: generate a Safari Web ID and enter it in the configuration.
What are push notifications and why does a WordPress site need them
Push notifications are short messages that a site sends to a subscriber directly in the browser or to the desktop. Unlike emails that drown in inboxes, push notifications appear on top of windows and apps, you can't scroll past or miss them.
The main advantage for a WordPress site: a visitor subscribes with one click, without entering an email and without mandatory registration. The browser remembers the subscription itself, and you get a channel for returning your audience.
Facebook and Pinterest use push specifically for re-engagement, bringing users back to the site through notifications about new content. The screenshot below shows an example of how a social network sends a notification about a new post.

A few numbers for context, all from SendX's industry report:
- The average opt-in rate for push notifications, according to SendX data, is 7-10%, which is higher than typical email subscription conversion.
- Push notification CTR is 4-8 times higher than email campaign clickability, according to the same report.
- E-commerce sites have subscription and CTR rates around 10%, financial sites reach 15% consent and 30% CTR (SendX).
- Average subscriber churn, according to SendX statistics, is around 10% per year, which is significantly lower than email unsubscribes.
But numbers aside, how do you apply this? Let's look at real scenarios.
How to use push notifications in practice
Push notifications aren't just about announcing new posts. Here are four working scenarios for a WordPress site:
- Urgent alerts. Flash sales, restocked items, niche news, anything that needs to be communicated instantly.
- Engagement. A notification about a new post, case study, or guide brings readers back to the site on publication day.
- Retargeting. A visitor abandoned their cart, you send a reminder via push with a direct link to it.
- Retention. Personalized discounts and reactivation campaigns for subscribers who haven't visited in a while.
Key point: unlike email, push doesn't require visitors to remember or enter an address. And unlike SMS, it's free for you and the subscriber. Now let's move on to configuration.
Step 1: Installing the OneSignal plugin
OneSignal is one of the largest push notification services with a free tier up to 10,000 web subscribers. The plugin is in the official WordPress.org repository, so installation is through the admin panel.
🔗 OneSignal on WordPress.org | 🔗 Live demo
Go to the WordPress admin and navigate to Plugins → Add New.

Type "OneSignal" in the search bar. When the plugin appears, click Install Now.

After installation, click Activate.

A new OneSignal Push item will appear in the admin sidebar, the plugin is ready for configuration.

If your site doesn't have an SSL certificate yet, install it before continuing. Push notifications require HTTPS: browsers don't show the subscription prompt on HTTP sites.
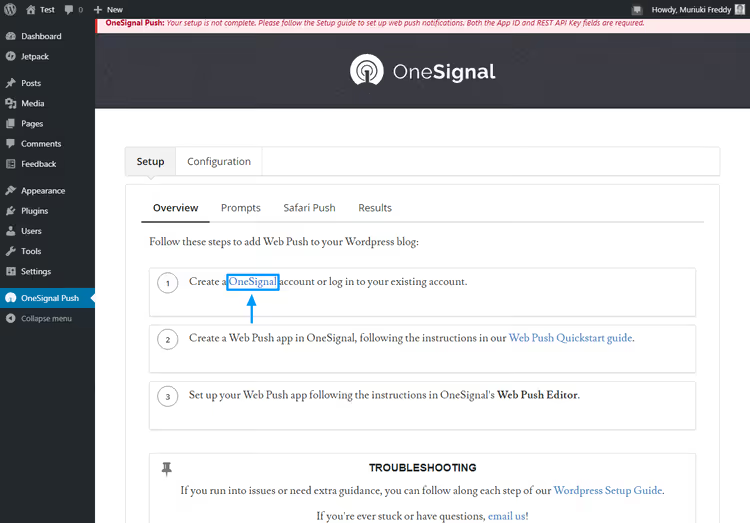
Click OneSignal Push in the menu, the settings page will open.

On the Setup tab, the plugin shows what to do next. Next to it is the Configuration tab, where we'll paste the keys later.
Now you need a OneSignal account.
Step 2: Registering a OneSignal account
On the Setup tab, click the OneSignal link, it will open the service's official website.
Click the Sign Up button and fill out the form: email, password, company name. Or sign in via GitHub, Google, or Facebook.

On the page that opens, you'll see a simple form, minimal fields, takes seconds to fill out.

After registration, the service will ask you to confirm your email.

Go to your mailbox and click the confirmation button.

Account activated. OneSignal will offer an introductory tour of the dashboard, you can take it or skip it.

You'll land on an empty dashboard, here we'll create the first application.

Step 3: Creating a Web Push application
In the dashboard, click the Add App button (or New App, depending on the interface version).
In the popup window, give the application a clear name, for example, the site name, and click Create.

On the next screen, select Web Push as the platform and click Next.

Select the WordPress Plugin or Website Builder tab, then WordPress.

Fill in the fields: site name, URL, upload a notification icon (site favicon or logo). Click Save.

Done, the application is created. OneSignal will show two keys that need to be transferred to the site.
Step 4: Connecting the application to WordPress
After saving the application, the dashboard displays the App ID and API Key. This is the bridge between the OneSignal service and your site.

Copy both keys. Return to the WordPress admin, go to OneSignal Push → Configuration and paste the App ID and API Key in the corresponding fields.

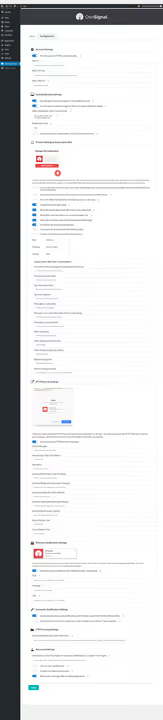
Below on the same page, configure notification behavior: subscription prompt text, popup position, and auto-send when publishing a new post. Scroll down and click Save.

From this moment, push notifications work in Chrome, Firefox, Edge, and Opera. Check: open the site in incognito mode, the browser should show the subscription prompt.

Ten minutes, and notifications are flying. But there's one browser left that requires separate configuration.
Step 5: Configuring push notifications for Safari
Safari on macOS and iOS uses its own push notification protocol, Apple Push Notification Service. For notifications to reach Safari users, you need to generate a Safari Web ID.
Open the OneSignal dashboard, click on the created application, and go to Settings.

In the application menu, find the Settings item and click it.

Select the Apple Safari tab.
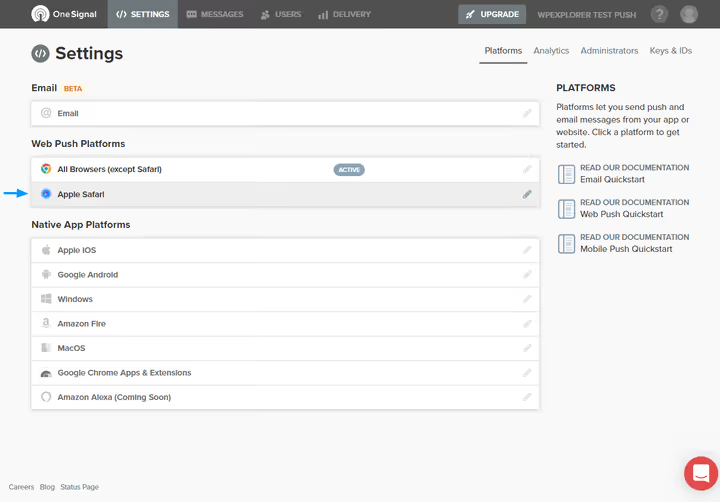
Fill out the popup form: site name and URL. Click Save.

The Apple Safari tab will update and show ACTIVE status.
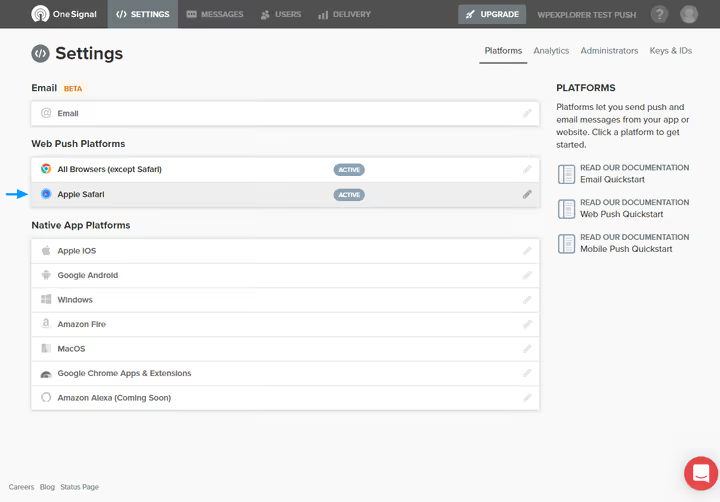
Click the tab again, a window with the ready Safari Web ID will open.

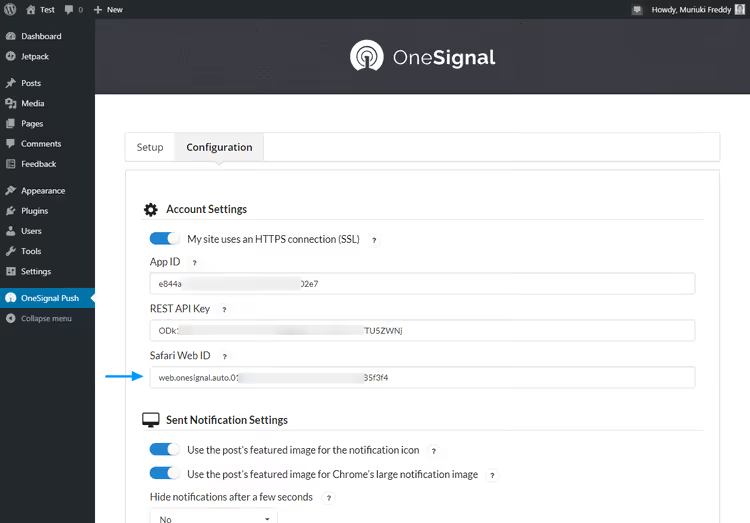
Copy this identifier and paste it in the Safari Web ID field on the Configuration tab of the plugin in the WordPress admin. Click Save.
Now push notifications arrive on all major browsers: Chrome, Firefox, Edge, Opera, and Safari. OneSignal's free tier includes up to 10,000 web subscribers and unlimited mobile subscribers. If your audience outgrows this limit, paid plans start with advanced segmentation and A/B testing features.
Video: configuring push notifications in 8 minutes
If you prefer watching over reading, here's a short English video with a visual walkthrough of all steps.
⁉️🤔 Frequently asked questions
Do push notifications work on HTTP sites?
No. Browsers require HTTPS for the Push API. If your site is still on HTTP, install a free SSL certificate via Let's Encrypt. Most WordPress hosts offer auto-install SSL in a couple of clicks. After enabling HTTPS, the subscription prompt will appear automatically.
Is it mandatory to use OneSignal specifically?
OneSignal is the most popular free option with a WordPress plugin in the official repository, but not the only one. Alternatives: PushEngage (has a free tier up to 2,500 subscribers, advanced segmentation), WonderPush (free up to 1,000 subscribers, GDPR-ready). For most sites, OneSignal covers needs completely, especially at the start.
How long does setup from scratch take?
In our experience, 10-15 minutes: plugin installation (2 min), account registration (3 min), application creation and key transfer (5 min), Safari configuration (3 min). The longest part is email confirmation, if the letter went to spam.
Can I send notifications to only part of subscribers?
Yes. In the OneSignal dashboard, you create segments, for example, by browser language, geolocation, or visit frequency. On paid tiers, behavior-based segmentation is available: subscribers who clicked a notification, opened a specific page, haven't visited in N days. For starting out, basic segments on the free tier are enough.
Won't popup subscription prompts scare visitors away?
With proper configuration, no. In the OneSignal plugin configuration, you set how many seconds after landing to show the prompt and on which pages. We recommend a 10-15 second delay and showing only on post pages, the visitor has already seen content and understands the value of subscribing. Aggressive showing on entry reduces conversion.
What happens if I exceed the 10,000 subscriber limit on the free tier?
Notifications continue sending to existing subscribers, but new subscribers over the limit are not accepted. You'll receive a notification from OneSignal about reaching the limit, this is a signal to switch to a paid tier, which starts at $9/month (prices update on the pricing page).
Is it worth connecting push notifications in 2026
Push notifications are not a new channel, but still underestimated. With minimal effort (10 minutes of setup and a free plugin), you get a direct line of communication with your audience that doesn't depend on social media algorithms and doesn't drown in inboxes.
For a WordPress blog, this is especially beneficial: each new article you deliver to hundreds or thousands of subscribers on publication day, rather than hoping they notice it in their feed. If you haven't connected push yet, do it today. Ten minutes now saves hours of marketing later.
Try it, test notification formats, and don't be afraid to experiment with text, a short headline with intrigue converts to clicks better than a dry announcement. And if you have questions about setup, write in the comments.

A professional team of writers and editors specializing in creating quality content.