













 AIIllustrative image: AI-generated
👆 How to add tabs to WordPress posts and pages
A long page with specifications, reviews, and instructions: users scroll, get lost, and leave. Stores solved this problem long ago by splitting descriptions, parameters, and reviews into tabs. No reload, no scrolling to the needed section.

But tabs aren't only useful for online stores. Look at any plugin page on WordPress.org: information, reviews, installation, everything is separated into tabs. Users see the structure immediately and switch to where they need.

Below are two working methods to add tabs to WordPress posts and pages. First, through a page builder, if you already have one installed. Second, through the free plugin Tabs Responsive, if you need tabs without tying to a specific builder.
💡 Quick overview:
- Check if your page builder has a tabs module
- Install the free Tabs Responsive plugin from the WordPress.org directory
- Create tabs in the drag-and-drop builder and fill with content
- Insert the generated shortcode on the needed page or in a widget
How tabs differ from accordions
Tabs shouldn't be confused with accordions, they serve different purposes. An accordion expands one block and collapses the rest: convenient for FAQ and mobile screens. Tabs keep all tabs visible and switch content instantly. Users always see the structure and can quickly jump to any section.

According to Nielsen Norman Group, accordions are appropriate when users need only one section out of several. Tabs work when visitors will likely switch between tabs in one visit. For product pages, tabs win: buyers compare specifications and description in one window without losing context.
Pay attention: if the content in a tab exceeds one screen, an accordion might be more convenient. A long tab forces scrolling just like a regular page.
Method 1: tabs through a page builder
If you're already using a page builder, you're in luck. Most popular builders include a tabs module out of the box.
Elementor
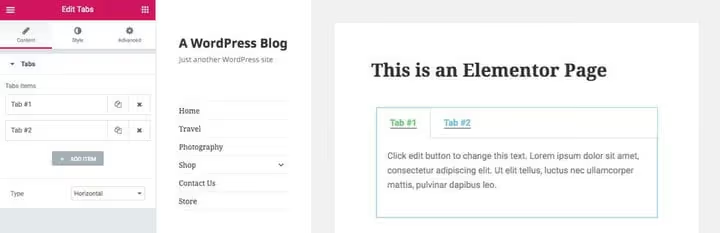
Elementor, the most popular page builder for WordPress: 10+ million active installations and 40-50% of the page builder market, according to Colorlib data for 2026. The tabs module is included in the free version. Drag the "Tabs" element onto the page, edit tab headings and content, customize the style to match your site design.
The advantage is that Elementor tabs inherit global styles: fonts, colors, and spacing are picked up automatically. No need to edit CSS separately.
WPBakery
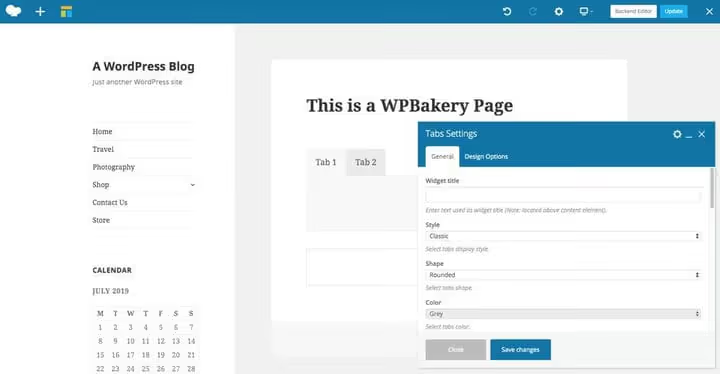
WPBakery (formerly Visual Composer), a premium builder often bundled with themes. Unlike Elementor, the tabs module here starts empty: you add separate elements to each tab, text, images, icons, buttons. This gives more flexibility but requires a few more steps during setup.
If you need detailed instructions for WPBakery, we have a separate guide.
Method 2: Tabs Responsive plugin, step-by-step setup
No page builder, and installing a builder just for tabs is overkill. Tabs Responsive, a free plugin from the WordPress.org directory, does exactly what it promises: adds tabs to any post or page via shortcode or widget.

🔗 Tabs Responsive on WordPress.org
The plugin is alive and updated: 20,000+ active installations, 4.7 out of 5 rating, 500+ reviews, last update May 2026, compatible with WordPress 6.8.3. The free version includes one design template, horizontal and vertical styles, Font Awesome icon support. Pro adds 20+ templates, 500+ Google fonts, and content animation.
Step 1: installation
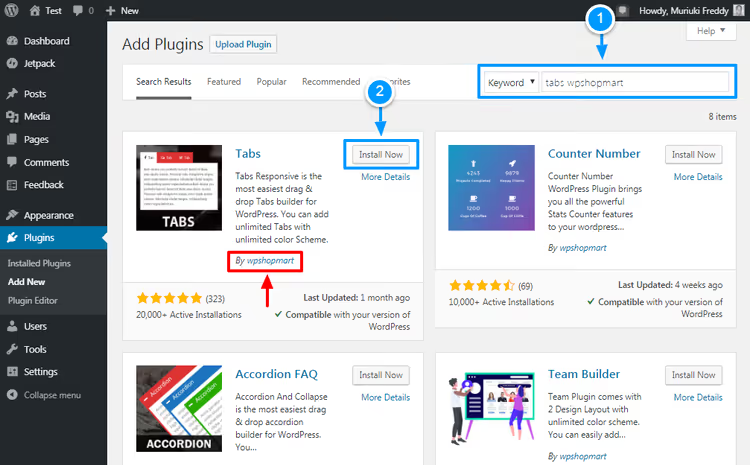
In the WordPress admin, go to Plugins → Add New, enter tabs responsive in the search. Find the plugin by wpshopmart, click Install Now, then Activate.
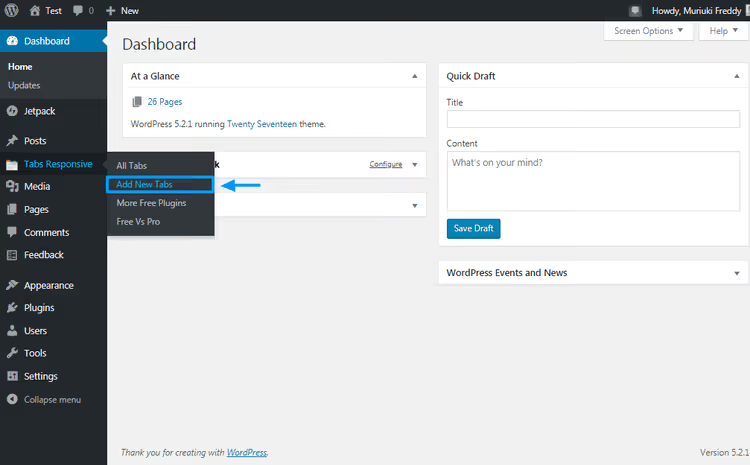
After activation, a new "Tabs Responsive" item appears in the left menu.
Step 2: creating your first tabs
Go to Tabs Responsive → Add New Tabs. A drag-and-drop builder will open.
First, give the tab set a descriptive name, for example, "Product specifications" or "Homepage tabs". This will be helpful when you have multiple sets for different pages.
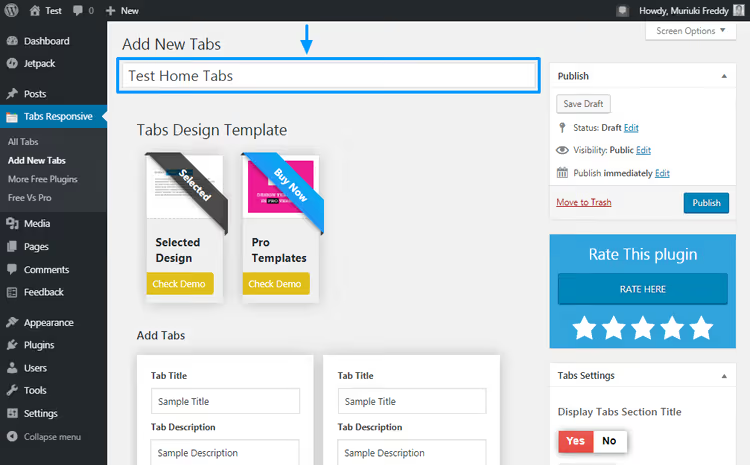
The builder looks imposing, but the logic is simple:
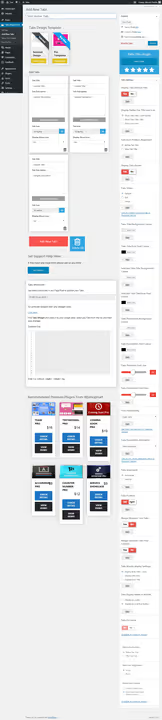
Now fill in the tabs themselves. In the Add tabs section, configure for each tab:
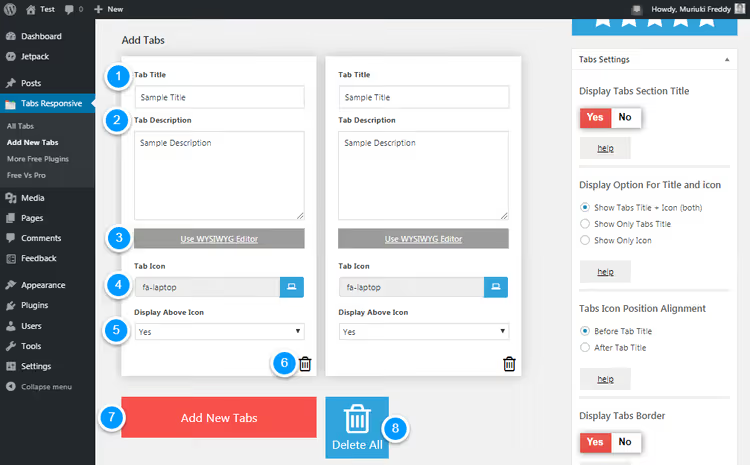
- Tab title, what the user will see on the tab: "Description", "Specifications", "Reviews".
- Tab description, the tab's content. A full WYSIWYG editor works: you can insert images, videos, music, other shortcodes.
- Tab icon, choose an icon from the Font Awesome library built into the plugin.
- Display above icon, option places the title above the icon or disables the icon, leaving only text.
- Remove, button to delete a specific tab.
- Add new tabs, adds an empty tab to the set.
- Remove all, resets all tabs at once.
Tabs can be dragged to change order. Click Save Draft during the process, if you accidentally leave the page, changes won't be lost.
Step 3: design and styles
Tab appearance is configured in the right sidebar of the builder.
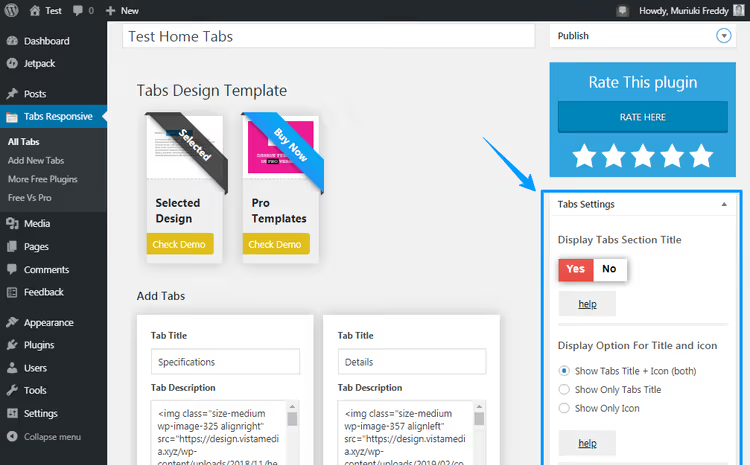
The free version offers one design template:
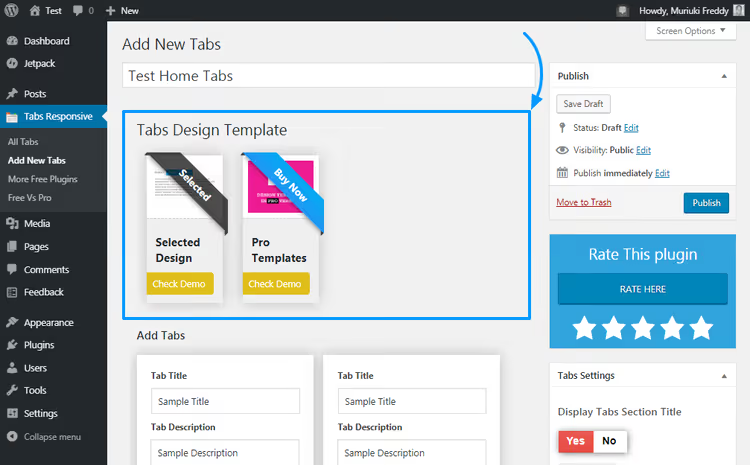
The Pro version adds 19 more templates. But even in the free version you can customize: background and font color, font family, padding, borders, icon alignment, transition animation.
If standard settings aren't enough, the plugin has a field for custom CSS:
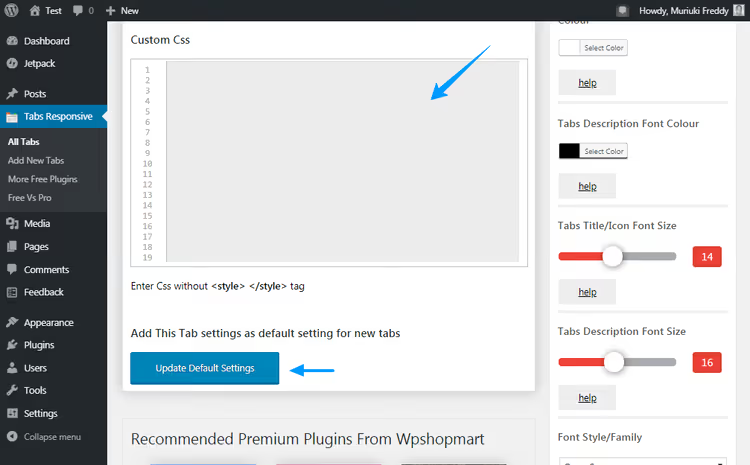
Here's also the Update Default Settings button, click it so all new tab sets are created with current style parameters.
Step 4: publishing tabs on a page
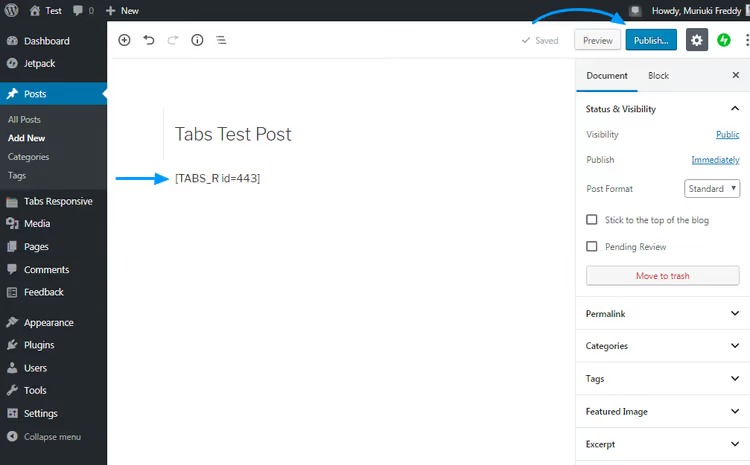
When content and style are ready, click Publish at the top of the screen.
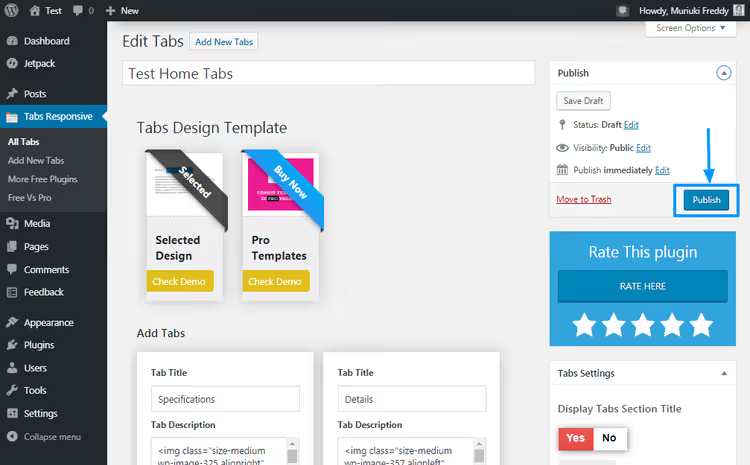
The plugin will generate a shortcode like [TABS_R id=443]. Copy it.
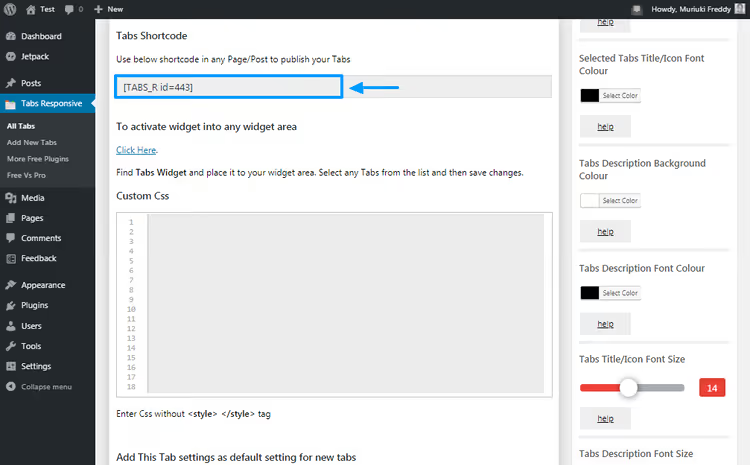
Open the post or page where you need to add tabs and paste the shortcode in the desired location. Works in any editor, both classic and Gutenberg.
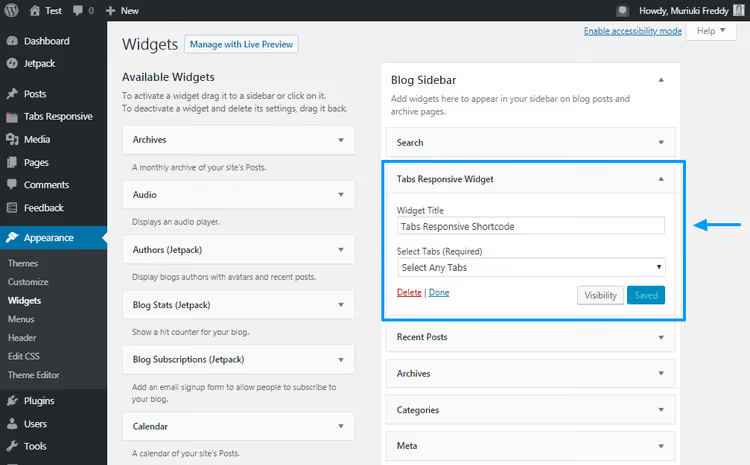
If you need to add tabs to a sidebar or footer, use the Tabs Responsive widget. Go to Appearance → Widgets:
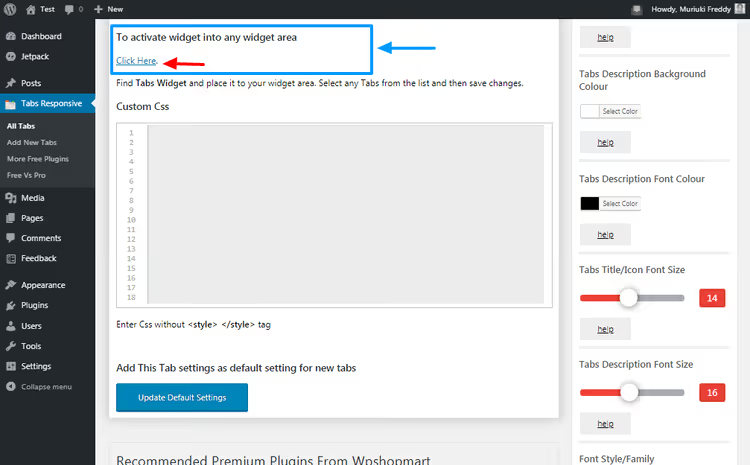
Click the "Click here" link, and you'll get to the widgets screen where you can drag the widget into any area:
The result after 5-7 minutes of setup looks like this:
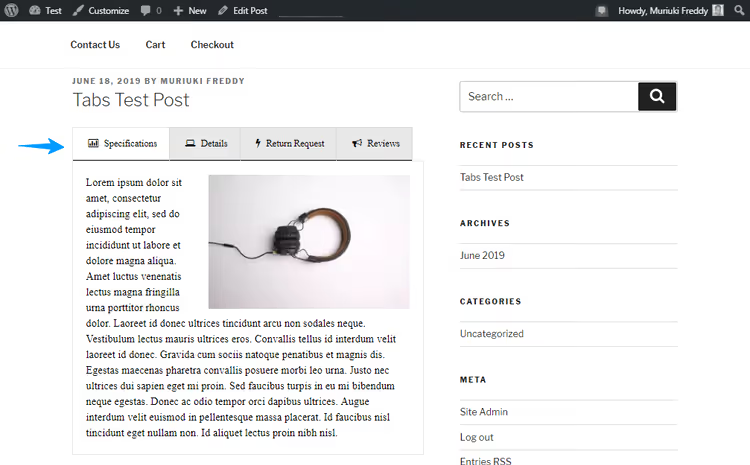
Colors and styles here are basic, if desired, tweak them in the builder's right panel or through custom CSS.
Watch the video to see the entire process from installation to finished tabs on the page:
⁉️🤔 Frequently asked questions
Do tabs work on mobile devices?
Yes. The Tabs Responsive plugin is built on Bootstrap, so tabs adapt to any screen. On narrow screens, horizontal tabs can turn into a vertical list or accordion, depending on the chosen template. Check how tabs look on a phone after setup: if tab text is long, vertical style might be more convenient than horizontal.
Can you add tabs to a post body without a plugin?
Without a plugin or builder, no, unless you write your own JavaScript and CSS code. WordPress out of the box doesn't provide a ready solution for tabs in content. The Tabs Responsive plugin solves the task without code: installation and setup take minutes, result via shortcode. This is a compromise between "don't want to install a plugin" and "don't want to write code from scratch".
Do tabs affect SEO?
With proper implementation, no. Content from all tabs loads in the page HTML on first render, Google sees and indexes it. The Tabs Responsive plugin delivers all content in the source code, not loading asynchronously, this is safe for SEO. Problems can only arise with AJAX-loaded tabs (tab content loads only on click), use such solutions with caution.
What to do if tabs conflict with the theme?
Style conflict is the most common problem. First try the custom CSS field in the plugin settings: usually a couple of lines are enough to fix background color or padding for the theme. If that doesn't help, switch from horizontal to vertical style in template settings, sometimes the problem is only in one of the modes. Last resort, plugin support forum on WordPress.org: the developer responds and helps with conflicts.
How does Tabs Responsive differ from tabs in a builder?
The plugin isn't tied to a specific builder. If you decide to change builders or move to the native block editor, tabs via shortcode will continue to work. With Elementor or WPBakery tabs, there's no such flexibility: when changing builders, tabs disappear with it. Additionally, Tabs Responsive supports vertical style, widgets, and icons, not every builder provides this in the free version.
What to choose for your task
If a page builder is already installed, use its tabs module. It's faster: one drag-and-drop, and tabs are on the page.
If there's no builder, use the Tabs Responsive plugin. It's free, updated, and doesn't tie you to a specific builder. Shortcode and widget work in any theme and any editor.
For WooCommerce online stores, the plugin adds a separate tab with description to the product card, this isn't available with Elementor tabs.
Try Tabs Responsive on a test site: installation takes a minute, and you'll build your first tabs in 5 minutes. If you get stuck at any step, check the video above or write in the comments, we'll figure it out.

A professional team of writers and editors specializing in creating quality content.