













 AIIllustrative image: AI-generated
🚀 How to set up Google Tag Manager for WordPress
You open the WordPress admin panel, launch the theme editor, and paste yet another JavaScript snippet into header.php. Sound familiar? A month later you have a dozen such snippets: analytics, ad pixels, chat widgets, heatmaps. The site gets heavier, and making sense of the tangled code becomes increasingly difficult.
Google Tag Manager solves this problem radically: instead of a dozen tags scattered across theme files, you get a single container and a web interface for managing everything from one place. No code edits, no calling a developer, no risk of breaking the layout.
Below is a step-by-step guide to installing GTM on WordPress: the manual method, the plugin method, and setting up Google Analytics 4 without a single line of code on your site.
💡 Quick overview:
- Create a free Google Tag Manager account and get a container with two installation codes
- Add the codes to WordPress: manually via
header.php(2 minutes) or through the GTM4WP plugin (1 minute, no theme edits) - Connect Google Analytics 4 inside GTM: a "GA4 Configuration" tag plus an "All Pages" trigger, not a single line of JS on your site
- Test via GTM preview mode, publish the container, and all tags work
What is Google Tag Manager
Google Tag Manager is a free tag management system from Google. Instead of placing each tracking code directly on your site, you add them to the GTM web interface and install just one snippet on your site: the GTM container.
A tag in the context of digital tracking is a JavaScript snippet that activates third-party functions: traffic analytics, ad campaigns, chat widgets, heatmaps. They are also called web beacons or tracking pixels. A classic example is the Google Analytics code you add to your site to track visits.
Tag vendors are platforms like Google Analytics, Google Ads, Meta (Facebook), LinkedIn, Hotjar, and dozens of others. Each offers its own JS snippet. Without a tag management system, all these snippets live directly in your WordPress theme code.
Why you need Google Tag Manager
The traditional approach of manually editing header.php, functions.php, and other theme files creates three problems.
First, site speed. Each third-party JS script adds weight to the page and increases load time. A dozen tags from different vendors, and Site Speed in Google Search Console turns red.
Second, security. Tags from unreliable sources expose your site to XSS attacks and data leaks. And you don't always know what's actually inside the next copied snippet.
Third, maintenance. The vendor updates their tracking code, and you need to dig into theme files and replace it manually. One wrong character and the tag stops working, data is lost.
Google Tag Manager eliminates all three problems:
One container instead of a dozen tags. On your site, just a couple of lines of GTM code. All tag logic lives in the cloud interface.
Setup without a developer. The GTM interface is intuitive: select the tag type, enter the tracking ID, assign a trigger, done. Not a single line of code on your site.
Built-in integrations. GA4, Google Ads, Floodlight, dozens of third-party templates: you choose from a list rather than copying code.
Preview mode and debugging. Before publishing, you see which tags fired on the page and what data they sent. Configuration errors are visible immediately, not a week later in reports.
Version control. GTM stores the history of all published container versions. Rolling back a failed configuration takes two seconds.
The free version of GTM covers the needs of the vast majority of sites. The paid version (Google Tag Manager 360) adds extended support and higher limits for large enterprise projects, but for a WordPress site of any scale, the free tier is more than enough.
GTM has a learning curve, and the interface may seem overwhelming at first. But basic scenarios (GA4 plus a couple of marketing tags) can be mastered in an hour. For deeper learning, there's a recommended YouTube video at the end of this post.
How to set up Google Tag Manager for WordPress
Next, two installation methods: manual (via theme file) and via the GTM4WP plugin. Both work; choose based on your workflow preference.
Create a Google Tag Manager account
The first step is a free GTM account. It gives you a container and an ID that you'll need for WordPress integration.
Go to the Google Tag Manager website and sign in with your Google account.

Click "Create Account" on the GTM admin panel.

Enter the account name (for example, your company name), select your country, and click "Continue."

Then specify the container name (usually your site domain), select "Web" as the target platform, and click "Create."

Accept the Google Tag Manager terms of service and data processing terms.

After confirmation, a popup window with two installation codes will appear. Don't close this tab; you'll need the codes for the next step.

GTM shows instructions for placing the codes: the first one as high as possible in <head>, the second one immediately after the opening <body>. Sounds simple, but for a WordPress beginner this may not be obvious. Below we cover both methods.
Important before continuing:
- Back up your site before editing theme files. Restoring a backup via a plugin like UpdraftPlus takes a minute; recovering a broken theme takes an hour.
- Even better, create a WordPress child theme and edit it instead of the parent theme. Updating the parent theme won't overwrite your changes.
Manual GTM installation via header.php
In the WordPress admin panel, go to "Appearance → Theme Editor."

The screenshot shows a child theme with files header.php (header), footer.php (footer), rtl.css, and 404.php. We'll insert the GTM codes into header.php.
Click "Theme Header (header.php)" in the right-side file navigation panel.
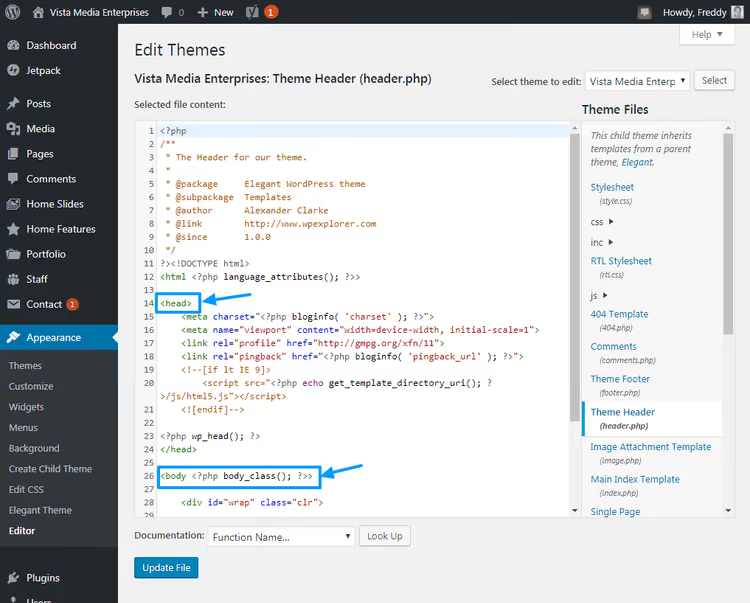
Follow the GTM instructions: the first code as high as possible in <head>, the second immediately after the opening <body> tag. In WordPress, the <body> tag usually looks like <body <?php body_class(); ?>>.
Copy the first code from GTM and paste it high in <head>.

Copy the second code and paste it immediately after the opening <body> tag.
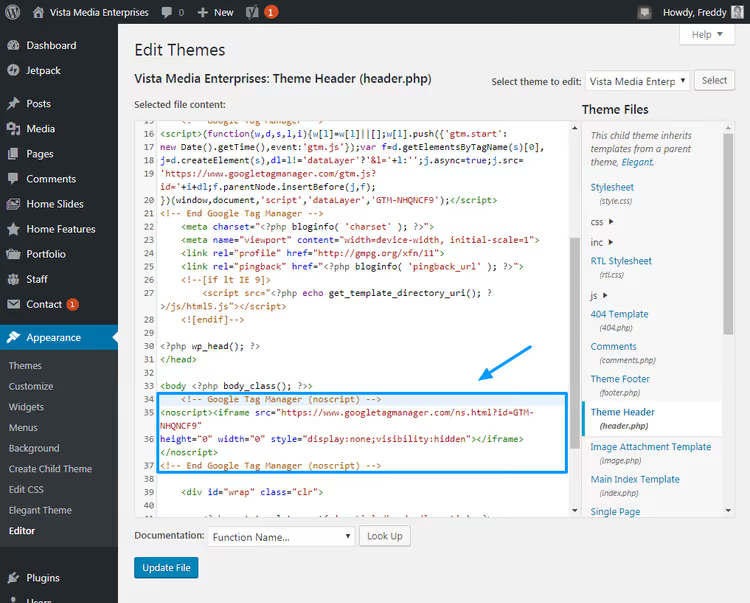
Click "Update File" at the bottom of the screen. Done, GTM is installed on your site manually. The entire process takes a couple of minutes.
Don't want to touch theme files? Next is the plugin method, which does the same thing without a single code edit.
Installation via the GTM4WP plugin
GTM4WP (Google Tag Manager for WordPress, author: DuracellTomi) is the most popular plugin for integrating GTM into WordPress: over 700,000 active installations, updated since 2013. It doesn't just insert container codes but also adds a data layer for WooCommerce, contact tracking, and other scenarios.
In the WordPress admin panel, go to "Plugins → Add New."

Type "Google Tag Manager for WordPress" in the search bar and click "Install Now."

After installation, click "Activate."

A notification will appear at the top of the screen prompting you to enter your GTM ID. Click the link in the notification.

Your GTM ID is located in your Google Tag Manager account, in the top panel next to the container name. Format: GTM-XXXXXXX.

Copy the ID, return to the WordPress admin panel, paste it into the corresponding field on the plugin settings page, and click "Save Changes."

Done. The plugin automatically placed both GTM codes in the right locations; you didn't open a single PHP file.
Now that the GTM container is on your site, let's set up data collection via Google Analytics 4.
How to connect Google Analytics 4 through Google Tag Manager
Previously, GTM used the "Universal Analytics" tag; it stopped collecting data in July 2024. The only current option is Google Analytics 4 (GA4). It's set up in three steps: creating a tag, specifying the measurement ID, and assigning a trigger.
If your site still has old Universal Analytics code (the gtag('config', 'UA-XXXXX-Y') function in header.php or inserted via a plugin), remove it first. Otherwise, GA4 and Universal Analytics will duplicate data, distorting your reports.
Return to your GTM account and click "Tags" in the left menu.

Click "New" (the Create button).

Name the tag (for example, "GA4, Page Views") and click the "Tag Configuration" field to select the tag type.

In the list of tag types, select "Google Analytics: GA4 Configuration." Specifically GA4, not Universal Analytics. The GTM interface is updated regularly, so the location of items may differ slightly from the screenshots, but the logic remains the same.

You'll return to the tag configuration. In the "Measurement ID" field, enter your GA4 measurement identifier (format: G-XXXXXXXXXX). To avoid hardcoding it in every tag, create a variable: this is GTM best practice.

Select "New Variable" and in the window that opens, enter your Measurement ID from Google Analytics 4. Name the variable something like "GA4 Measurement ID."

To find your Measurement ID, sign in to your Google Analytics account and select the appropriate property.

Go to "Admin" → "Property Settings" → "Data Streams" → select the web stream. The Measurement ID starts with G- and is displayed in the upper right corner of the stream card.

Copy the Measurement ID, paste it into the variable field, and click "Save."

Now let's assign a trigger, the condition under which the tag fires. Click the "Triggering" section.

To track all page views, select the built-in "All Pages" trigger.

Click "Save." The GA4 tag is ready but not yet published.
Testing and publishing the tag
Before sending the container to production, test the tag in preview mode. Click the "Preview" button in the upper right corner.

GTM will enter debug mode. Reload your site; at the bottom of the browser window, the GTM console will open, showing that the GA4 tag fired on page load.

To confirm that data is reaching GA4, open Google Analytics and go to "Reports → Realtime." You'll see the page view you just generated by reloading your site.

Data is flowing. You didn't add a single line of JS to your site; everything is processed inside the GTM container.
Now publish the container so the tag works for all visitors. Click "Submit" in the upper right corner.

In the window that appears, give the version a meaningful name (for example, "GA4 page view tag v1") and description.

Click "Publish." After publishing, the active container version will display with a green indicator.
That's it, GA4 is collecting data from your WordPress site through Google Tag Manager. Other tags are added using the same process: select the type, specify parameters, assign a trigger, test, publish. GTM manages the order and loading time of each tag automatically.
If you want to dive deeper into GTM capabilities (from click events to YouTube player tracking and Google Ads integration) watch this video tutorial: it covers the full GA4 + GTM setup cycle on WordPress.
⁉️🤔 Frequently asked questions
How is Google Tag Manager different from Google Analytics?
Google Analytics collects data about visitors: page views, traffic sources, conversions. Google Tag Manager doesn't collect data itself; it's a courier that delivers tags to your site. GTM simplifies installing and updating dozens of marketing tools from a single web interface, while GA4 processes the collected data in reports.
Do I have to use the GTM4WP plugin or can I do without it?
You can do without a plugin by inserting the two GTM codes into
header.phpmanually. The GTM4WP plugin is more convenient: it doesn't lose settings when you change themes, adds a data layer for WooCommerce and contact forms, and automatically places codes in the right locations. The choice depends on how often you change themes and whether you need an out-of-the-box data layer.
What is data layer and why do I need it?
Data layer is a JavaScript object, a layer between your site and GTM. It passes structured data: product ID, order amount, event type. GTM reads the data layer and decides which tag fires when. Without a data layer, you track page views; with it, you track every user action with precise amounts and product names.
Is Google Tag Manager free?
Yes, the basic version is completely free with no limits on tags, triggers, or traffic volume. The paid Tag Manager 360 ($150,000 per year, according to the official Google Marketing Platform page) adds extended support and SLA for enterprise teams. For a WordPress site of any scale, the free version is more than enough.
Do I need to remove the old Universal Analytics code before setting up GA4?
Absolutely. Universal Analytics stopped processing data in July 2024. Old
UA-XXXXX-Ycode left inheader.phpor a plugin duplicates data with GA4 and distorts reports. After setting up GA4, check the "Admin → Data Comparison" section in Google Analytics: the absence of discrepancies with expected traffic confirms that the old code has been removed.
How do I verify that GTM is working after installation?
Three methods: open the page source code (Ctrl+U) and search for
GTM-in<head>; the container should be there. Install the Google Tag Assistant Legacy extension for Chrome; it will show all active tags on the page. Enable Preview Mode in GTM, reload your site, and confirm that the debug console displays a green "Connected" status.
What to install on WordPress in summary
Google Tag Manager is a tool that saves hours every time you change a marketing tag. Instead of "going into the code, finding the right file, replacing the snippet, checking that nothing broke," you open a web interface, edit the tag settings, and click "Publish." No hosting access, no theme editor, no risk of crashing your site with a stray comma in PHP.
The key scenario for a WordPress site: install GTM via the GTM4WP plugin (once, two minutes), add a GA4 tag (once, five minutes with testing), and analytics works. Then you add Hotjar, Google Ads, LinkedIn Insight Tag, and any other pixels as needed without touching your site's code.
Start with GA4 and preview mode to confirm that data is flowing. Then explore GTM's built-in tag templates: there are dozens of ready-made integrations that previously required manually placing JS on every page.

A professional team of writers and editors specializing in creating quality content.