













 AIIllustrative image: AI-generated
🚀 How to shrink Font Awesome to 10 KB and speed up your website
Icons make websites intuitive. Navigation, social media, action buttons: everywhere you need small visual cues that visitors recognize instantly. Font Awesome has solved this problem for 14 years with a library of over 2000 free icons that connect with a single line. The problem is that single line brings hundreds of kilobytes along with it.
The full Font Awesome 7 Free package weighs about 150 KB per style for webfont files alone, without CSS. Add CSS (another ~100 KB minified), and every first page load delivers 250+ KB to the user. Worse: if you use 8-10 icons out of two thousand, the browser still downloads everything. On mobile 4G, that means 2-3 extra seconds of waiting. Google PageSpeed penalizes such payloads with a direct score reduction.
But the problem is solvable. We will show you how to extract only the icons actually used on your site from the library and get a final size of 10-15 KB without losing functionality. All methods are covered: from automatic to manual, from online tools to CLI utilities. No magic, just working techniques.
💡 Quick overview:
- Analyze your site and compile a list of Font Awesome icons actually in use
- Choose the optimization method for your situation: the FontCut online tool, the fa-subset CLI utility, or the official Kit mechanism
- For maximum control, take the manual route through FontForge or IcoMoon: it requires effort but gives you complete control over the final file
- Generate the trimmed webfont and CSS, replace the full version on your server with them
- Measure speed before and after: typical PageSpeed Score improvement is 20-40 points
Why trim Font Awesome at all?
The main reason is loading speed. A Google study shows that 53% of mobile visitors leave a page if it takes longer than 3 seconds to load. Every extra 100 KB on the critical rendering path increases time to First Contentful Paint.
Font Awesome Free 7 contains three styles: Solid, Regular, and Brands. Combined, that is over 2000 icons and about 450 KB of compressed webfont files. A typical landing page or blog uses 10-20 icons, less than 1% of the library. The browser downloads everything else for nothing.
The second reason is Core Web Vitals. The LCP (Largest Contentful Paint) metric directly depends on how quickly the browser receives and renders fonts. An untrimmed Font Awesome blocks text rendering until the webfont loads. After subsetting, the file becomes small enough that the browser receives it within the first network request.
The third reason is mobile traffic. Users on limited data plans will not thank you for an extra 400 KB on every page. Subsetting returns control over your loading budget.
Real-world numbers: reducing a webfont file from 345 KB to 14.5 KB boosted the Lighthouse Performance Score from 52 to 89 points on one project. The difference is visible to the naked eye: the page becomes interactive almost instantly.
Method 1: official Kit mechanism (recommended)
The simplest and most supported approach is using a Font Awesome Kit with built-in subsetting. This method works with a free account and requires no third-party tools.
How it works
A Kit is a personalized Font Awesome package that you configure in your dashboard on fontawesome.com. In the Kit settings, there is an "Icon Selection" section with two modes:
- By Style: you check the styles you need (Solid, Regular, Brands), and the Kit loads only those selected. At this step alone, you cut two of three styles if you only need Solid.
- By Icon: you specify particular icons through search, and the Kit generates a file containing only them. This mode provides maximum compression.
After saving settings, the Kit automatically rebuilds the package. You get a <script> tag to insert into your site's <head>. The Font Awesome CDN delivers the already trimmed version. No local files, no manual building.
Advantages of the Kit approach
- No need to download and host files: the Font Awesome CDN distributes the trimmed package globally
- When adding a new icon, you simply update the list in Kit settings, and rebuilding happens automatically
- Works with Font Awesome Pro, including Duotone and Sharp styles
- Supports both SVG+JS and Webfonts+CSS modes
When a Kit does not fit
The only limitation: a trimmed Kit cannot be downloaded to your own server on the free tier. If hosting fonts locally is critical for you (internal network, security policy), a Kit is not an option. Then look at methods 2 and 3.
Method 2: FontCut online tool
If you do not want to register with Font Awesome or prefer a ready ZIP file you can put in your repository, try FontCut.com. It is a free online generator specifically designed for Font Awesome 6.4.0 and Bootstrap Icons.
The process has three steps:
- Select an icon set (Font Awesome Free 6.4.0, the latest available version)
- Check the icons you need in the visual grid
- Download a ZIP archive with CSS and webfont files, upload to your server
The result is a standalone 10-15 KB package that you host yourself. The tool requires no registration, and the preview shows the final size in real time.
Limitation: FontCut uses FA 6.4.0, not the current version 7.2.0. For most projects, the difference is negligible: solid-style icons do not change between versions. But if you need icons added in FA 7 (Pro+ packages), FontCut will not offer them.
Method 3: fa-subset CLI utility (for developers)
Automatic detection of used icons is the most precise approach. The fa-subset utility (Python, BSD-2-Clause, instructions on Dev.to) scans your project's source code, finds all fa-* classes, and generates a trimmed webfont containing only the icons actually used.
Installation:
1 pip install fonttools
Basic run (dry-run for analysis):
1 python3 bin/fa-subset.py \ 2 --src ./src ./templates \ 3 --ext .html .php .twig .js \ 4 --pack solid:css=./css/fontawesome.min.css,font=./fonts/fa-solid-900.ttf \ 5 --out ./optimised \ 6 --dry-run
The utility outputs a list of found icons and the projected size of the trimmed file. Without the --dry-run flag, it generates ready CSS and webfont in the ./optimised folder.
Strengths of fa-subset:
- Scans PHP, HTML, JS, Blade, Twig, Vue, React, and any text files in your project
- Understands duotone icons (dual codepoints in Font Awesome 6+)
- Can output a JSON report for CI/CD pipelines:
--report-json ./report.json --strict-styles - Works with WordPress themes, Laravel templates, and React/Vue components
Real production result: compression from 803 KB (fonts + CSS) to 14.5 KB, a 98% reduction. The utility is free and not tied to Font Awesome services.
Method 4: IcoMoon (visual font builder)
IcoMoon is a web application for creating custom icon fonts. It is available at icomoon.io/app. The approach is slightly more complex than Kits but offers one unique capability: mixing icons from different libraries into a single file.
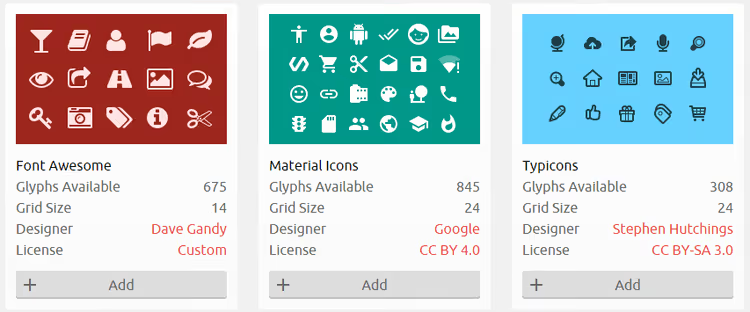
Step 1: select the Font Awesome package
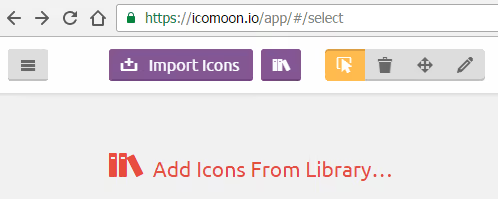
Go to icomoon.io/app, click "Add Icons From Library", find Font Awesome in the list, and click "Add".
Step 2: mark the icons you need
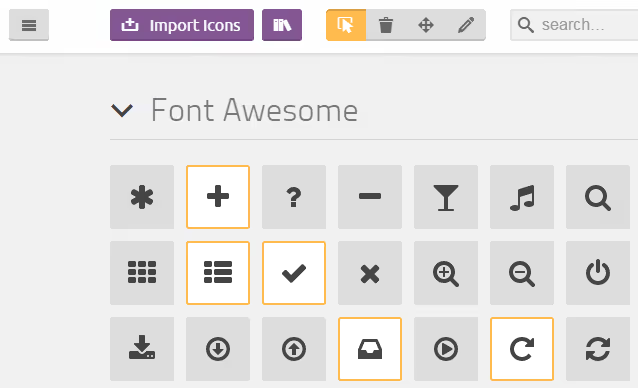
In the selection window, mark all the icons used on your site by clicking each one. You can select multiple libraries at once (for example, Font Awesome + Material Icons) and get a single file with icons from both sets.
Step 3: generate and download the font
After selection, click the "Generate Font" button at the bottom of the page. IcoMoon will show all selected icons and provide a "Download" button. The ZIP archive contains webfont files (woff, woff2, eot, svg, ttf), a style.css file, and a demo demo.html.
Save the files to your site repository and connect style.css in <head>. If something went wrong, open demo.html from the archive: it shows exactly how the font is connected and used.
IcoMoon works well when you need to mix icons from different sets or when you fundamentally do not want to depend on the Font Awesome CDN.
Method 5: manual trimming through FontForge
The most labor-intensive but also the most controlled method. It suits cases where you want to understand every byte of the final file or work in an environment without access to external services.
Step 1: localize the font
Download Font Awesome from the official website. Remove the CDN link from <head> if it was there. Unpack the archive into your site repository.
Connect CSS locally:
1 <link rel="stylesheet" href="/font-awesome/css/font-awesome.css">
Clear browser cache and reload the site. Icons should display as before, but now you control the files on your server.
Step 2: remove unnecessary files
After unpacking the Font Awesome archive, you will see the folder structure:
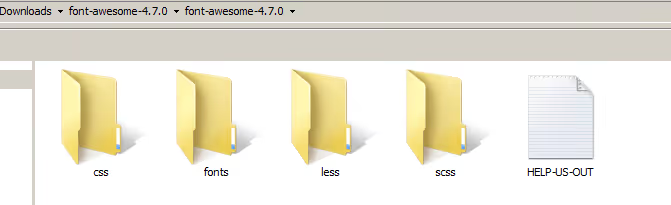
Only CSS and webfont files are needed for operation. Modern browsers only need the woff2 format, so ttf, eot, and svg files can be deleted.
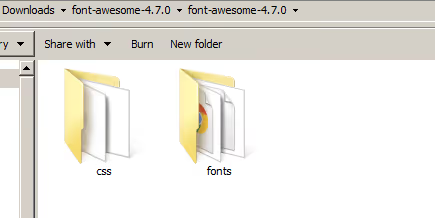
Delete Less and SCSS sources if you do not plan to compile them. Keep only css/ and fonts/ with the fa-solid-900.woff2 file (or equivalent for your version).
Step 3: edit the webfont in FontForge
Download and install FontForge (a free open-source font editor). Open the .woff2 file through File → Open.
In the FontForge interface, find the glyph panel. To avoid scrolling manually, go to Encoding → Compact: all occupied positions will move to the beginning.
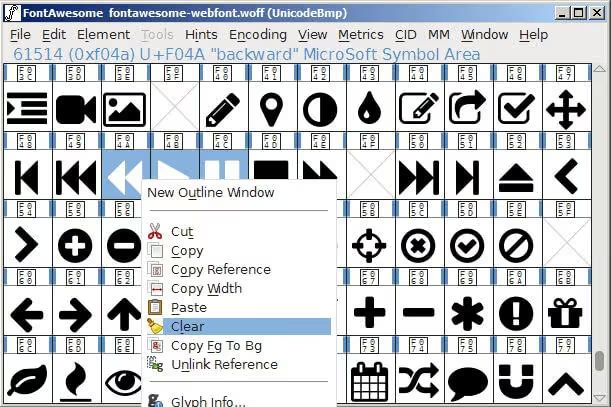
Now the most critical part: hold Shift and select all glyphs your site does NOT use. Delete them (Edit → Clear). Keep only icons actually present in your markup: social media, arrows, menu icons, brand logos.
Save the result: File → Generate Fonts. Select Web Open Font Format (woff2) and specify the filename. Replace the original webfont in the fonts/ folder with the trimmed version.
Reload the site and verify all icons. If any disappeared, you deleted a needed glyph: open FontForge again and repeat the selection more carefully.
Or maybe just switch libraries?
Sometimes the best optimization is not optimizing Font Awesome but choosing a tool that is lighter from the start. Modern alternatives provide icons in SVG format with tree-shaking at the import level: only the icons you explicitly import end up in the bundle.
Three options worth considering:
Lucide Icons: 1460+ icons, MIT license, direct successor to Feather Icons. Icons on a 24px grid, stylistically close to FA, but the package weighs mere kilobytes with tree-shaking. For React/Vue/Svelte, native components with
size,color, andstrokeWidthprops.Phosphor Icons: 1400+ icons in six styles (thin, light, regular, bold, fill, duotone). Each icon is imported individually:
import { House } from '@phosphor-icons/react'. No unused ballast.Bootstrap Icons: 2000+ SVG icons, free, actively developed. Direct compatibility with the Bootstrap ecosystem, but usable independently. Separate SVG files allow embedding icons inline without additional requests.
If your site runs on WordPress, check out our guide on adding Font Awesome to WordPress. For those who want to dig deeper into web fonts, there is a breakdown of loading web fonts without blocking rendering.
⁉️🤔 Frequently asked questions
What is icon subsetting and why is it needed?
Subsetting is the process of creating a reduced version of an icon font containing only the icons actually used on the site. The full Font Awesome 7 Free package weighs about 450 KB in compressed webfont files. A typical site uses 10-20 icons; after subsetting, the file shrinks to 10-15 KB. The loading difference immediately reflects in PageSpeed Score: typical improvement is 20-40 points.
How many icons does the browser load if I connected Font Awesome via CDN?
All of them. A CDN link to
all.min.csspulls the full set of three styles: Solid, Regular, and Brands. The browser loads all webfont files even if only one icon is used on the page. This is exactly why the CDN approach without a Kit is the most byte-expensive. A Kit with "By Icon" setting solves this problem: the CDN delivers only the icons you explicitly selected in settings.
Which optimization method should I choose for a WordPress site?
If your site runs on WordPress and you do not want to deal with CLI, use the official Kit (method 1). Setup takes 5 minutes in the fontawesome.com dashboard, and results are immediately served via CDN. If security policy prohibits using CDN, FontCut (method 2) works: download the ZIP, upload via FTP, connect in
header.php. For developers who want automation, fa-subset (method 3) can scan your theme's PHP templates and rebuild the font on every deploy.
Is it safe to delete webfont formats ttf, eot, and svg?
Yes. Modern browsers (Chrome, Firefox, Safari, Edge) have supported woff2 since 2016. According to Can I Use data, support covers 98%+ of the global browser market. The woff2 format provides better compression (on average 30% more compact than woff). Files eot (needed only for IE8), ttf, and svg can safely be deleted from the fonts folder. Keep only woff2, and if you need support for old Safari on iOS 12 and below, add woff as a fallback.
Is it worth using Font Awesome at all in 2026?
It depends on the project. If you already have Font Awesome implemented and use 5-10 icons, subsetting (any method above) solves the weight problem in an hour. If the project is new and you are choosing a library from scratch, consider Lucide or Phosphor: they are built around tree-shaking from the start and produce zero overhead. Font Awesome remains the leader in icon ecosystem quantity and integrations, but its weight cost without subsetting is higher than modern SVG alternatives.
Is it worth bothering with a few dozen kilobytes?
Definitely yes. Every unoptimized kilobyte on the critical rendering path directly reduces conversion. Amazon calculated that 100 ms of loading delay costs 1% in sales. Google penalizes slow pages in mobile search results. This is not perfectionism; it is direct economics.
Choose the method for your situation:
- Minimum effort: Kit with By Icon setting. 5 minutes, result immediately on CDN.
- Local hosting, no registrations: FontCut. 10 minutes, ZIP on your server.
- CI/CD automation: fa-subset. Scans code, rebuilds on deploy.
- Full control: FontForge or IcoMoon. Takes longer, but you know every glyph.
Reducing from 450 KB to 15 KB changes speed perception dramatically. Try it on one project, measure PageSpeed before and after. The result will speak for itself.

A professional team of writers and editors specializing in creating quality content.