














🚀 Migrating a WordPress site with Duplicator: complete guide from backup to launch
Migrating a WordPress site from a local server to a live hosting environment is a task that intimidates beginners. Manual migration through database export, wp-config.php editing, and FTP wrangling takes hours, and a single mistake in a path or table prefix breaks the entire site.
Migration plugins handle this task: they package the site into an archive, transfer it, and deploy it to a new location in just a few clicks. One of the oldest and most reliable tools for this is Duplicator: it has worked with WordPress since 2011, has a 4.9 out of 5 rating in the repository, and boasts over 1.5 million active installations.
In this guide, we will walk through step by step how to migrate a WordPress site from a local environment to Cloudways cloud hosting via Duplicator. But the principle itself is the same for any hosting provider, only the server connection details change.
💡 Quick overview:
- Installing Duplicator and creating a backup package (files + database are packed into a ZIP archive)
- Uploading the archive and
installer.phpto the target server via FTP client - Running the installer in the browser and entering database credentials, Duplicator automatically replaces URLs and paths
- Testing the migrated site and running Security Cleanup to remove installation files
Alternative plugins
Duplicator is not the only way to migrate a site. Here are a few more proven tools, each with its own specialization.
All-in-One WP Migration, a free plugin that handles migration in literally three clicks: export → drag the file to the new site → import. The limitation of the free version is 512 MB per upload file; for large sites you need an extension. Over 5 million installations, 4.6 out of 5 rating on WordPress.org.
UpdraftPlus, a combined backup and migration plugin. The free version can save backups to the cloud (Google Drive, Dropbox, and a dozen other storage services); the paid version adds a migrator, the ability to restore a backup on another site without manual intervention. Over 3 million active installations and a 4.8 rating on WordPress.org.
WP Migrate (formerly WP Migrate DB Pro) from Delicious Brains, a professional tool for developers. Designed for push/pull databases between environments (local → staging → production), can replace URLs "on the fly" and doesn't break serialized data. From $49 per year at deliciousbrains.com.
BackupBuddy (now Solid Backups) from SolidWP, a market veteran with all-in-one backup and migration functionality. Supports cloud storage, backup scheduling, and one-click restore. Premium product, from $99 per year at solidwp.com.
Migrate Guru, a free plugin from the BlogVault team for migrating large sites (up to 200 GB). Migration happens on Migrate Guru servers, not loading your hosting, which saves sites on weak shared plans. Available on WordPress.org.
WP Clone, a lightweight and simple tool for quick site cloning. Free, with minimal settings: specify the target site URL and you're done. Suitable for small projects that don't need cloud storage and schedules. Available on WordPress.org.
All of them work, but for a step-by-step guide we're using Duplicator, it has the most transparent process and excellent documentation.
Installing Duplicator and creating a backup
We start with the local site, the one you need to migrate. First, let's install the plugin and make a full backup.
Step 1: Installing the plugin
In the WordPress admin panel, go to "Plugins" → "Add New". In the search bar on the right, type "Duplicator", the plugin will appear first in the results. Click "Install Now", and after installation, "Activate".
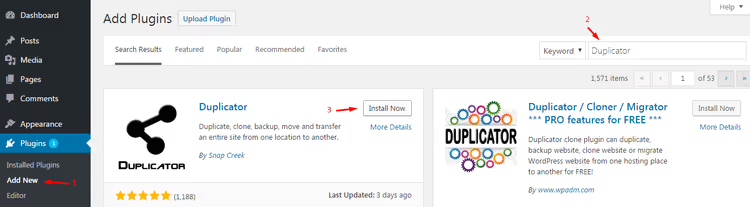
The second method is to download the plugin directly from Duplicator's page on WordPress.org and upload the ZIP archive via "Plugins" → "Add New" → "Upload Plugin".
After activation, a new item will appear in the left menu of the admin panel, Duplicator.
Step 2: Creating a backup package
Go to Duplicator → Packages and click the "Create New" button.
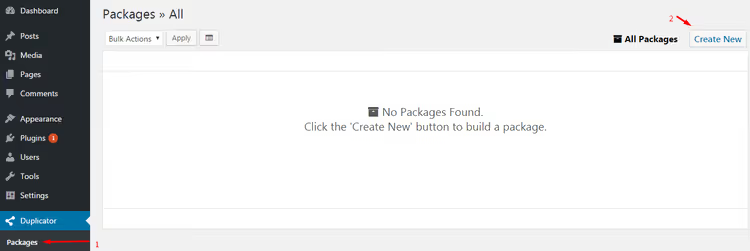
The build process consists of three stages.
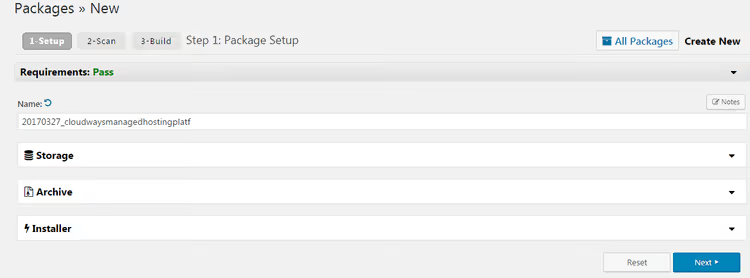
Stage 1, Setup. The plugin checks the environment and warns about potential problems. If everything is green, click Next.
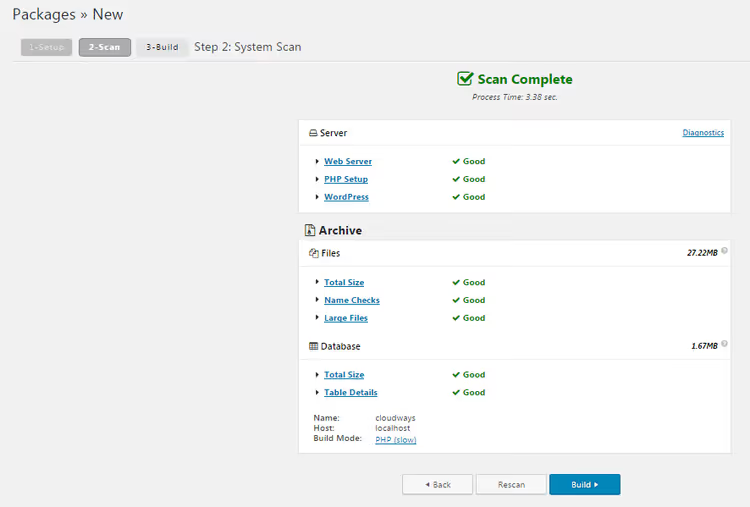
Stage 2, Scan. Duplicator scans the site: counts the size of files, database tables, and rows. If the archive size exceeds the hosting limit, a warning will appear. When everything is fine, click Build.
Stage 3, Build. The plugin packages files and database into a ZIP archive. Upon completion, you will receive two files: installer.php (the installer) and an archive with a name like 20250614_sitename_archive.zip. Download both to your computer.
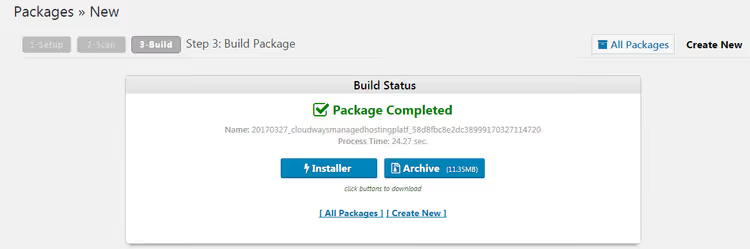
The backup is ready. Now let's transfer it to the live server.
Migrating the site to a cloud server
The following steps are shown using Cloudways as an example, a cloud hosting provider with a convenient control panel. If you are using another hosting provider (Timeweb, Beget, VDS with ISPmanager), the logic is the same: you need FTP access and database credentials.
Preparing the server on Cloudways
Log in to the Cloudways console. If you don't have an account yet, sign up, new users get a trial period.
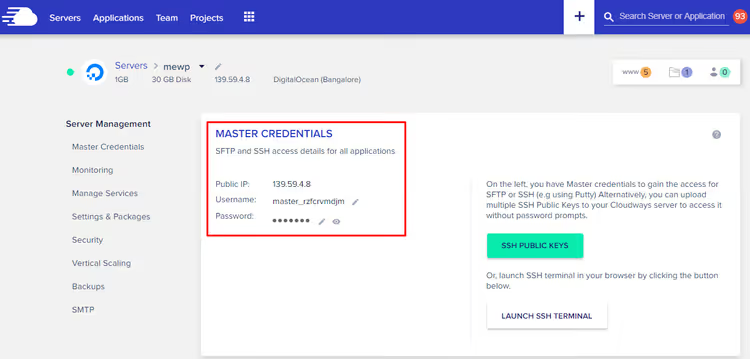
After logging in, go to the Servers tab and select the server to which you will migrate the site. In the Server → Server Management section, find the Master Credentials tab, there are your FTP credentials: host, username, and password.
Uploading files via FTP
To upload files to the server, use any FTP client. We recommend FileZilla, it's free, cross-platform, and stable. Download the latest version from the official website.
Connect to the server by specifying the host, username, password, and port. For Cloudways use port 22 (SFTP), this will avoid firewall problems.
An important preparatory step: delete the wp-config.php file from the public_html folder on the target server (if it's there). Duplicator will create a new configuration file with the correct database connection data.

Now navigate to the public_html folder of your application and upload both files there, installer.php and the ZIP archive. The upload may take a couple of minutes: site archives often weigh from 100 MB to several gigabytes.
Running the Duplicator installer
Open a browser and enter in the address bar the URL of your site with the suffix /installer.php:
1 https://your-domain.com/installer.php
You will see the Duplicator installer interface.
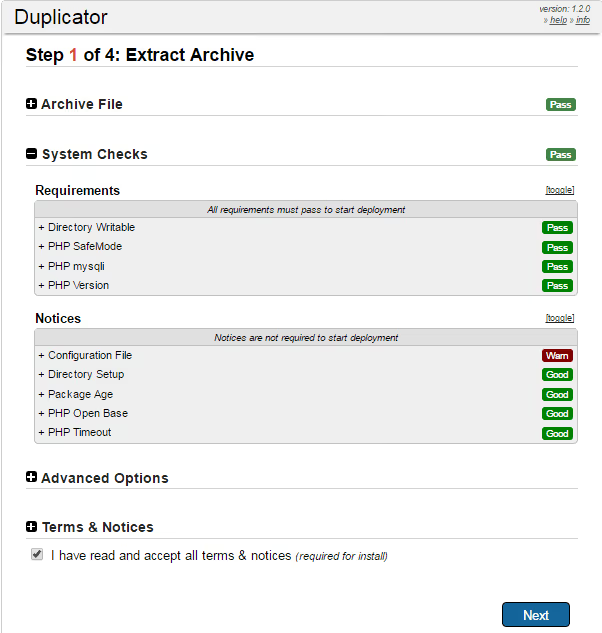
The installer checks that the archive is available and the server meets the requirements. If everything is fine, click Next.
Configuring the database connection
Now you need to create a database on the server and enter its credentials. On Cloudways this is done in the control panel: select Server → your application and scroll down to the Application Management section.
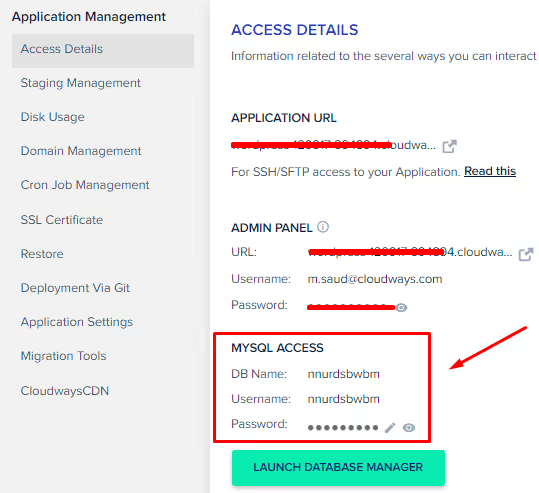
Copy three values from there: Database Name, User Name, and Password. Paste them into the corresponding fields of the Duplicator installer. Click Validate, the plugin will check the connection. Green indicators next to the "Server Connected" and "Database Found" fields mean everything is configured correctly.
The database must be empty. If there were any tables on the server already, delete them. On Cloudways: click Launch Database Manager, check all tables with checkboxes, and execute Drop.
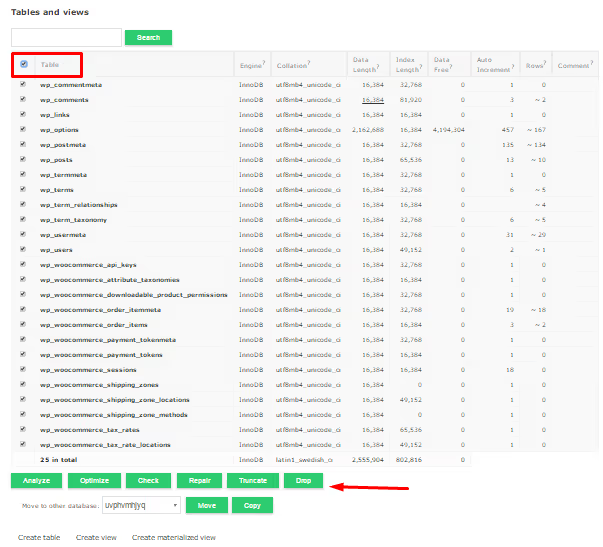
Confirm the deletion.
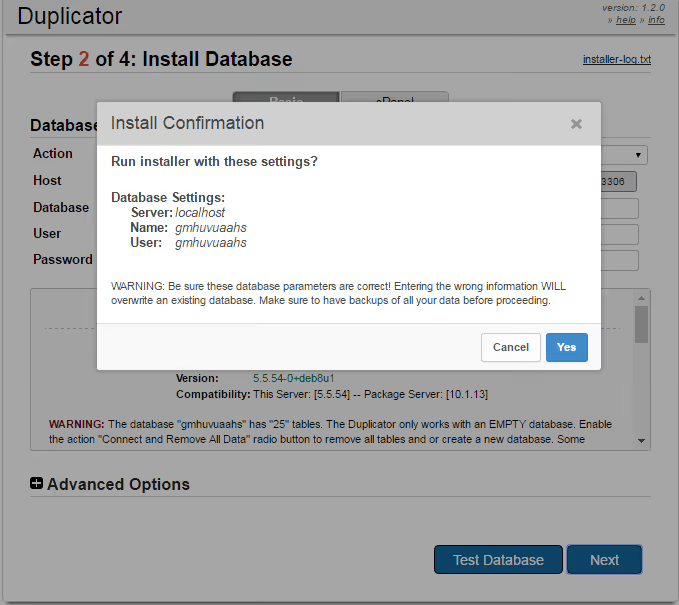
Now click Next to proceed to the next step.
Automatic URL and path replacement
Duplicator analyzes the old and new URLs, as well as file paths, and offers automatic replacement. In most cases, the values are filled in correctly, the plugin itself determines the domain and root directory.
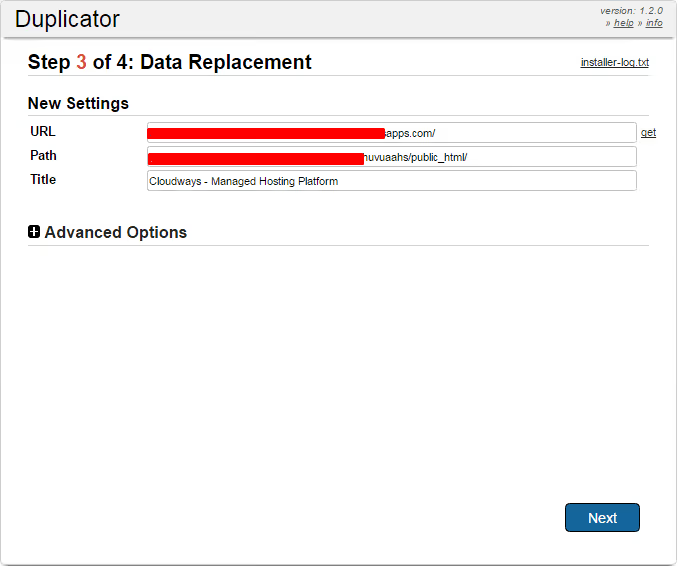
Click Next, the plugin will deploy the site, replace all links in the database, and create a new wp-config.php.
Final steps and testing
After the installation is complete, Duplicator will offer three actions:
- Save Permalinks, saves the permalink structure (click to make pretty URLs work correctly);
- Test Site, opens your site in a new tab for verification;
- Security Cleanup, deletes installation files (
installer.php, archive, and temporary data) so attackers cannot restart the installation.
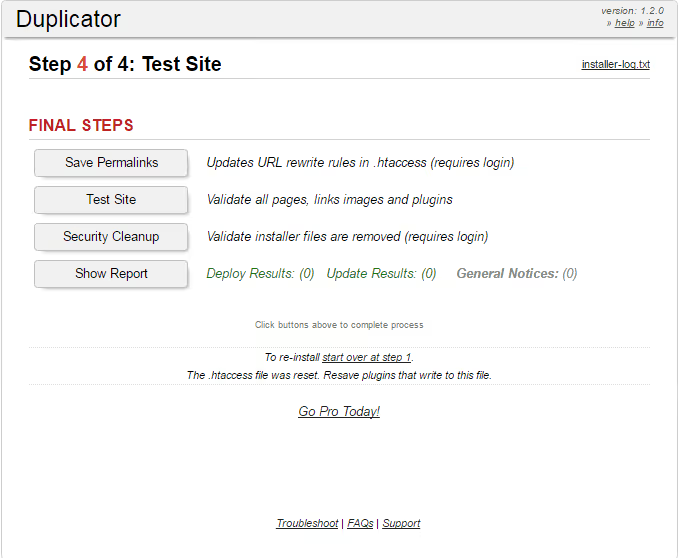
Be sure to run Security Cleanup after you make sure the site is working correctly. That's it, migration is complete.
What to do with large sites: backups over 1 GB
Archives of large sites often don't upload via FTP due to hosting limitations or break off midway. The solution is to unpack the archive locally and upload the site files directly.
Suppose you have this backup:

Unpack the Duplicator ZIP archive. If there is a nested archive inside, unpack that too. As a result, you will get the site's root folder with all files:
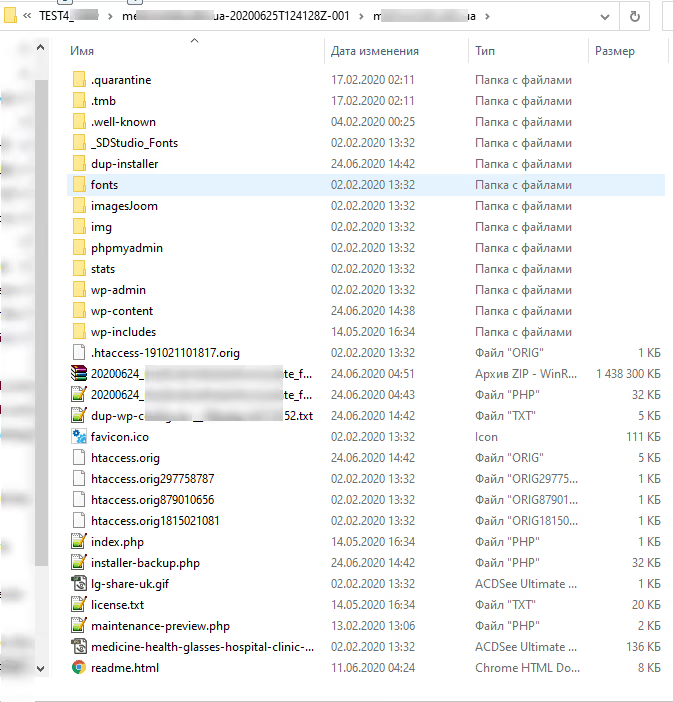
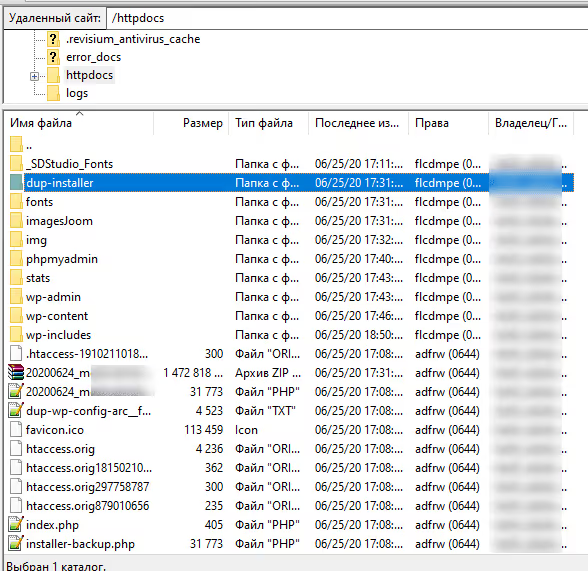
Copy all these files and folders to the server via FTP (usually to the httpdocs or public_html folder):
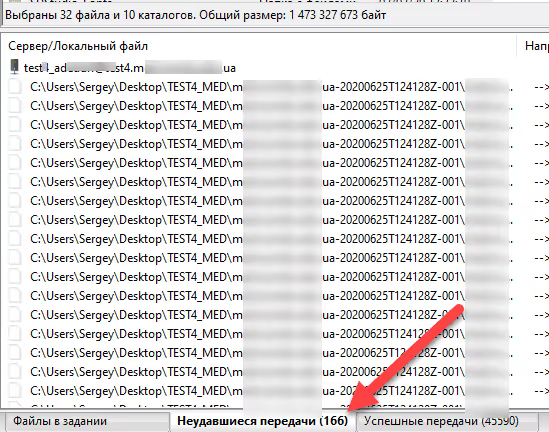
After the upload is complete, carefully check the FTP client logs. In FileZilla, this is the "Failed transfers" tab, where you can see files that didn't upload:
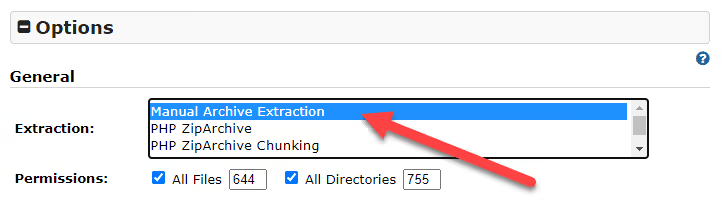
When all files are on the server, open https://your-domain.com/installer-backup.php in your browser. On the installer page, select the Manual Archive Extraction option, which tells Duplicator that the site is already unpacked in the file system:
Then proceed with the standard process: entering database data, URL replacement, final steps.
How to fix transfer errors in FileZilla
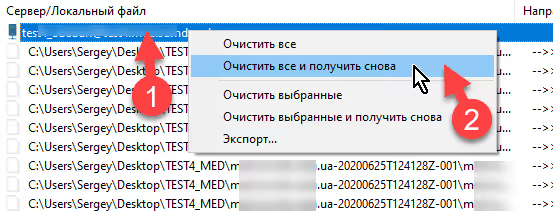
If after uploading there are files left in the "Failed transfers" tab, it's okay. Select them all (marker 1 in the screenshot below), right-click, and choose "Reset and requeue all" (marker 2):
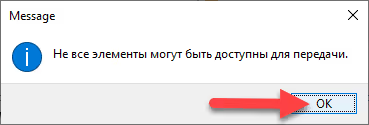
If a dialog appears with a warning about overwriting, confidently click OK:
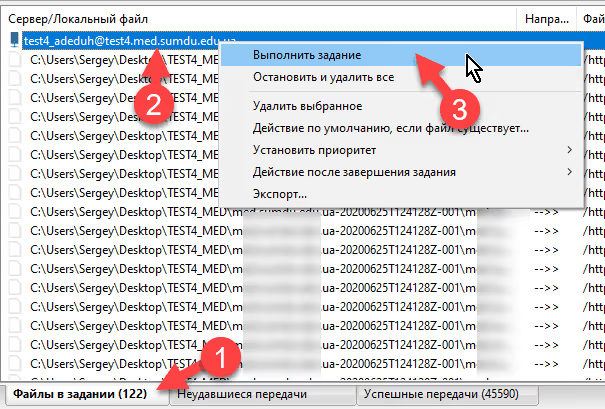
After that, go to the "Queued files" tab, check the item under marker 2, and click "Process Queue" (marker 3):
If a window appears in the process asking about the action for existing files, choose "Overwrite" and check "Always use this action":
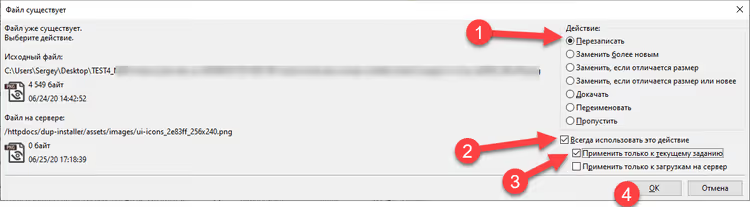
After completion, check the "Failed transfers" tab again, usually 1-2 problematic files remain. Repeat the procedure and they will upload too.
Common problems and their solutions
ZipArchive not enabled on the server
If when scanning the site before building the backup you see the error ZipArchive Enabled, Fail, it means the PHP extension for working with ZIP archives is not installed on the server.
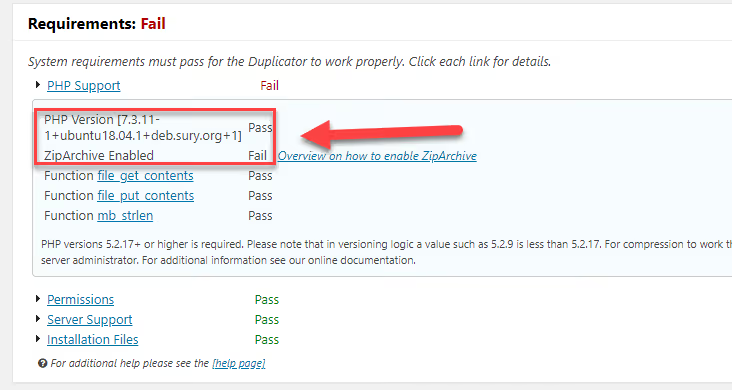
This is fixed with a command in the server console (requires SSH access):
1 sudo apt-get install php8.2-zip
Specify the PHP version number (8.2) that is used on your server. After installation, restart the web server:
1 sudo systemctl restart apache2
Errors when creating a backup of a large site
On sites heavier than 1 GB, Duplicator may give timeout or memory shortage errors when building a full archive. The solution is to create a backup of only the database, and copy the site files manually via FTP.
When creating a package, select the "Archive Only the Database" option:
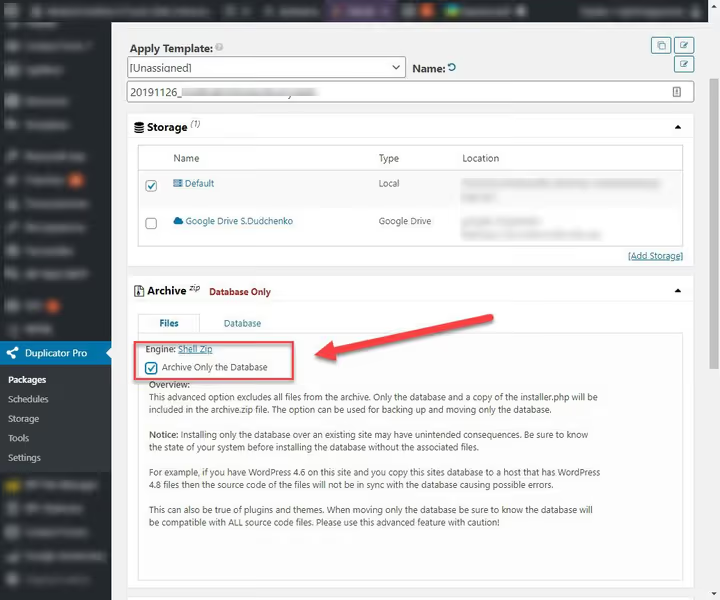
Then the algorithm is as follows: create a database backup via Duplicator → download site files from the current hosting via FTP → upload them to the new server along with the database backup → run installer.php → standard deployment. This feature is available in both the free and Pro versions of the plugin.
Useful video on the topic
Before moving on to frequently asked questions, here's a short video that visually demonstrates the entire process of migrating a WordPress site via Duplicator from start to finish:
⁉️🤔 Frequently asked questions
Do I need to pay for Duplicator to migrate a site?
The free version of Duplicator (Lite) is sufficient for most migration tasks: create a backup, transfer to a new server, deploy. The Pro version from $49 per year adds cloud storage (Google Drive, Dropbox, Amazon S3, OneDrive), scheduled backups, multisite support, and migration of sites larger than 2 GB without manual manipulation. For a one-time migration of a single site, the Lite version is more than enough.
Can I use Duplicator to migrate a site between two live servers?
Yes, the process is the same: create a package on the source server, download
installer.phpand the archive, upload to the target server, and run the installer. The only caveat is that the source site continues to work during migration, so changes made to it after creating the backup will not reach the new server. We recommend briefly enabling maintenance mode on the source site to avoid discrepancies.
What to do if the Duplicator installer doesn't see the database?
Three common reasons: incorrect credentials (check the database name, user, and password, copy them from the hosting panel, don't enter them from memory), database not created (create it through the hosting panel or phpMyAdmin), and user rights issue (make sure the MySQL user has full privileges on this database,
GRANT ALL PRIVILEGES).
Why is Duplicator better than manual migration?
Manual WordPress migration is more than ten steps: database export, creating a new database on the target server, importing the dump, manual URL replacement in SQL (because serialized data is not fixed by simple search and replace), copying wp-content via FTP, editing wp-config.php, resaving permalinks. Duplicator does all this automatically and correctly handles serialized strings, this is the main advantage. An error in one step of manual migration costs a broken site.
Can I migrate a site to a local server (localhost) via Duplicator?
Yes, and this is a common scenario: pull a live site to a local environment for development or testing. The process is exactly the reverse: create a backup on the live server, download the files, run the installer at
localhost/installer.php. Duplicator will automatically substitute local paths and URLs. The only requirement is that a web server with PHP and MySQL must be deployed on the local machine (Laragon, XAMPP, Local by Flywheel, or MAMP).
Is it worth using Duplicator in 2026?
Duplicator remains one of the best tools for WordPress migration in 2026, and it's not just about the age of the plugin. It covers the entire site relocation cycle in 15-20 minutes, correctly works with serialized data (WordPress's sore point), and is not tied to a specific hosting provider: it works with Cloudways, VDS on bare metal, and a local server.
The free version covers the vast majority of migration scenarios. The Pro version is needed when a site exceeds 2 GB or when migration is put on a conveyor and scheduled backups to the cloud are needed.
If the task is to migrate a site once from a local machine to hosting, Duplicator Lite will cover it completely. If you migrate regularly or work with large projects, take a look at Pro. In any case, keep alternatives (All-in-One WP Migration and UpdraftPlus) bookmarked: in some scenarios they may work faster.
Try it out and choose the tool for your task, and we will continue testing migration plugins and reporting the results.

A professional team of writers and editors specializing in creating quality content.