













 AIIllustrative image: AI-generated
🔗 Setting up WordPress permalinks: a step by step guide
You installed WordPress, wrote your first post, opened the site, and the address bar shows /?p=123. It looks terrible: neither the reader nor the search engine understands what the page is about. Yet URL structure directly affects click-through rates in search results and whether users decide to return to your site.
The default WordPress scheme outputs a bare post ID with zero semantic value. Switching to a human-readable format takes two minutes but pays off for years. There is a catch, though: changing permalinks on a live site with hundreds of published posts is genuinely scary. There is a safe approach for that too, and we will walk through it.
Below is a step-by-step guide covering everything from choosing a format to setting up redirects when changing the structure on a live site. With screenshots from the admin panel and no fluff.
💡 Quick overview:
- Go to Settings → Permalinks and choose "Post name"
- Build a custom structure from tags if your site needs special URL logic
- Replace the category base from
/category/to something topical for niche blogs - Install a redirect plugin if you are changing the structure on a live site
What permalinks are and why you should change them
A permalink is a unique URL pointing to a specific post, page, category, or tag. WordPress generates these addresses automatically on publication, and technically they do not change (hence "permanent").
The default "Plain" structure produces an address like example.com/?p=123. It works: the site loads and pages get indexed. But it has three problems:
- Users cannot tell from the URL where they will land, so they click less often.
- Search engines have a harder time determining page relevance to a query.
- A keyword in the URL is one ranking factor, and
?p=123contains none.
The "Post name" structure (example.com/how-to-set-up-permalink/) solves all three problems at once. Nearly every SEO plugin recommends it, and Yoast SEO along with Rank Math display a warning if the keyword is missing from the URL.
Step 1: choose the right structure
WordPress offers six permalink options. Let us examine each one: who it suits and who it hurts.
Structure | Example URL | Who it suits |
|---|---|---|
Plain |
| We recommend this to no one; there is no worse option |
Day and name |
| News sites with dozens of posts per day |
Month and name |
| Blogs where chronology matters but not the exact date |
Numeric |
| Rarely used; meaningless to readers |
Post name |
| Most sites; our main recommendation |
Custom structure | Configured with tags | When you need special logic: authors, categories in the URL |
Post name is the gold standard. Short, readable, keyword right in the address. A three-year-old article does not look "stale" just because the URL lacks a date.
Day and name or Month and name make sense for news sites and publications with high posting frequency. For an ordinary blog, however, a date in the URL creates a problem: an updated post with a /2023/05/... structure is subconsciously perceived as outdated, even when the content is fresh.
Step 2: change the settings in the admin panel
Go to Settings → Permalinks. You will see six radio buttons and a field for a custom structure.
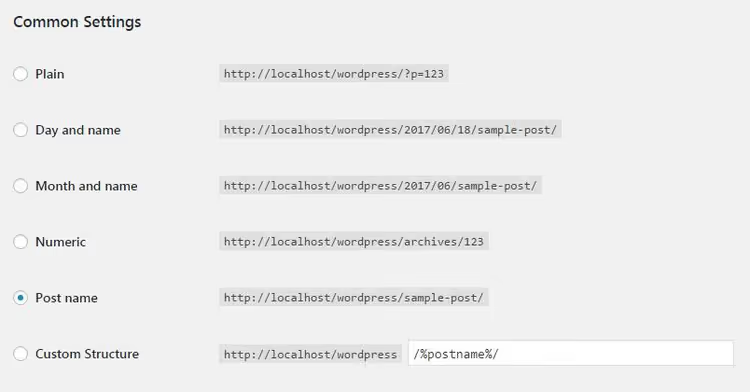
Select the option you want (for example, "Post name") and click Save Changes. For the first five options, that is all you need. WordPress immediately rebuilds every URL on your site to match the new scheme.
If you are changing the structure on a site that already has published posts, do not close the admin panel after saving. The next mandatory step is redirects (covered in step 5).
Step 3: build a custom structure
The "Custom Structure" option lets you assemble your URL format from ten structure tags. Here is the full list:
Tag | What it outputs |
|---|---|
| Publication year (four digits) |
| Month (two digits) |
| Day (two digits) |
| Hour |
| Minute |
| Second |
| Numeric post ID |
| Post title (sanitized, lowercase with hyphens) |
| Category name |
| Author name (sanitized) |
The most common scenario is combining category and title. If your blog actively uses categories to organize content, the structure /%category%/%postname%/ tells readers which section they are in right from the URL.
When building a custom structure, add a forward slash / after each tag except the last one. The final string:
/%category%/%postname%/
By default, WordPress pre-fills the "Custom Structure" field with /%postname%/, exactly the same scheme as "Post name." Change it only if you understand why you need additional tags.
Step 4: change the category and tag base
Categories and tags have their own URL prefixes. By default, these are /category/ and /tag/:
example.com/category/cakes/``example.com/tag/chocolate/
At the bottom of the permalink settings page, WordPress lets you replace these bases with any other words.

Say a cooking blog uses categories only for recipes and tags only for ingredients. It makes more sense to do this:
- Category base:
recipes→ URL becomesexample.com/recipes/cakes/ - Tag base:
ingredients→ URL becomesexample.com/ingredients/chocolate/
Changing the base only makes sense if it accurately matches the section's content. On a general-purpose blog, /category/ and /tag/ are a neutral and understandable choice.
Step 5: change the structure on a live site without losing traffic
The most common fear: "I will change my permalinks and all the old URLs will break." That fear is justified. Search engines have already indexed pages under the old addresses, users may have bookmarked them, and other sites may have linked to them externally.
The solution is a redirect plugin that automatically sends visitors and search bots from the old URL to the new one. WordPress does not do this out of the box, so after changing the structure you need one of three tools:
- Redirection: a free plugin with 2 million active installs. It tracks permalink changes and creates 301 redirect rules automatically. Updated to version 5.8.0 with WordPress 7 support.
- Rank Math: an SEO plugin with a built-in redirect manager in the free version.
- Yoast SEO: the premium version can redirect when the structure changes; the free version cannot.
After installing the plugin, check the 404 error log a few days later. It will show whether the redirect missed any pages. Add any missing URLs manually.
An important note: the sooner you settle on a structure, the better. Ideally, do it before publishing your very first post. Then you will not need redirects at all.
🎥 Video: setup in two minutes
A short tutorial: the entire process from logging into the admin panel to saving settings:
⁉️🤔 Frequently asked questions
Which permalink structure is best for SEO?
"Post name" is the virtually unanimous choice of the SEO community. The keyword appears in the URL, the address stays short and readable, and the absence of a date extends the content's "shelf life" in the reader's eyes. According to a WordPress.org survey, more than 60% of sites use this exact structure.
Can I change permalinks retroactively on a site with a thousand posts?
Yes, but carefully. After changing the structure, old URLs will stop working, so you need a redirect plugin. Redirection handles most pages automatically, but occasional misses are possible. Check the 404 log a few days after migration and add any missing URLs manually.
What is the difference between "Post name" and "Custom Structure" with the *%postname%* tag?
Nothing. When you first open the settings page and switch to "Custom Structure," WordPress automatically pre-fills
/%postname%/, which produces exactly the same URLs as "Post name." The difference only appears when you add other tags.
Should I include the category in the URL?
It depends on your blog's structure. If categories are a key navigation element and there are not many of them (5 to 7), including
/category/post-title/helps readers orient themselves. But if you have dozens of categories with overlapping content, the extra segment in the URL only makes the address more complex without any benefit.
Do I need to change the category base from */category/* to something else?
Only if your blog's topic is narrow and the word "category" looks out of place. Cooking site →
/recipes/, portfolio →/projects/, online store →/shop/. For a general-purpose blog,/category/does not get in the way.
What should I do if my site returns 404 on all pages after changing the structure?
First, check whether the permalink settings were actually saved. Sometimes after a WordPress update or migration the
.htaccessfile gets reset. Go to Settings → Permalinks and click "Save Changes" again, even without changing anything. WordPress will rewrite the rules and restore URL functionality. If that does not help, verify thatmod_rewriteis enabled on your server.
What to set on your site: the bottom line
For a typical blog, company site, or portfolio, choose "Post name" and keep it simple. This option covers the vast majority of WordPress projects and requires no maintenance down the road.
For a news outlet with dozens of posts per day, go with "Day and name," because here a date in the URL actually helps. If your content structure is tightly tied to categories, use the custom scheme /%category%/%postname%/. And if you are already running a site with hundreds of published pages, change the structure along with a redirect plugin and monitor the 404 log.
The choice you make now will serve you for years. It is better to spend five minutes on setup before launch than a full day fixing broken URLs later.

A professional team of writers and editors specializing in creating quality content.