













 AIIllustrative image: AI-generated
🔑 WordPress social login: setting up Facebook and Google in half an hour
Registration on a website is the moment you lose half your visitors. Nobody wants to invent a password, check their email, and remember yet another login-password pair.
With social networks, users sign in with one click: Facebook or Google have already verified their identity. According to LoginRadius data for 2024, 53.1% of users choose Facebook, and 44.8% choose Google. Other networks barely reach 2%.
Below is a step-by-step guide to setting up login via Facebook and Google with the Nextend Social Login plugin. You will go from installing the plugin to live buttons on your login page in half an hour.
💡 Quick overview:
- Install Nextend Social Login from the WordPress.org directory
- Create a Facebook app in Meta for Developers and obtain App ID + App Secret
- Create a Google app in Google Cloud Console and obtain Client ID + Client Secret
- Enter the keys in the plugin settings on your site and test the login
- Enable the providers, and "Continue with Facebook" and "Sign in with Google" buttons will appear automatically
Nextend Social Login plugin: what it does and why this one
Nextend Social Login on WordPress.org is a free plugin with 200,000+ active installations and a 4.5-star rating. The latest update was released in 2026, and the plugin is actively maintained.
What the free version offers:
- One-click login and registration via Facebook, Google, and X (formerly Twitter)
- Linking social accounts to an existing WordPress account in the user profile
- Avatar from social profile instead of Gravatar
- Widget and shortcodes for placing buttons anywhere on the site
- Customization of button appearance and text
The Pro version adds compatibility with WooCommerce, BuddyPress, Ultimate Member, and over two dozen additional providers: Apple, Microsoft, LinkedIn, GitHub, Discord, TikTok, and others.
The plugin works out of the box: after configuring a provider, buttons automatically appear on the /wp-login.php page, in the wp_login_form() form, and in the user profile.
How to set up login via Facebook
Go to Settings → Nextend Social Login and click Getting Started in the Facebook section:
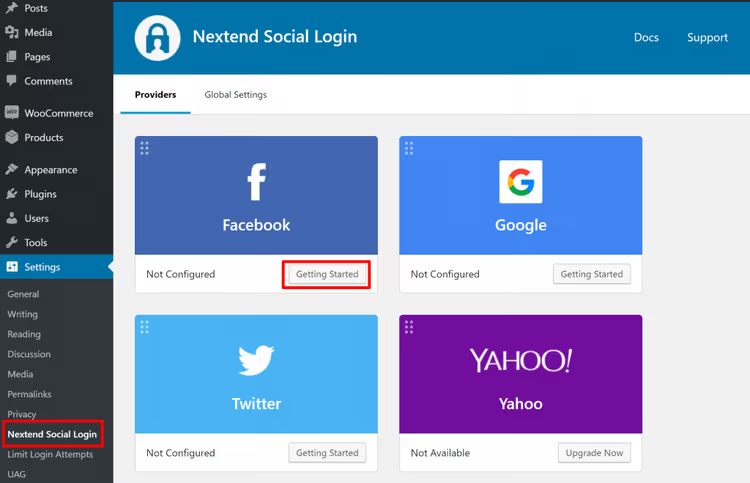
The plugin will walk you through the steps. But the order is: first create an app on the Facebook side, then enter the keys back into WordPress.
Step 1: Create a Facebook app
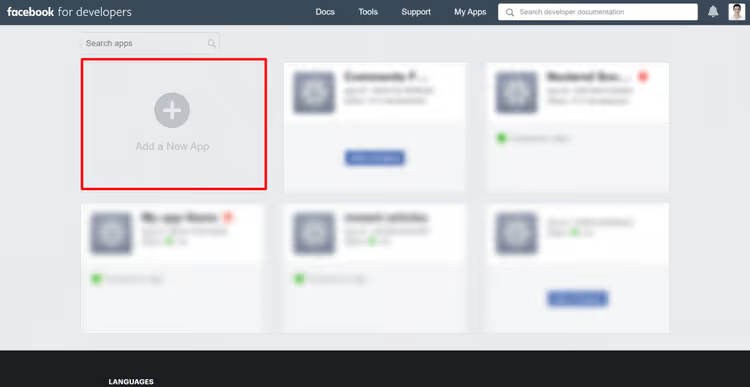
Open Meta for Developers and click Create App:
In the popup window, enter the display name (users will see it when signing in, your site name works well) and contact email:
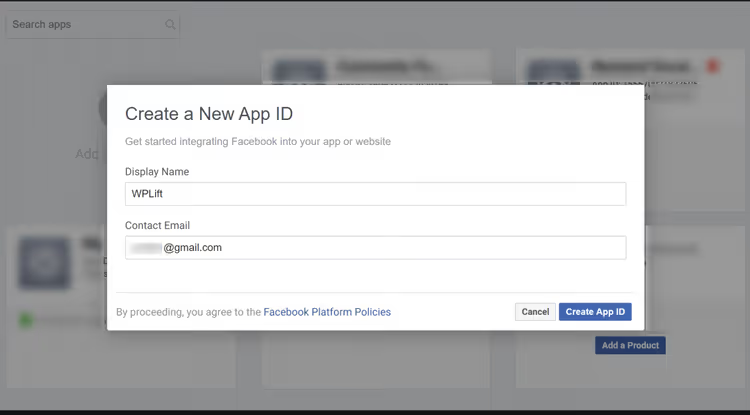
Click Create App ID.
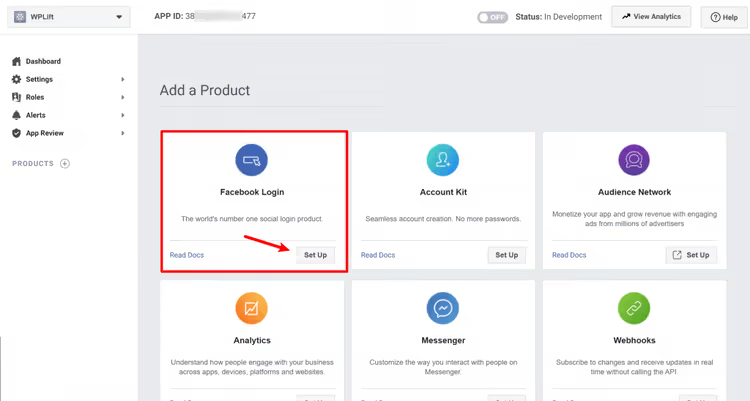
Now you are in the app settings. Find Facebook Login and click Set Up:
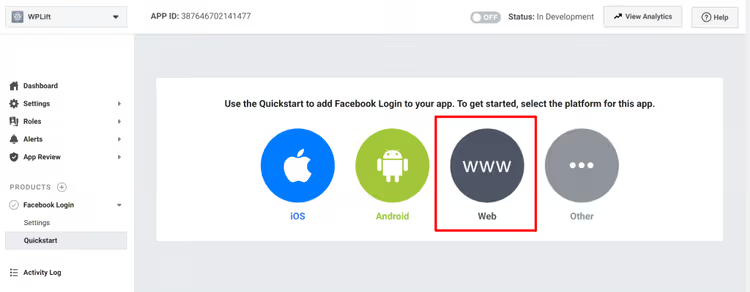
On the next screen, select Web:
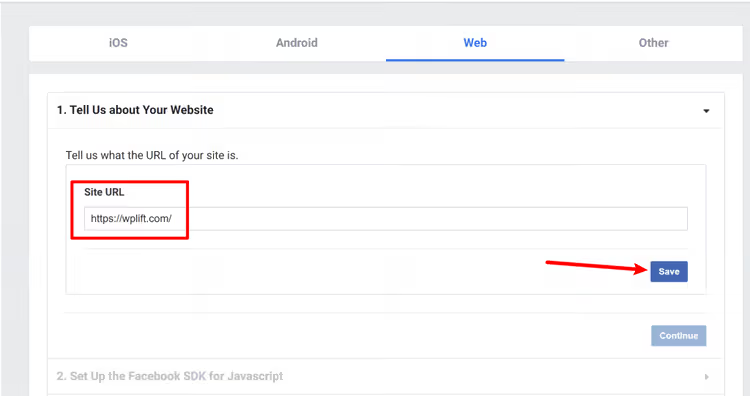
Enter your site URL and click Save, then Continue:
Facebook will then show several additional options; the plugin handles them for you, just scroll through.
Two important actions remain.
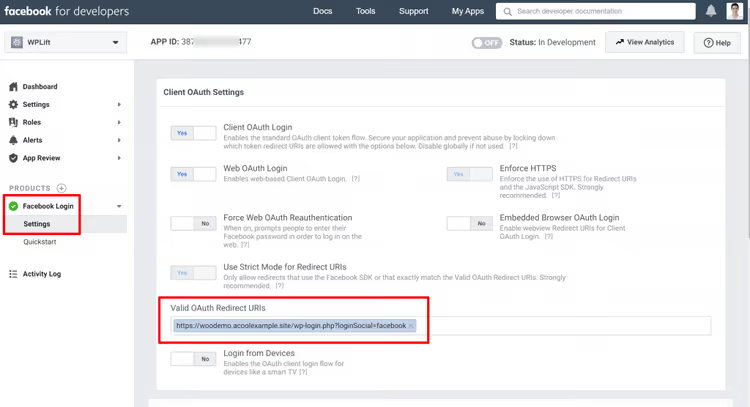
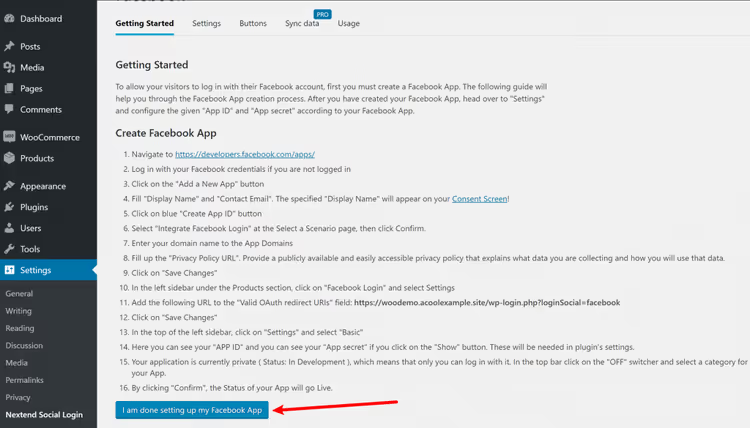
First: go to Facebook Login → Settings and add the OAuth redirect URL to the Valid OAuth Redirect URIs field. The URL format is: https://yoursite.com/wp-login.php?loginSocial=facebook:
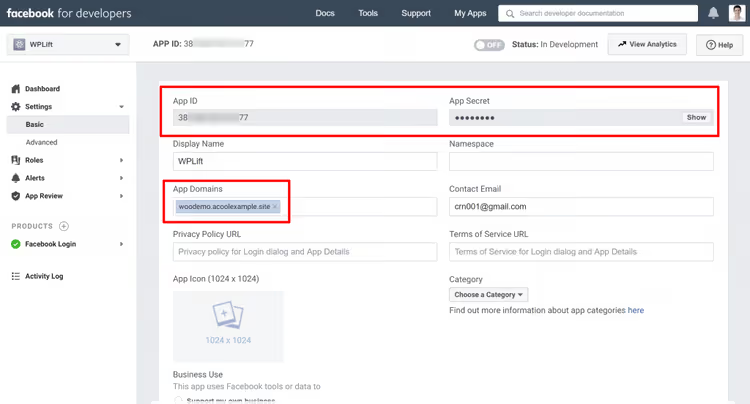
Second: go to Settings → Basic and add your site domain to App Domains. After saving, click the Show button next to the App Secret field. You need the App ID and App Secret for the next step:
The Facebook side setup is complete.
Step 2: Enter the keys in the plugin
Return to WordPress. Click I am done setting up my Facebook App:
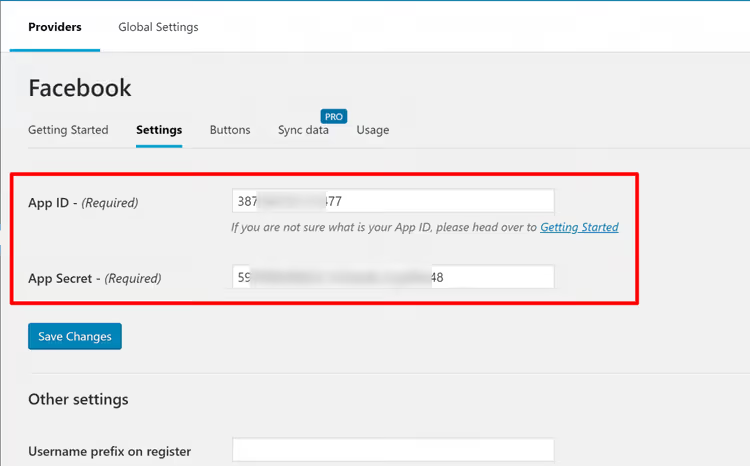
Paste the App ID and App Secret from the developer console and click Save Changes:
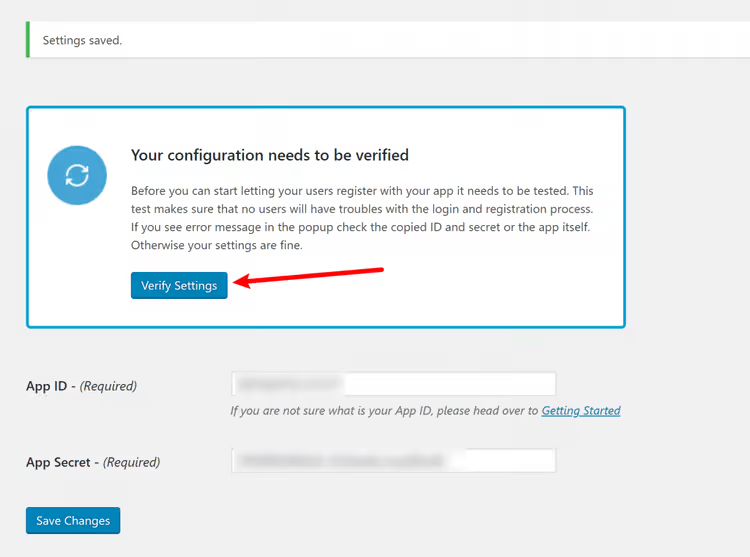
The plugin will prompt you to verify the connection. Click Verify Settings:
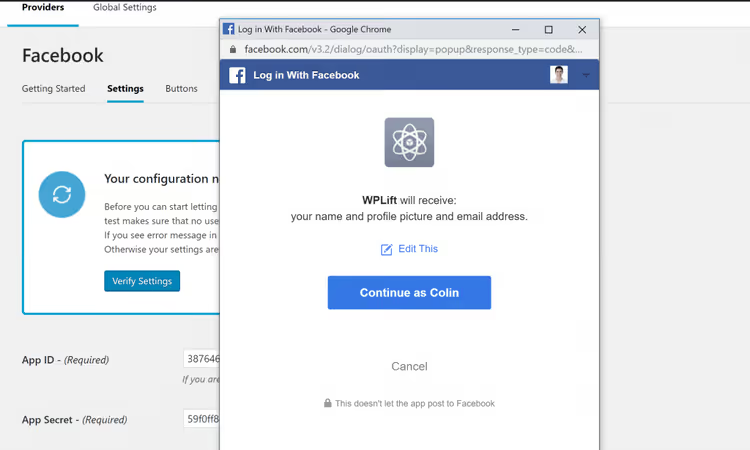
If everything is correct, a Facebook login popup will open. Sign in to confirm:
After successful verification, enable the provider by clicking Enable:
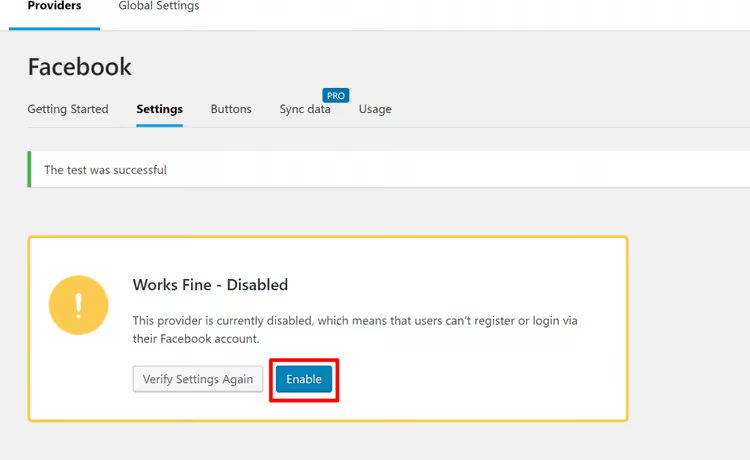
Done. A Continue with Facebook button now appears on the /wp-login.php page:
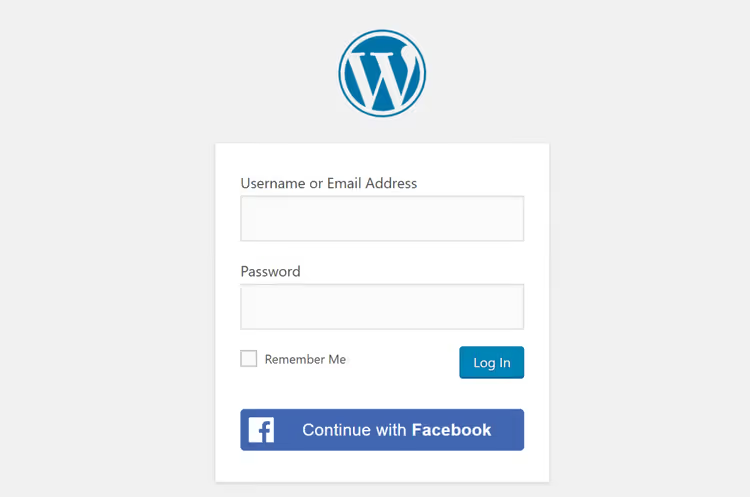
In the plugin settings, you can change the button text, appearance, and post-login behavior (for example, set a custom redirect URL after registration).
How to set up login via Google
In Settings → Nextend Social Login, click Getting Started in the Google section:
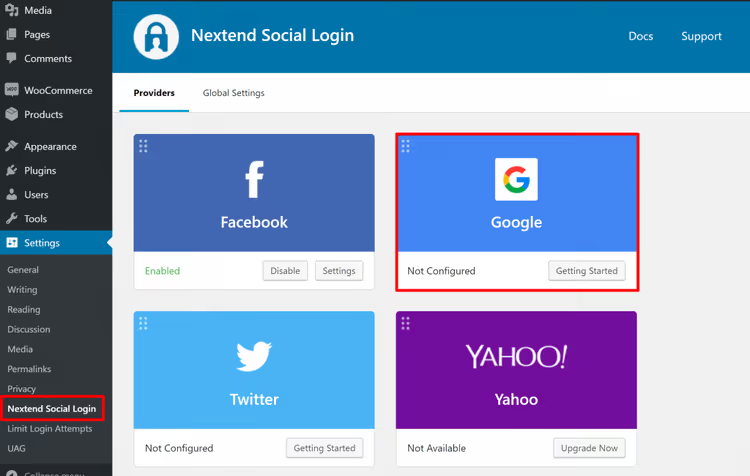
Step 1: Create a Google app
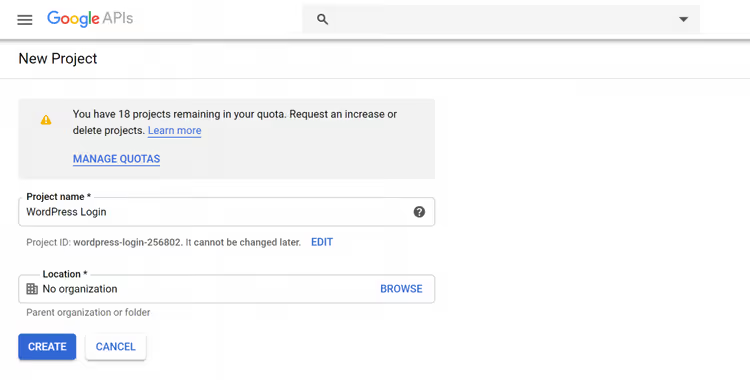
Open Google Cloud Console and create a new project or select an existing one:
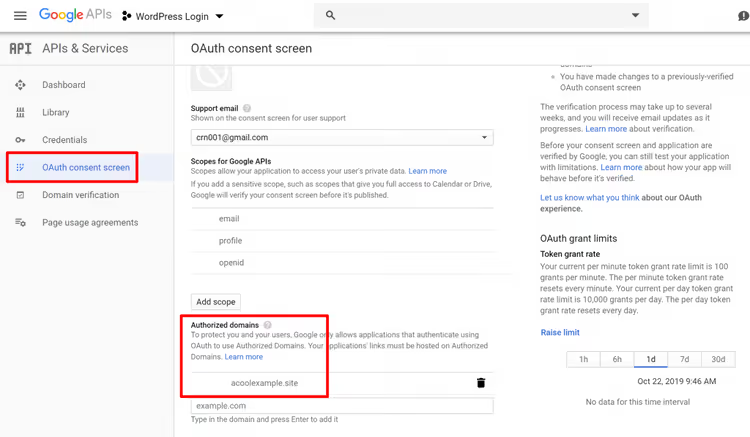
In the sidebar, select OAuth consent screen. Add your site domain to Authorized domains and fill in the contact information:
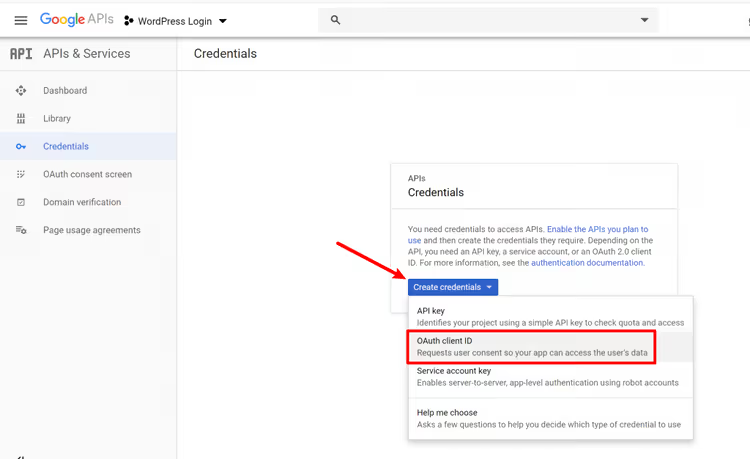
After saving, go to Credentials. Click Create Credentials and select OAuth client ID:
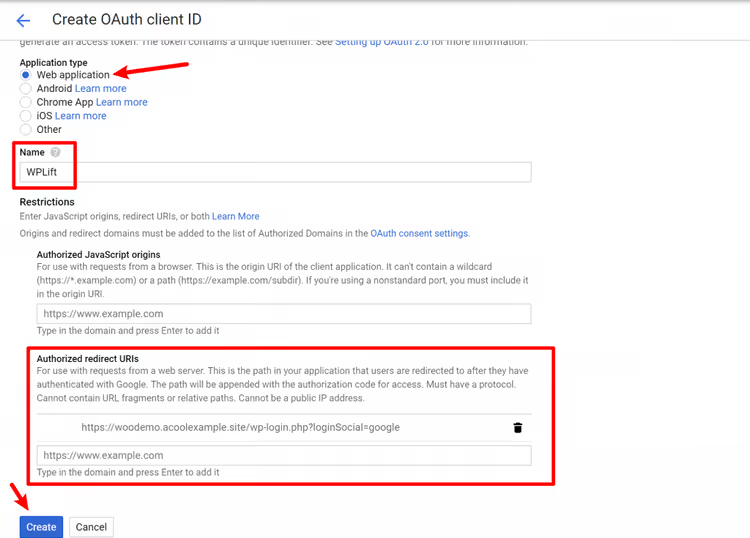
Fill in the form:
- Application type: Web application
- Name: any descriptive name
- Authorized redirect URIs:
https://yoursite.com/wp-login.php?loginSocial=google
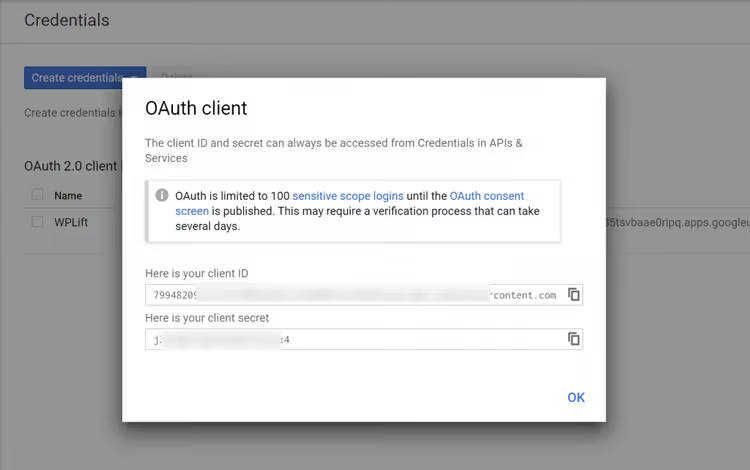
Click Create. Google will display the Client ID and Client Secret in a popup. Do not close it:
Step 2: Enter the keys in the plugin
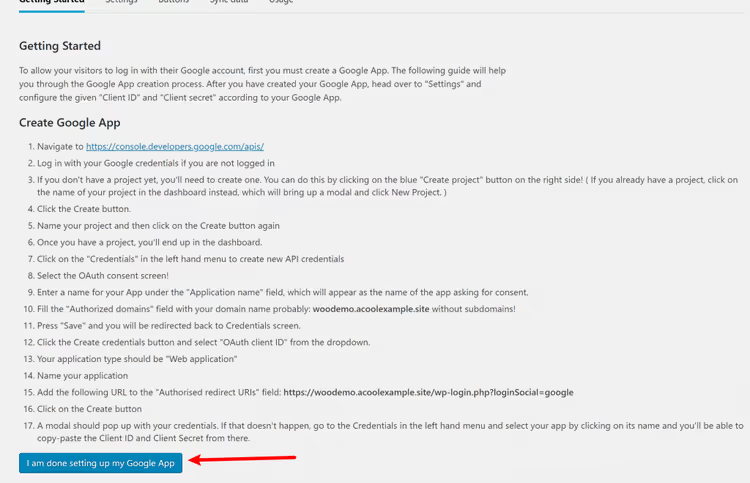
Return to WordPress and click I am done setting up my Google App:
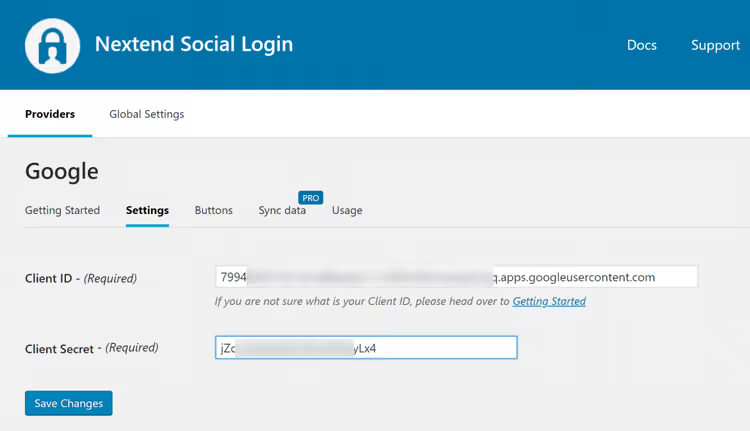
Paste the Client ID and Client Secret from the Google console and save:
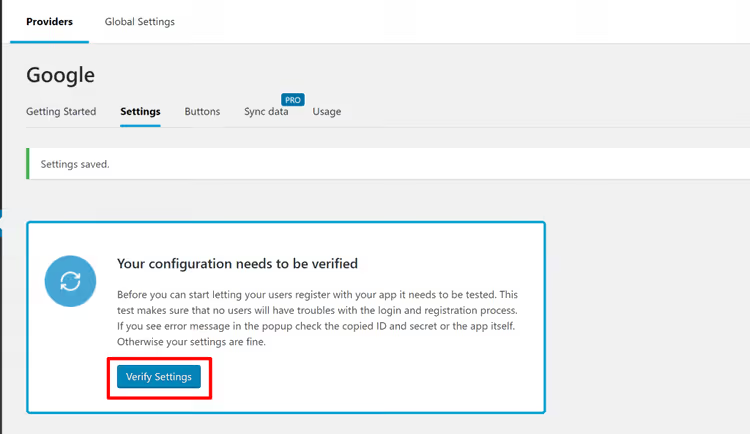
The plugin will prompt you to verify the connection. Click Verify Settings:
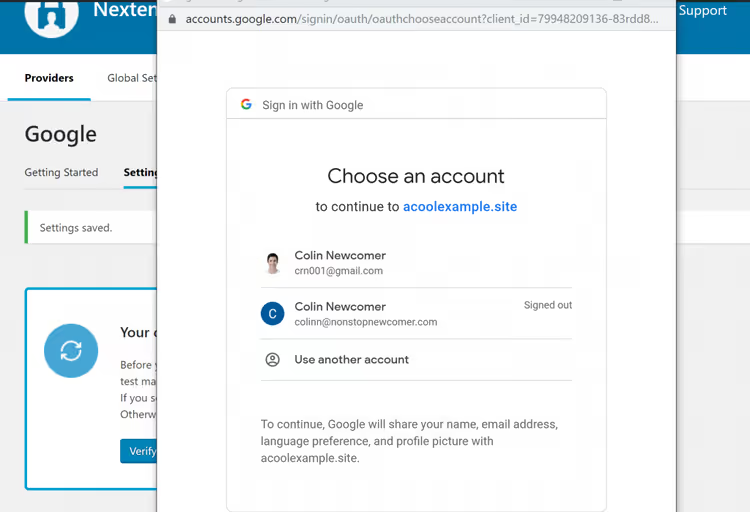
The standard Google authorization window will open. Sign in to verify:
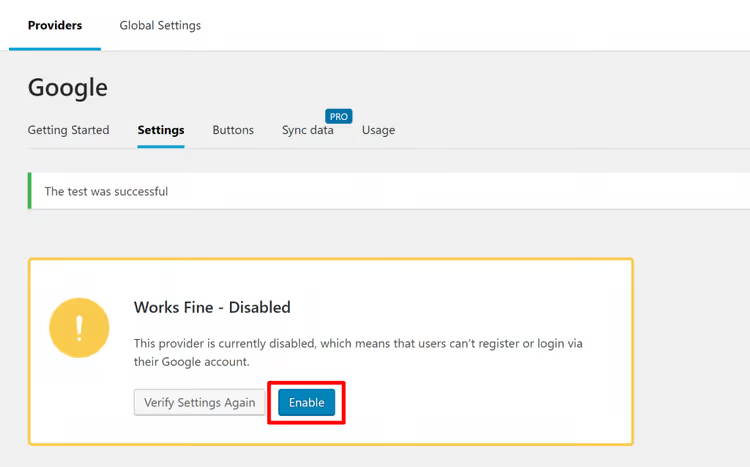
Enable the provider:
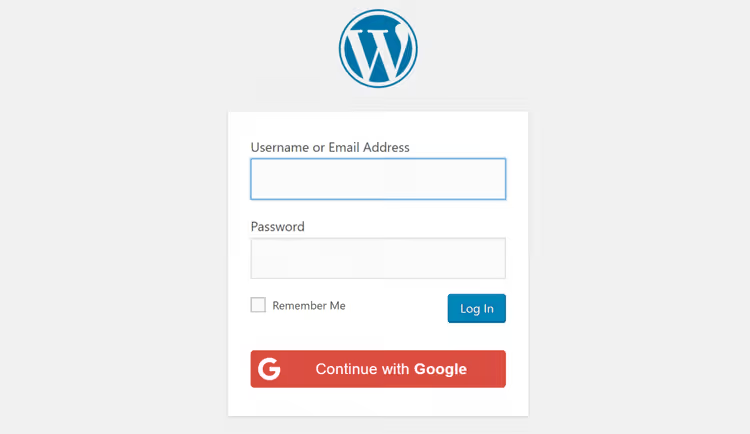
Now a Google button appears on the WordPress login page:
⁉️🤔 Frequently asked questions
Does social login work with a custom login page?
Yes. If your theme or plugin uses
wp_login_form()to render the form, Nextend buttons will appear automatically. For non-standard solutions, there is a widget and the[nextend_social_login]shortcode.
Is HTTPS required for Facebook Login?
Yes. Facebook has required HTTPS for OAuth redirects since 2018. Without an SSL certificate, the Facebook button simply will not work. You will get an error at the settings verification stage.
Can I connect Twitter (X) in the free version?
Yes. Nextend Social Login supports X (formerly Twitter) in the free version alongside Facebook and Google. The setup is similar: create an app in the Twitter Developer Portal and enter the keys.
What should I do if the plugin generates random usernames?
WordPress prohibits special characters in usernames. When a social network returns a name with spaces, Cyrillic characters, or emojis, the plugin cannot create a valid username and generates a random one. In the Pro version, you can prompt the user for a name during registration.
Are user passwords stored on the site?
No. Nextend does not store social network passwords. The plugin only receives identity confirmation from the provider (Facebook/Google) and links the social profile to the WordPress account. Users can disconnect the link in their profile at any time.
Do I need to recreate Facebook and Google apps after plugin updates?
No. The App ID and Secret do not depend on the plugin version. You create the app once, unless Facebook or Google change their requirements (typically once every few years). If you change your site domain, you need to update the OAuth URI in the app settings.
Will login break if I delete the plugin?
Users registered through social networks will remain as regular WordPress accounts. However, they will only be able to log in via password reset; the social buttons will disappear. Before deleting the plugin, make sure administrators have access through standard login.
You set up login, what is next?
Facebook and Google cover 98% of social login scenarios for an average website. In practice, the free version of Nextend is sufficient for a blog, a WooCommerce online store, or a membership site.
If you need login via Apple, Microsoft, or GitHub, consider the Pro version. It also addresses the issue of requesting an email from providers that do not share it automatically.
The entire setup process comes down to three actions: create an app with the provider → copy the keys into the plugin → verify and enable. Each provider takes 10-15 minutes the first time, and 3-5 minutes once you have done it before.
Check that the buttons display on both desktop and the mobile version of your site. Sometimes themes with non-standard login forms override wp_login_form(). In such cases, use the plugin shortcode.

A professional team of writers and editors specializing in creating quality content.