














🏪 Custom WooCommerce order statuses: how to create and configure
We processed the order, but there's no standard status for this stage. "Processing" for assembly, "Completed" for shipping, and a void in between. The store is growing, and the seven default WooCommerce statuses are no longer enough.
You can add a custom status in two ways: with a couple of lines of code in functions.php or with a ready-made plugin. Both approaches work and don't break the standard order logic. Below, step by step, with tested code and an alternative without programming.
💡 Quick overview:
- Which statuses come with WooCommerce out of the box and why they're not enough
- Registering a custom status via PHP code
- Adding multiple statuses and custom email notifications
- Plugins for order statuses when code isn't suitable
- Answers to common questions: HPOS, colors, deletion, translation
What statuses come with WooCommerce out of the box
By default, WooCommerce provides seven order statuses. Each is tightly linked to a specific point in the lifecycle:
Status | What it means |
|---|---|
Pending payment | Order created, payment not received |
Processing | Payment received, order being processed |
Completed | Order fulfilled and closed |
On hold | Awaiting payment confirmation |
Cancelled | Cancelled by customer or administrator |
Refunded | Funds returned |
Failed | Payment failed |
For a typical store, this set is sufficient. But as soon as custom processing logic appears, such as made-to-order production or multi-stage delivery, seven statuses are no longer enough. You need "In assembly", "Handed to delivery", "Awaiting prepayment" or "Requires manager verification".
Step 1: registering a custom status via code
Before WooCommerce 3.0, statuses used the shop_order_status taxonomy, and adding a new one was non-trivial. Now it's simpler: an order status is a post status of the custom post type shop_order. It's registered with a single register_post_status() function and the wc_order_statuses filter.
The code is added to the child theme's functions.php. Before any edits, make a complete site backup.
1 // Registering a new order status 2 function sdstudio_register_custom_order_status() { 3 register_post_status( 'wc-preparing', array( 4 'label' => 'In assembly', 5 'public' => true, 6 'exclude_from_search' => false, 7 'show_in_admin_all_list' => true, 8 'show_in_admin_status_list' => true, 9 'label_count' => _n_noop( 10 'In assembly (%s)', 11 'In assembly (%s)', 12 'sdstudio' 13 ), 14 ) ); 15 } 16 add_action( 'init', 'sdstudio_register_custom_order_status' ); 17 18 // Adding status to WooCommerce list 19 function sdstudio_add_custom_order_status( $order_statuses ) { 20 $order_statuses['wc-preparing'] = 'In assembly'; 21 return $order_statuses; 22 } 23 add_filter( 'wc_order_statuses', 'sdstudio_add_custom_order_status' );
After saving functions.php, the new status will appear in the order status dropdown in the admin panel and in WooCommerce reports. The system sees it as a full-fledged status, you can filter orders, change the status manually and use it in hooks.
What's happening here
The register_post_status() function creates a new post status with the wc- prefix, this is a WooCommerce convention. The label parameter sets the readable name in the admin panel. label_count, via _n_noop(), handles the correct display of counters in the Russian interface.
The wc_order_statuses filter adds the status to the array that WooCommerce uses to build the list. Without this step, the status will be registered in the system but won't appear in the order dropdown menu.
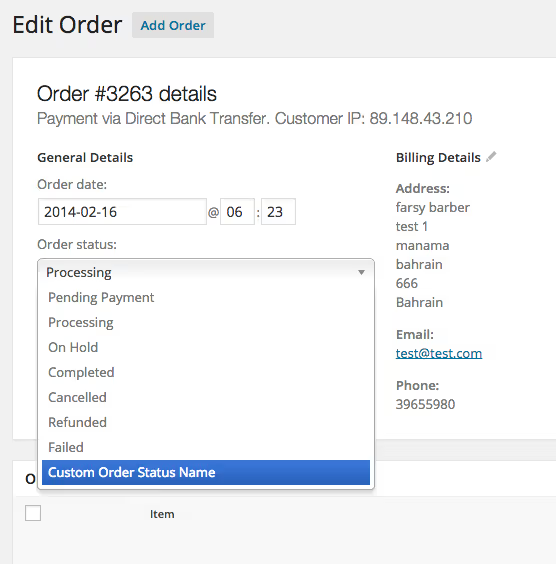
Visually, the result looks exactly like this, the new status displays in the general list alongside the standard ones.
Step 2: adding multiple statuses and email notifications
For one status, the code above works perfectly. If you need several, just duplicate register_post_status() inside the same function and add an entry to the $order_statuses array. For example, for a store with made-to-order production:
1 function sdstudio_register_multiple_statuses() { 2 // Status "In production" 3 register_post_status( 'wc-in-production', array( 4 'label' => 'In production', 5 'public' => true, 6 'exclude_from_search' => false, 7 'show_in_admin_all_list' => true, 8 'show_in_admin_status_list' => true, 9 'label_count' => _n_noop( 10 'In production (%s)', 11 'In production (%s)', 12 'sdstudio' 13 ), 14 ) ); 15 16 // Status "Ready to ship" 17 register_post_status( 'wc-ready-to-ship', array( 18 'label' => 'Ready to ship', 19 'public' => true, 20 'exclude_from_search' => false, 21 'show_in_admin_all_list' => true, 22 'show_in_admin_status_list' => true, 23 'label_count' => _n_noop( 24 'Ready to ship (%s)', 25 'Ready to ship (%s)', 26 'sdstudio' 27 ), 28 ) ); 29 } 30 add_action( 'init', 'sdstudio_register_multiple_statuses' ); 31 32 function sdstudio_add_multiple_statuses( $order_statuses ) { 33 $order_statuses['wc-in-production'] = 'In production'; 34 $order_statuses['wc-ready-to-ship'] = 'Ready to ship'; 35 return $order_statuses; 36 } 37 add_filter( 'wc_order_statuses', 'sdstudio_add_multiple_statuses' );
Note: the status identifier (the first argument of register_post_status) always starts with wc-. Without this prefix, WooCommerce won't pick up the status.
Email notifications for custom statuses
By default, WooCommerce doesn't send emails when changing to a custom status. To enable notifications, add the woocommerce_email_actions filter:
1 function sdstudio_add_custom_status_email( $email_actions ) { 2 $email_actions[] = 'woocommerce_order_status_wc-preparing'; 3 $email_actions[] = 'woocommerce_order_status_wc-in-production'; 4 return $email_actions; 5 } 6 add_filter( 'woocommerce_email_actions', 'sdstudio_add_custom_status_email' );
After this, you can configure the email template in WooCommerce → Settings → Emails, the new status will appear in the list of triggers for customization. The template is created in the child theme at path woocommerce/emails/, the file is named following the pattern customer-<status>.php.
Plugins for order statuses: when code isn't suitable
Code is not the only path. If you don't want to edit functions.php or need to change statuses frequently, there are plugins. Two main options:
WooCommerce Order Status Manager, the official extension from WooCommerce. Adds an interface for creating and editing statuses directly from the admin panel: WooCommerce → Settings → Order Statuses. Supports email notifications, icons, colors and status import/export. Paid, included in some WooCommerce plans.
Flexi Custom Order Status, a free plugin from the WordPress.org catalog. Also provides a visual editor for statuses, but with fewer features. Suitable for basic scenarios: added a status, assigned a color, enabled an email.
Which path to choose:
- You need one or two statuses and you're not afraid of code,
functions.phpis enough. - There are many statuses, they change frequently, or the site is managed by a client without technical skills, get a plugin.
- You're using HPOS (High-Performance Order Storage), both approaches work. Statuses are still based on
register_post_status(), HPOS doesn't affect them.
The short video above shows the process of adding a custom status in five minutes, from plugin installation to first use in orders.
⁉️🤔 Common questions
Does custom status work with HPOS?
Yes, completely. HPOS changes the way order data is stored, but doesn't touch post status. The
register_post_status()function remains the main mechanism, your code will work with HPOS both enabled and disabled.
Can you set a color for a custom status?
Via code, only with CSS styles in the admin panel: hook onto the
.status-wc-preparingclass and set the background. More convenient, via plugins: Order Status Manager and Flexi provide visual color selection without a single line of code.
How to delete a created status?
Remove it from
register_post_status()and from thewc_order_statusesfilter. Orders with this status won't disappear, they'll remain in the database, but the status will stop displaying in the dropdown list. Before deletion, move all orders with the removable status to another one so you don't lose sight of them.
How to translate statuses to another language?
The
labelparameter inregister_post_status()accepts a string, specify the name in the required language. If the site is multilingual, wrap the string in a call to__()or_x()with a text domain, and translate via.po/.mofiles like any other theme text.
Is the wc- prefix mandatory?
Yes. WooCommerce filters statuses by this prefix. If you register a status without
wc-, it won't appear in the order admin panel. Exception, plugins: they add the prefix themselves or bypass filtering with internal mechanisms.
Can you add a custom status without code and without a plugin?
Without code and without a plugin, no. WooCommerce doesn't provide an interface for creating statuses out of the box. The minimal path without programming, free Flexi Custom Order Status from the WordPress.org catalog. One-click installation, configuration via admin panel.
What to use for your task
Custom order statuses are one of those WooCommerce mechanisms that's easy to skip while the store is small. But as soon as production, staged logistics or manual order verification appears, without them the admin panel turns into chaos of vague notes.
- You need one or two statuses and you've edited
functions.phpbefore, code from step 1 will close the task in five minutes. - You need a visual editor and color settings for the client, Flexi Custom Order Status (free).
- Statuses are part of a complex business process with email scenarios and dozens of stages, WooCommerce Order Status Manager (official extension).
Check which approach suits you better and add your first custom status today. If you use a different method or know a plugin that's not in the article, share in the comments.

A professional team of writers and editors specializing in creating quality content.