














🚀 OptinMonster review: popup and lead capture plugin for WordPress in 2026
A visitor opens an article, scrolls to the bottom, and leaves. No comment, no subscription, no hook that would let you bring them back later. You pay for traffic, and it slips through your fingers. The sidebar newsletter form stopped working long ago: banner blindness turned it into background noise nobody notices.
The problem is not traffic. The problem is timing. You need to offer a subscription exactly when the reader is ready to subscribe, not earlier and not later. This requires a tool that understands visitor behavior and acts accordingly. OptinMonster is built precisely for this task.
We tested the plugin on a live WordPress site: from installation to conversion analysis. Below is a detailed breakdown without embellishment: what OptinMonster can do, where it beats free alternatives, and under what conditions it pays for itself.
💡 Quick overview:
- Your first popup takes 5-7 minutes to set up: choose a template, design in the visual editor, connect to an email service via API key.
- The plugin works beyond WordPress; the campaign JavaScript code can be inserted into any CMS.
- The Plus plan unlocks A/B testing, Pro adds Exit Intent and mobile campaigns, Growth adds geolocation and retargeting.
- Built-in analytics shows conversions for each campaign without connecting Google Analytics.
What is OptinMonster and why do you need it
OptinMonster is a SaaS platform for creating lead capture forms. It operates in two "layers": a cloud account at optinmonster.com manages campaigns, while the WordPress plugin connects your site to the cloud. According to the service, over 1.2 million marketers and website owners use it.
Standard forms in the sidebar collect almost nothing. A lightbox popup with a display timer, scroll trigger, or Exit Intent converts much better. Case study: Social Media Examiner collected 95,654 subscribers in 7 months after implementing Exit Intent through OptinMonster.
Video review: plugin interface in 5 minutes
Screen recording with live demonstration: creating a campaign from template selection to publishing on your site.
Below we break down each step in text, including settings not shown in the video.
Installation and activation on WordPress
Installation is standard for any WordPress plugin. Download the zip archive from the OptinMonster admin panel, upload via "Plugins → Add New → Upload Plugin" and activate. An OptinMonster item appears in the side menu.
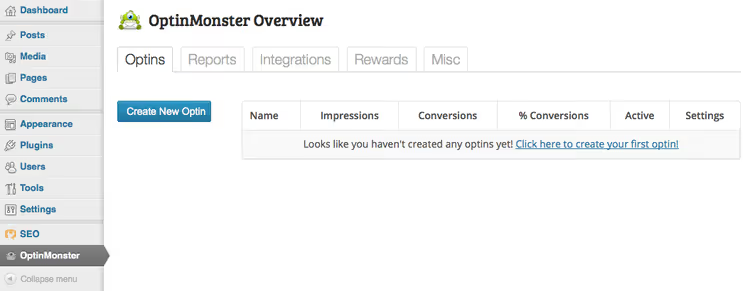
On first launch, the plugin requests account connection; insert the API key from your dashboard. Without a cloud account, the plugin does not work: all campaigns are created and stored on the service side, and the WordPress plugin only displays them on your site. After connecting, click "Create New Optin" and you enter the setup wizard.
Creating your first campaign: step-by-step breakdown
Choosing the popup type
The first thing the wizard offers is the format. The basic plan includes a lightbox (centered popup) and a floating bar. On Plus plans and above, slide-in (slides from the corner) and fullscreen overlay are added.
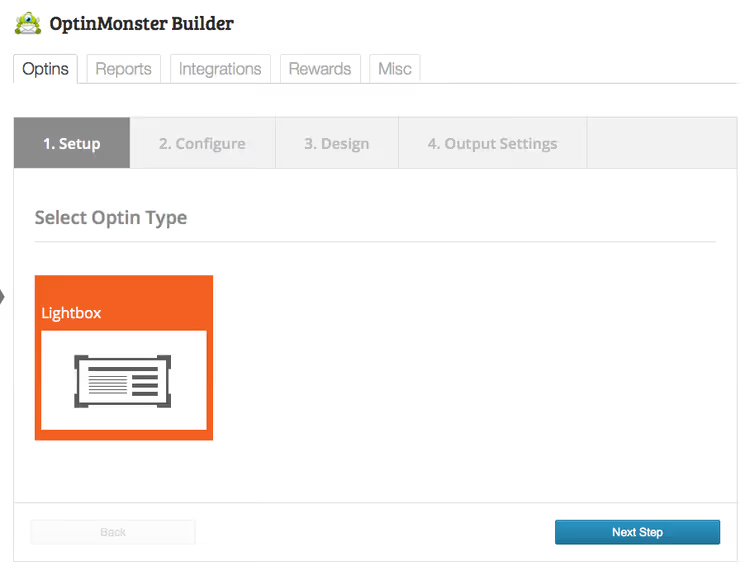
For a blog, start with a lightbox. It is noticeable, does not completely cover content, and shows stable conversion rates in tests. The floating bar works well for promotions and coupons; it does not annoy regular readers. Save slide-in for e-commerce stores: it slides out 10-15 seconds after the product page loads and does not cover the product card.
General campaign settings
Give your popup a meaningful name. A month from now, you will thank yourself for "Lightbox-article-WP-optimization" instead of "Optin #1".
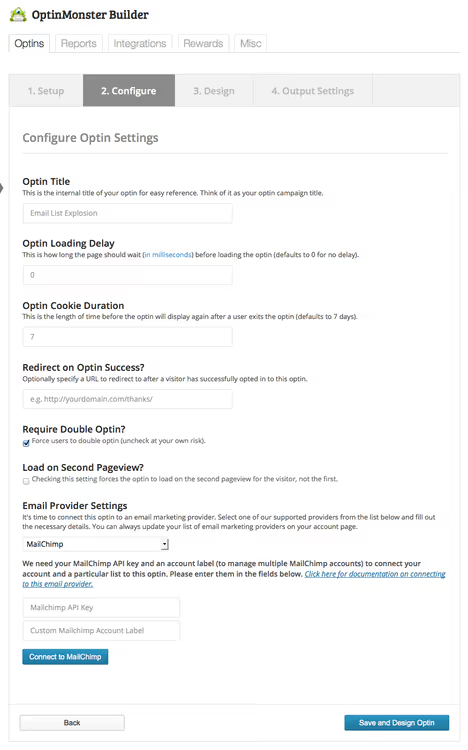
Settings worth configuring immediately:
- Load delay. For articles, set 8-12 seconds; the reader has time to understand the material, and the form does not feel pushy. For landing pages, 3-5 seconds is enough.
- Cookie duration. Default is 7 days. Increase to 30 if you use one campaign across the entire site so subscribers do not see the popup on every visit.
- Redirect URL. After subscribing, the user lands on a "Thank You" page or special offer. Do not leave this field empty; it is an upsell opportunity.
- Double opt-in. Leave it enabled: it filters bots and accidental clicks. Yes, you will get slightly fewer subscribers, but list quality is higher.
- Show on second page. The popup shows only to those who navigated to a second page on your site. This filters out casual visitors and noticeably increases subscription conversion.
Next, email service integration. OptinMonster supports over 30 providers: Mailchimp, ActiveCampaign, ConvertKit, Brevo, Drip, Constant Contact, AWeber, GetResponse, HubSpot, Klaviyo, and others. For each one, the plugin shows a hint on where to find the API key or authorization code. After connecting, click "Save"; settings do not apply instantly, wait 20-30 seconds.
Popup design
OptinMonster offers four built-in themes for lightboxes, from minimalist to bright promotional styling. But the main feature here is the editor.
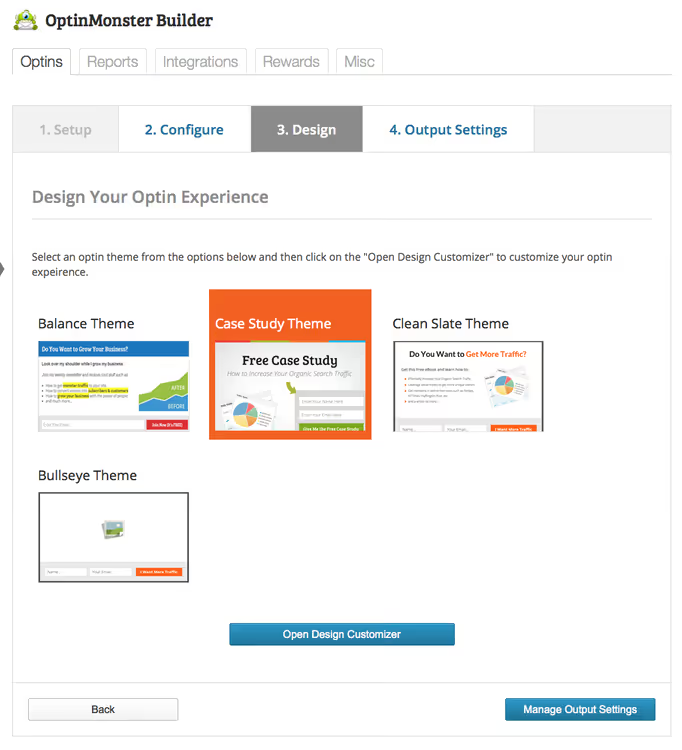
After selecting a theme, you enter the visual builder:
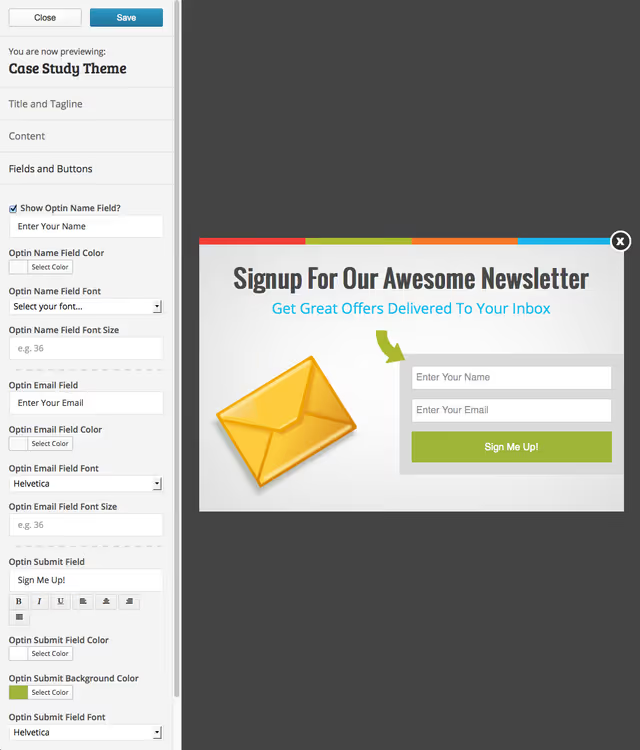
The editor is divided into three sections: "Title and Slogan," "Content," and "Fields and Buttons." Each lets you customize fonts, colors, spacing, background, and text. You can upload your own image, change button text, add a name field (by default only email). No code required: drag-and-drop plus inline editing. When finished, click "Save" and "Close."
Display settings
The final step: deciding where and when the popup appears.
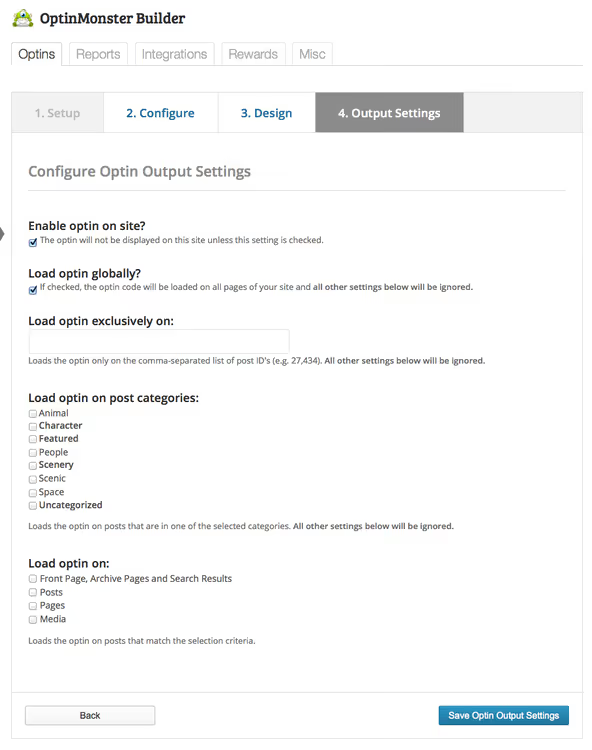
Targeting options by plan:
- Globally or on specific pages. You can enable the popup site-wide with one checkbox or specify post and page IDs.
- Categories. On Plus plans and above, show only in selected blog categories.
- Triggers. Basic: time on page and scroll. Pro: Exit Intent, link click, user inactivity. Growth: geolocation, new versus returning visitors.
After saving, test the popup on your live site in incognito mode. In the WordPress admin, click the gear icon next to the campaign:
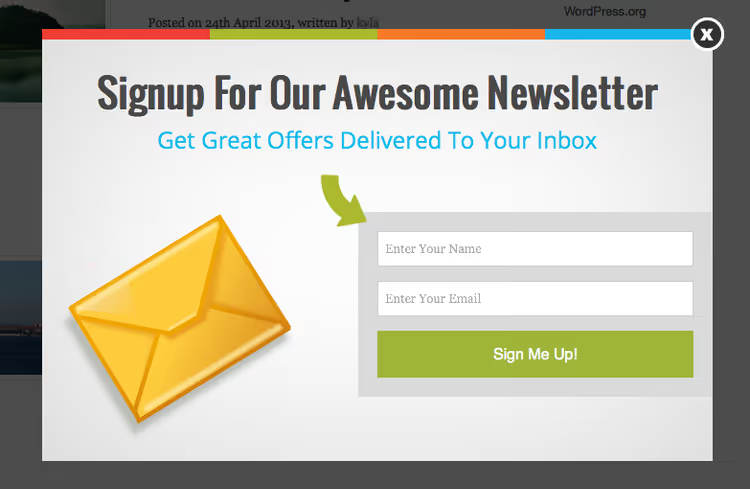
Through this menu, you can quickly change display settings, design, or go to reports.
Reports and analytics right in the admin panel
A strong point of OptinMonster: you do not need Google Analytics to understand whether your popup is working. The built-in Reports tab shows conversions by day, week, quarter, and year.
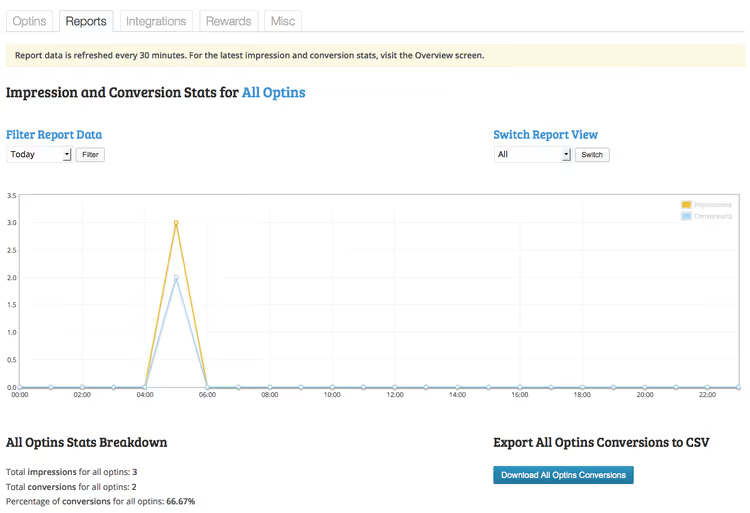
You can view aggregated statistics across all campaigns or select a specific popup from the dropdown. Metrics: impressions, conversions, conversion rate. This instantly answers which campaign is winning and which should be stopped.
A/B testing
On Plus plans and above, built-in split testing is available. It works simply: on the main OptinMonster screen, click the gear icon next to a campaign and select "Split Testing." A clone of the popup is created. Change one element in the clone (headline, button color, image), and the plugin randomly shows visitors the original or clone while counting conversions separately.
In our experience, changing a single headline in a lightbox can produce a difference in conversion of one and a half to two times. A/B testing pays for the Plus plan in the very first month.
Extensions: floating bar and Exit Intent
Floating bar and slide-in
On Plus plans and above, additional formats become available:
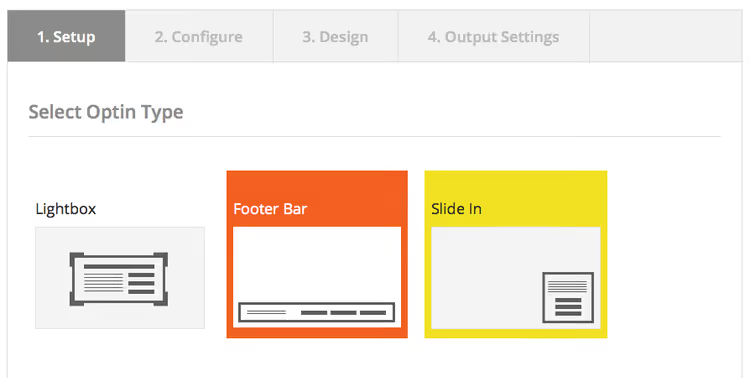
The floating bar attaches to the bottom edge of the screen and does not cover content. It is ideal for coupons, webinar announcements, and promotions; the visitor sees the offer but continues reading comfortably. The slide-in appears from the lower right corner after a set delay and also does not block viewing.
Exit Intent: catching those who leave
Exit Intent analyzes mouse cursor movement and predicts the moment when a visitor is about to close the tab or navigate to another site. At that second, a popup appears with a subscription offer.

Exit Intent is one of the highest-converting formats. Social Media Examiner founder Michael Stelzner reports 95,654 subscribers in 7 months after implementing it. Neil Patel notes doubled subscriptions with Exit Intent popups.
OptinMonster pricing: what each plan offers
Prices are listed for monthly billing (annual subscription is roughly half the price). All plans include unlimited campaigns and subscribers, with a 14-day refund policy.
Plan | Price/mo | Sites | Views/mo | Key features |
|---|---|---|---|---|
Basic | $21 | 1 | 2,500 | Lightbox, floating bar, inline forms, scroll box, 700+ templates, AI popups, basic integrations |
Plus | $57 | 2 | 10,000 | +A/B testing, device targeting, content locking, Attention Activation, full analytics |
Pro | $87 | 3 | 25,000 | +Exit Intent, mobile campaigns, countdown timers, Smart Tags, Multi-Step, branding removal |
Growth | $147 | 5 | 100,000 | +Geolocation, OnSite Retargeting, Follow-up campaigns, Adblock detection, eCommerce, custom branding |
For a WordPress blog, Plus is optimal: A/B testing pays for the price difference over Basic through increased conversions. Pro makes sense if your site earns from sales; Exit Intent and Multi-Step campaigns significantly raise average order value. Growth is for e-commerce stores with geo-targeting and retargeting needs.
All plans are billed in USD. You can cancel or change plans at any time.
⁉️🤔 Frequently asked questions
Do I need to know how to code to set up OptinMonster?
No, you do not need to code. The entire popup creation process, from template selection to publishing, is done with your mouse in the visual editor. Drag-and-drop, text and color replacement, trigger configuration via checkboxes. The only thing required is an API key from your email service, but for each provider the plugin gives a direct link to the key page and step-by-step instructions. Average setup time for a first campaign: 5-7 minutes.
Does the plugin slow down site loading?
No, OptinMonster is designed not to affect loading speed. Its JavaScript code loads asynchronously and does not block page rendering. The popup appears only after content is fully loaded and the trigger fires; it does not participate in the initial render cycle. In our tests, installing the plugin did not change Largest Contentful Paint or Total Blocking Time metrics in PageSpeed Insights.
Can I use OptinMonster without WordPress?
Yes. OptinMonster works on any CMS and even on custom-built sites; just insert the campaign JavaScript code into the page
<body>. The WordPress plugin simply automates this insertion. A cloud account at optinmonster.com is required regardless: that is where all campaigns are created and stored. Shopify, BigCommerce, Magento, Wix, Squarespace, Drupal, and other platforms are supported.
What happens if I exceed the view limit on my plan?
OptinMonster does not disable campaigns when you exceed the limit. You will be automatically upgraded to the next available plan. If you exceed even the Growth plan limit, the sales team will contact you to discuss custom terms. The service policy: traffic growth is customer success, and you are not penalized for it.
What is the difference between OptinMonster and free alternatives like Popup Maker?
Free plugins like Popup Maker or Hustle provide basic functionality: create a popup, set display conditions. The difference appears when you want to understand whether your popup is working. OptinMonster has built-in analytics, A/B testing, Exit Intent (actually functional, with cursor trajectory analysis), over 30 native email service integrations, and geolocation triggers. Free plugins require separate solutions for each of these tasks. For a blog with traffic under 5,000 visitors per month, free Popup Maker may suffice. For a site that earns from subscriptions or sales, OptinMonster pays for itself.
Is OptinMonster worth getting in 2026

OptinMonster remains one of the most powerful lead capture tools on the market. It is not cheap: even the basic plan at $21/month is noticeable for a starting blog. But if your site already generates traffic, the plugin turns that traffic into an asset: a mailing list.
Our verdict: if you have more than 5,000 visitors per month, get Plus. A/B testing and full analytics pay for themselves. If your site is on WordPress and you are just starting out, try free Popup Maker first, and when you understand conversion mechanics, switch to OptinMonster. Subscription growth after switching, in our experience, ranges from one and a half to three times.

A professional team of writers and editors specializing in creating quality content.