














💬 How to customize the WordPress comment form: all sections
The default WordPress comment form consists of four gray fields and a boring "Submit" button. Users see it dozens of times across different sites and simply scroll past. Meanwhile, lively comments are one of the strongest signals for search engines: the page gets regular updates, receives fresh UGC content, and keeps visitors engaged longer.
The problem is that the standard form design kills the desire to write. The "Name," "Email," and "Website" fields feel like bureaucracy rather than an invitation to conversation. The good news: WordPress gives you full access to the form markup. Through filters, hooks, and CSS, you can transform it into anything without touching the core engine.
In this guide, we will cover ALL customization methods for comments, from changing the input field font to adding reCAPTCHA and plugins that turn the form into something almost like a social network. All code works on current WordPress versions through standard core filters, with no hacks or direct engine modifications.
💡 Quick overview:
- Changing input field styles via CSS (font, color, padding), no plugins, just the
style.cssfile - Redesigning the submit button: color, border radius, text, via the
comment_form_defaultsfilter - Removing the Website field, leaving spammers nowhere to drop links and making it easier for users
- Adding custom fields (age, rating, phone) through
comment_form_default_fields - Setting up Google reCAPTCHA, blocking bots while real people pass through unnoticed
- Changing the block heading and field order, putting the textarea first or last
- Adding reply subscriptions, Quicktags, and CSS styling for the entire block
- Extending the form with plugins (Disqus, Jetpack, Simple Comment Editing) when code isn't enough
Changing input field styles via CSS
The simplest and safest way to refresh the form is a few lines in your theme's style.css. The CSS classes for comment fields are documented and haven't changed in years. These are #author for name, #email for email, #url for website, and #comment for text.
Here's an example that changes the font inside the fields: author and email get serif styling with italics, while the URL field gets a monospace font to visually stand out:
1 #author, #email { 2 font-family: "Open Sans", "Droid Sans", Arial; 3 font-style: italic; 4 color: #1d1d1d; 5 letter-spacing: .1em; 6 } 7 8 #url { 9 color: #1d1d1d; 10 font-family: "Lucida Console", "Courier New", "Courier", monospace; 11 }

Add this code to the end of your child theme's style.css (or through "Appearance → Customize → Additional CSS"), save, and the fields will change immediately. No plugins, no overhead.
Changing the submit button appearance and text
The default "Submit" button is a gray rectangle with no personality. CSS transforms it into a bright call to action. Here's a ready snippet with gradient, rounded corners, and hover effect:
1 #submit { 2 background: linear-gradient(to bottom, #44c767 5%, #5cbf2a 100%); 3 background-color: #44c767; 4 border-radius: 28px; 5 border: 1px solid #18ab29; 6 display: inline-block; 7 cursor: pointer; 8 color: #ffffff; 9 font-family: Arial; 10 font-size: 17px; 11 padding: 16px 31px; 12 text-decoration: none; 13 text-shadow: 0px 1px 0px #2f6627; 14 } 15 16 #submit:hover { 17 background: linear-gradient(to bottom, #5cbf2a 5%, #44c767 100%); 18 background-color: #5cbf2a; 19 } 20 21 #submit:active { 22 position: relative; 23 top: 1px; 24 }
CSS changes the appearance but not the actual text. When you need to replace "Submit" with "Leave a Comment," "Share Your Opinion," or something thematic, the PHP filter comment_form_defaults comes into play. The code below goes in functions.php or a snippet plugin (Code Snippets):
1 $commenter = wp_get_current_commenter(); 2 $req = get_option('require_name_email'); 3 $aria_req = ($req ? " aria-required='true'" : ''); 4 5 $fields = array( 6 'author' => '<p class="comment-form-author">' . 7 '<label for="author">' . __('Name') . '</label> ' . 8 ($req ? '<span class="required">*</span>' : '') . 9 '<input id="author" name="author" type="text" value="' . 10 esc_attr($commenter['comment_author']) . '" size="30"' . $aria_req . ' /></p>', 11 12 'email' => '<p class="comment-form-email">' . 13 '<label for="email">' . __('Email') . '</label> ' . 14 ($req ? '<span class="required">*</span>' : '') . 15 '<input id="email" name="email" type="text" value="' . 16 esc_attr($commenter['comment_author_email']) . '" size="30"' . $aria_req . ' /></p>', 17 ); 18 19 $comments_args = array( 20 'fields' => $fields, 21 'label_submit' => 'Send My Comment', 22 ); 23 24 comment_form($comments_args);
The key line is 'label_submit' => 'Send My Comment', which is exactly what overrides the button text. Replace the string with your own version, and the form will speak with your blog's voice.
Removing the Website field from the form
The "Website" field is a magnet for spammers. They fill it with links to their resources even when the comment itself looks innocent. For regular readers, this field serves no purpose, as people come to share their thoughts, not to advertise.
You can remove the Website field without plugins using the comment_form_default_fields filter. The code below keeps only the name and email fields, removing URL:
1 $commenter = wp_get_current_commenter(); 2 $req = get_option('require_name_email'); 3 $aria_req = ($req ? " aria-required='true'" : ''); 4 5 $fields = array( 6 'author' => '<p class="comment-form-author">' . 7 '<label for="author">' . __('Name') . '</label> ' . 8 ($req ? '<span class="required">*</span>' : '') . 9 '<input id="author" name="author" type="text" value="' . 10 esc_attr($commenter['comment_author']) . '" size="30"' . $aria_req . ' /></p>', 11 12 'email' => '<p class="comment-form-email">' . 13 '<label for="email">' . __('Email') . '</label> ' . 14 ($req ? '<span class="required">*</span>' : '') . 15 '<input id="email" name="email" type="text" value="' . 16 esc_attr($commenter['comment_author_email']) . '" size="30"' . $aria_req . ' /></p>', 17 ); 18 19 $comments_args = array('fields' => $fields); 20 21 comment_form($comments_args);
We passed only author and email to the $fields array. The url key is simply absent, so WordPress doesn't render it. Users now fill in two fields instead of three, the entry barrier drops, and spammers have nowhere to leave links. Add the code to functions.php and check the form on any post.
Adding custom fields through the filter
Sometimes standard fields aren't enough. You need a star rating, an "Age" field, a checkbox for agreeing to rules, a phone number, or anything else. WordPress provides the comment_form_default_fields filter, which lets you hook into the fields array and add your own.

The example below adds an "Age" text field between the standard fields and the textarea:
1 function add_comment_fields($fields) { 2 $fields['age'] = '<p class="comment-form-age">' . 3 '<label for="age">' . __('Age') . '</label>' . 4 '<input id="age" name="age" type="text" size="30" /></p>'; 5 return $fields; 6 } 7 add_filter('comment_form_default_fields', 'add_comment_fields');
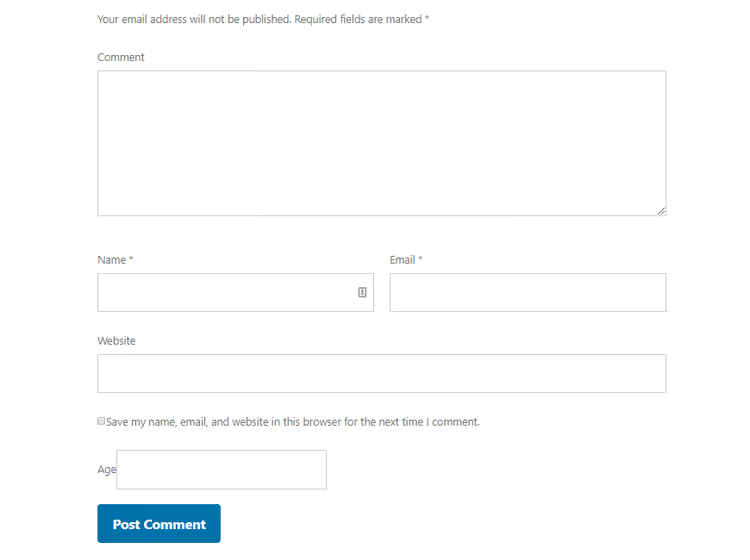
The filter passes the $fields array through your function, you add the 'age' key with HTML markup, and WordPress renders it in the form. You can add a "Phone" field (type="tel"), a newsletter subscription checkbox (type="checkbox"), or a dropdown list for selecting a topic (<select>) the same way.
The main advantage of the filter over direct template editing: your code lives in functions.php or Code Snippets and doesn't depend on the specific theme. Switch themes, and your custom fields remain.
Adding Google reCAPTCHA for spam protection
Even with the Website field removed, spammers find loopholes. Bots have learned to generate coherent comments and bypass simple captchas. Google reCAPTCHA solves the problem fundamentally: verification happens in the background, without clicking on traffic lights.
The Invisible reCAPTCHA for WordPress plugin integrates verification into all standard site forms: login, registration, password recovery, and (important for us) comments. It tracks mouse pointer behavior and interaction patterns, detecting bots without asking a single question to real users. Read more about setup in our article on how to add reCAPTCHA to WordPress comments.
Quick setup algorithm:
- Go to google.com/recaptcha/admin/create and register your site (choose v3 or v2 Invisible)
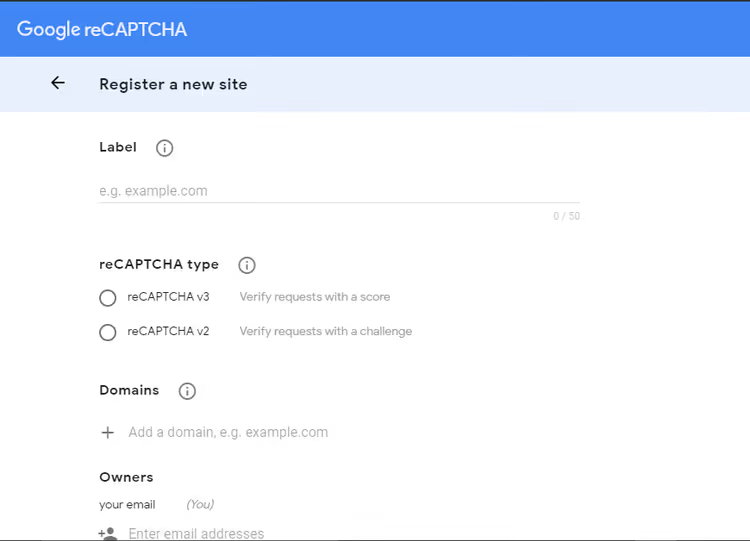
- Fill in the label and domain, accept the terms, and click "Submit"
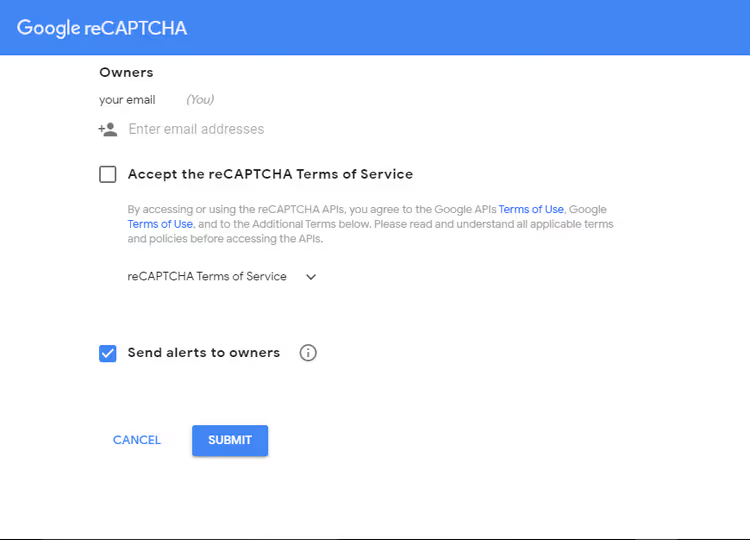
- Copy the Site Key and Secret Key, as you'll need them to activate the plugin
- In the WordPress admin, go to "Settings → Invisible reCAPTCHA"
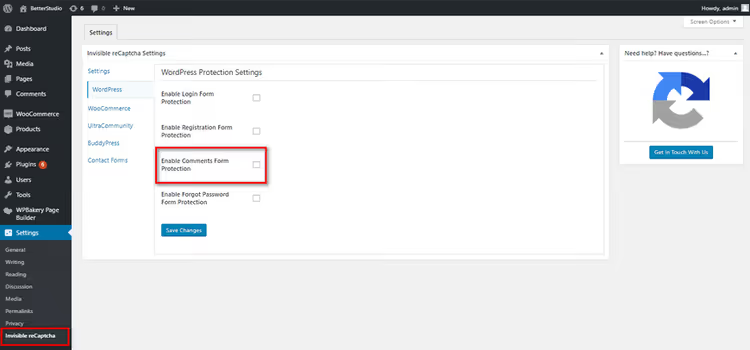
- Paste the keys in the corresponding fields and check "Enable Comments Protection"
- Save changes
From this point on, every comment goes through background verification. Real users notice nothing, while bots get rejected. Spam comments drop to zero in one evening.
Changing the heading above the form
"Leave a Reply" is the default heading WordPress displays above the form. In most cases, it's neutral and appropriate, but sometimes you want something more engaging: "Share Your Thoughts," "Got Something to Add?," "Join the Discussion."

The heading is changed through the same $comments_args array we used for the button. The title_reply parameter overrides the text:
1 $comments_args = array( 2 'fields' => $fields, 3 'title_reply' => 'Please give us your valuable comment', 4 ); 5 comment_form($comments_args);
The code goes in functions.php along with other form settings. If you've already customized the button or removed the Website field, just add 'title_reply' to the existing $comments_args array without creating a duplicate comment_form() call.
Changing field order
Starting with WordPress 4.4, the textarea comes first by default, before name, email, and website. Users immediately see where to write. But if you prefer the old format (name → email → website → text), the comment_form_fields filter gives you full control.
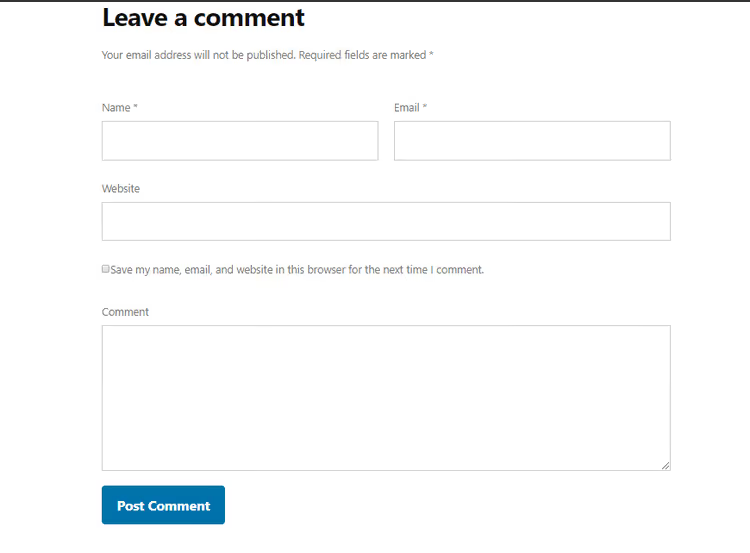
The function below moves the text field to the end of the form, which is the classic pattern familiar to users from older WP versions:
1 function wpb_move_comment_field_to_bottom($fields) { 2 $comment_field = $fields['comment']; 3 unset($fields['comment']); 4 $fields['comment'] = $comment_field; 5 return $fields; 6 } 7 add_filter('comment_form_fields', 'wpb_move_comment_field_to_bottom');
The logic is simple: extract the comment element from the array, remove it from its current position, and place it last. Want a different order? Change the sequence of unset and assignment. The $fields array is a regular PHP associative array. Its standard keys are author (name), email (email), url (website), and comment (text), plus any custom fields you added earlier.
Subscribing to comment replies
A user leaves a comment and leaves. Someone replies three days later, and they never find out or return. A "Notify me of replies" checkbox solves this problem: readers receive an email when someone responds to their comment and return to the discussion thread.

The Subscribe to Comments Reloaded plugin handles this function. Install it the standard way (Plugins → Add New → search by name), activate it, and go to "Settings → Subscribe to Comments."
In the settings, you can configure:
- the text next to the checkbox;
- notification design (plain text or HTML);
- the ability to subscribe WITHOUT leaving a comment (guests can also follow discussions);
- the interval between emails to avoid spamming.
The plugin adds a single checkbox to the form, and users check it if they want. No obligation, no UX degradation. And reader return rates to the site increase noticeably.
Quicktags: formatting toolbar above the text
Quicktags are formatting buttons WordPress shows above the comment text field: Bold, Italic, Link, Quote. They're disabled by default in most themes, which is unfortunate: users who see a familiar toolbar like in Word feel more confident and write more structured comments.
The Comment Form Quicktags plugin enables this toolbar with one click. After installation and activation, go to "Settings → Discussion," find the Quicktags section, and enable the option. Save, and the toolbar will appear above the text field on all posts.
Complete CSS styling for the comment block
When you want more than just colored fields and need to rework the entire block with background, shadows, rounded corners, and padding, you need comprehensive CSS. Below is a ready set of styles that transforms the gray layout into a neat card with border, shadow, and colored accent on the left:
1 .comment-respond, 2 .entry-pings, 3 .entry-comments { 4 color: #444; 5 padding: 20px 45px 40px 45px; 6 border: 1px solid #ccc; 7 overflow: hidden; 8 background: #fff; 9 box-shadow: 0px 0px 8px rgba(0,0,0,0.3); 10 border-left: 4px solid #444; 11 } 12 13 .entry-comments h3 { 14 font-size: 30px; 15 margin-bottom: 30px; 16 } 17 18 .comment-respond h3, 19 .entry-pings h3 { 20 font-size: 20px; 21 margin-bottom: 30px; 22 } 23 24 .comment-respond { 25 padding-bottom: 5%; 26 margin: 20px 1px; 27 border-left: none !important; 28 } 29 30 .comment-header { 31 color: #adaeb3; 32 font-size: 14px; 33 margin-bottom: 20px; 34 } 35 36 .comment-header cite a { 37 border: none; 38 font-style: normal; 39 font-size: 16px; 40 font-weight: bold; 41 } 42 43 .comment-header .comment-meta a { 44 border: none; 45 color: #adaeb3; 46 } 47 48 li.comment { 49 background-color: #fff; 50 border-right: none; 51 } 52 53 .comment-content { 54 clear: both; 55 overflow: hidden; 56 } 57 58 .comment-list li { 59 font-size: 14px; 60 padding: 20px 30px 20px 50px; 61 } 62 63 .comment-list .children { 64 margin-top: 40px; 65 border: 1px solid #ccc; 66 } 67 68 .comment-list li li { 69 background-color: #f5f5f6; 70 } 71 72 .comment-list li li li { 73 background-color: #fff; 74 } 75 76 .comment-respond input[type="email"], 77 .comment-respond input[type="text"], 78 .comment-respond input[type="url"] { 79 width: 50%; 80 } 81 82 .comment-respond label { 83 display: block; 84 margin-right: 12px; 85 } 86 87 .entry-comments .comment-author { 88 margin-bottom: 0; 89 position: relative; 90 } 91 92 .entry-comments .comment-author img { 93 border-radius: 50%; 94 border: 5px solid #fff; 95 left: -80px; 96 top: -5px; 97 position: absolute; 98 width: 60px; 99 } 100 101 .entry-pings .reply { 102 display: none; 103 } 104 105 .form-allowed-tags { 106 background-color: #f5f5f5; 107 font-size: 16px; 108 padding: 24px; 109 } 110 111 .comment-reply-link { 112 cursor: pointer; 113 background-color: #444; 114 border: none; 115 border-radius: 3px; 116 color: #fff; 117 font-size: 12px; 118 font-weight: 300; 119 letter-spacing: 1px; 120 padding: 4px 10px; 121 text-transform: uppercase; 122 width: auto; 123 } 124 125 .comment-reply-link:hover { 126 color: #fff; 127 } 128 129 .comment-notes { 130 display: none; 131 }
This CSS styles not just the form but also the list of already published comments: avatars become circular and shift left, replies are highlighted with background and border, the "Reply" link becomes a compact button, and the "Your email will not be published" notice is hidden.
Add it to your child theme's style.css or through the customizer, and it works on any stack.
Comment form for a specific post type
Sometimes custom fields are needed only for specific content. For example, on a movie database site, you might want to display an "Age" field only under the "Movies" post type while keeping the standard form in the blog.
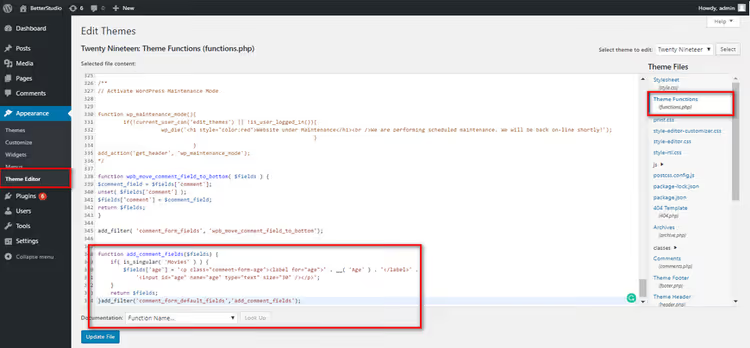
WordPress lets you bind a filter to a specific post type using the is_singular() conditional tag:
1 function add_comment_fields($fields) { 2 if (is_singular('Movies')) { 3 $fields['age'] = '<p class="comment-form-age">' . 4 '<label for="age">' . __('Age') . '</label>' . 5 '<input id="age" name="age" type="text" size="30" /></p>'; 6 } 7 return $fields; 8 } 9 add_filter('comment_form_default_fields', 'add_comment_fields');
The function is the same as in the section about adding fields, but wrapped in if (is_singular('Movies')). The "Age" field renders ONLY when the current page is a single post of the Movies type. In the blog, on pages, and in other custom post types, the form remains standard.
Plugins for advanced customization
When the code from this guide isn't enough and you want to completely rebuild comments, specialized plugins come into play. They replace the standard form with their own, complete with their own styles, moderation, and features.
Jetpack Comments
Jetpack from Automattic is not just a comments plugin but a whole set of modules (over 20). The key feature specifically for comments is that users can log in through social networks (Google, Twitter, Facebook) and publish comments without filling in fields manually. The form becomes shorter, and the entry barrier drops. At the same time, the classic option remains available, with fields for manual input still accessible.
Disqus Comment System
Disqus is the most well-known alternative to standard comments. Key advantages: sorting by newest/oldest/popular, ability to upvote others' comments, recommendations of similar posts from your own site, and comment synchronization back to the WordPress database (you can roll back to the standard form at any time without losing data). For users with a Disqus account, commenting becomes seamless on any site with this plugin. They see a reply notification, click through, and respond.
Downsides include mandatory Disqus registration (unlike the standard form where name and email are sufficient), advertising links that need to be disabled in settings, and privacy concerns, as the plugin collects visitor data for showing recommendations. Pair Disqus with Disqus Conditional Load: it delays script loading until the user scrolls to the comments, noticeably speeding up the page.
Simple Comment Editing
Simple Comment Editing solves one specific task: it gives users a 5-minute window to edit a just-submitted comment. A typo in the name, a broken link, a grammar mistake: see it, fix it, save it. Research shows that most users notice errors right after submission, and the ability to quickly correct text reduces anxiety and increases engagement.
Lazy Load for Comments
Lazy Load for Comments doesn't add new features but does something important: it defers loading the entire comment block until the user scrolls to it. Since comments are always at the bottom of the page, their HTML and scripts shouldn't load with the main content. The plugin cuts unnecessary requests at startup, speeds up Largest Contentful Paint, and generally makes the site faster according to Core Web Vitals metrics.
Video: customizing the comment form in practice
This 10-minute tutorial shows the complete process of setting up the WordPress comment form, from adding custom fields to CSS styling:
⁉️🤔 Frequently asked questions
Can I customize the comment form without editing theme files?
Yes, and this is even recommended. Custom CSS is inserted through "Appearance → Customize → Additional CSS," and PHP code through the Code Snippets plugin (free, in the WordPress repository). Both methods survive theme changes and updates without loss. The only exception is if you know for certain you're working with a child theme and control its
functions.phpandstyle.css.
Which spam protection method is better: reCAPTCHA or removing the Website field?
Both together. Always remove the Website field, as it's not needed by real readers and serves almost exclusively spammers. Add reCAPTCHA v3 on top, which blocks bots at the behavior level, invisibly to visitors. Each method alone lets some spam through, but together they achieve near-zero junk comments.
What should I do if the comment form breaks after adding code?
First: verify that the PHP code is inserted in
functions.phpBEFORE the closing?>tag (if present) and that the snippet contains no syntax errors. Second: if you editedfunctions.phpdirectly, always make a backup before editing, as the white screen of death is fixed by restoring the file via FTP. Third: if the form just disappeared visually, check the CSS fordisplay: nonein the.comment-respondor.comment-notesselectors.
Does this code work with block themes (FSE)?
CSS styles work in any theme, including block themes (Twenty Twenty-Three, Twenty Twenty-Four, and derivatives). The PHP filters
comment_form_defaultsandcomment_form_default_fieldsare also universal, as they're part of the WordPress core and don't depend on the theme. The only nuance: in block themes, the comments template may be overridden through the Site Editor, and CSS classes may differ. Check actual selectors through the browser inspector.
Can I completely disable comments across the entire site?
Yes: "Settings → Discussion" → uncheck "Allow people to submit comments on new posts." For existing posts, select all in "Posts → All Posts," choose "Edit" from the bulk actions dropdown, apply, and in the "Comments" dropdown select "Do not allow." Plugins like Disable Comments do the same thing with one click, but for a one-time operation, a plugin is overkill.
What to implement and in what order: final checklist
The sequence of actions that will give maximum results with minimum hassle:
- Remove the Website field, leaving spammers nowhere to drop links and making it easier for users.
- Set up reCAPTCHA v3, blocking bots at the behavior level, without a captcha.
- Refresh the CSS: font, padding, button color, shadow on the block. Five minutes and the form looks like part of the design rather than a foreign element.
- Add reply subscriptions, as every second returning commenter comes specifically from a notification.
- Enable Quicktags, because the formatting toolbar increases user confidence and text quality.
If after these steps the form still doesn't meet your expectations, move on to advanced techniques from this guide: custom fields for specific post types, Disqus for community features, Lazy Load for speed.
Write in the comments below this post which method worked for you. We read everything and update the guide based on readers' real experiences.

A professional team of writers and editors specializing in creating quality content.